
2015-12-18 10:59:00
As part of an ongoing research project for Fox Technologies I had a need for a private Windows Active Directory server. Having never built a Windows server, let alone a domain controller, it's been a wonderful learning experience. The following paragraphs outline the process I used to build a Windows AD KDC and how I set up the initlal connections from the BoKS hosts.
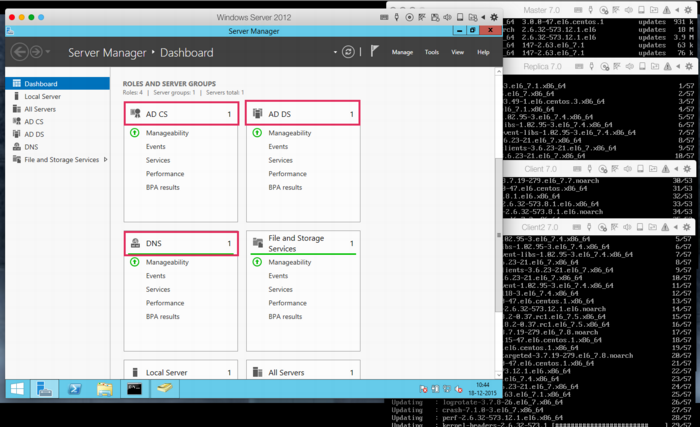
I run all my tests using the Parallels Desktop virtualization product. The first screenshot below will show five hosts running concurrently on my Macbook Air: a Windows Server 2012 host and four hosts running RHEL6 (BoKS master, replica and two clients).

Even installing Windows Server 2012 proved to be a hassle, insofar that the .ISO image provided by Microsoft (for evaluation purposes) appears to be corrupt. Every single attempt to install resulted in error code 0x80070570 halfway through. This is a known issue and the only current workaround appears to lie in using an alternative ISO image provided by a good samaritan. Of course, one ought to be leery about using installation software not provided by the actual vendor, so caveat emptor.
Once the installation has completed, setup basic networking as desired. Along the way I opted to disable IPv6 as this would make the setup and troubleshooting of Kerberos a bit more complicated.
Next up, it's time to add the appropriate Roles to the new Windows server. This is done through Windows Server Manager, from the "Manage" menu one should pick "Add roles and features". Add:
This tutorial by Rackspace quickly details how to setup the Domain Services. In my case I set up the forest "broehaha.nl" which matches the name of the domain (and my LDAP directory on Linux). Setting up the CA (certificate authority) requires stepping through a wizard, using the default values provided.
BoKS will also require the installation of the (deprecated) role Identity Manager for Unix. Microsoft provide excellent instructions on how to install these features on Windows 2012, through the command line. In short, the commands are (NOTE the disabling of NIS):
Dism.exe /online /enable-feature /featurename:adminui /all
Dism.exe /online /disable-feature /featurename:nis /all
Dism.exe /online /enable-feature /featurename:psync /all
The Windows AD KDC should be in sync with the time as running on the Linux hosts. Setup NTP to use the same NTP servers as follows:
w32tm /config /manualpeerlist:pool.ntp.org /syncfromflags:MANUAL
Stop-Service w32time
Start-Service w32time
Export the root CA certicate by running:
certutil -ca.cert windows_ca.crt >windows_ca.txt
certutil -encode windows_ca.crt windows_ca.cer
You may now SCP the windows_ca.cer file to the various Linux hosts (for example by using pscp, from the Putty team).
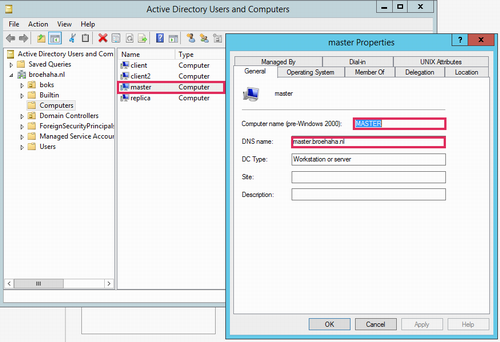
Now it's time to put some data into DNS and Active Directory. Using the "AD Users and Computers" tool, create Computer records for all BoKS hosts. These records will not automatically include the full DNS names, as these will be filled at a later point in time. Using the DNS tool, create a forward lookup zone for your domain (broehaha.nl in my case) as well as a reverse lookup zone for your IP range (10.211.55.* for me). In the forward zone create A records for your Windows and your Linux hosts (the wizard can automatically create the reverse PTR records). See below screenshots for some examples.


My Linux hosts were already installed before, as part of my BoKS testing environment. All hosts run RHEL6 and BoKS 7.0. The master server has Apache and OpenLDAP running for my Yubikey testing environment.
First order of business is to ensure that the Linux hosts all use the Windows DNS server. Best way to arrange this is to ensure that /etc/sysconfig/network-scripts/ifcfg-eth0 (adjust for the relevant interface name) has entries for the DNS server and search domains. In my case it's as follows, with DNS2 being my default DNS for everything outside of my testing environment):
DNS1=10.211.55.70
DNS2=10.211.55.1
DOMAIN=broehaha.nl
As was said, NTP should be running to have time synchronization among all servers involved.
Your Kerberos configuration file should be adjusted to match your AD domain:
[logging]
 default = FILE:/var/log/krb5libs.log
 kdc = FILE:/var/log/krb5kdc.log
 admin_server = FILE:/var/log/kadmind.log

[libdefaults]
 dns_lookup_realm = true
 dns_lookup_kdc = true
 ticket_lifetime = 24h
 renew_lifetime = 7d

 default_realm = BROEHAHA.NL
 forwardable = true
[realms]
 BROEHAHA.NL = {
  kdc = windows.broehaha.nl
  admin_server = windows.broehaha.nl
 }

[domain_realm]
 .broehaha.nl = BROEHAHA.NL
If so desired you may test the root CA certificate from the Windows server, after which the certificate may be installed:
openssl x509 -in /home/thomas/windows_ca.cer -subject -issuer -purpose
cp /home/thomas/windows_ca.cer /etc/openldap/cacerts/
cacertdir_rehash /etc/openldap/cacerts
You should be able to test basic access to AD as follows:
ldapsearch -v -x -H ldaps://windows.broehaha.nl:636 -D "CN=Administrator,CN=Users,DC=BROEHAHA,DC=NL" -b "DC=BROEHAHA,DC=NL" -W
ldapsearch -vv -Y GSSAPI -H ldap://windows.broehaha.nl -b "DC=BROEHAHA,DC=NL"
Now you may join your Linux host(s) to the Windows AD domain:
kinit bokssync@BROEHAHA.NL Password for bokssync@BROEHAHA.NL:
adjoin join -K windows.broehaha.nl BROEHAHA.NL Administrator@BROEHAHA.NL
If you now use "AD Users and Computers" on the Windows server, you'll notice that the fully qualified DNS name of the Linux host has been filled in.
Basic AD connectivity has now been achieved. We'll start putting it to good use in an upcoming tutorial.
kilala.nl tags: work, sysadmin,
View or add comments (curr. 0)
 You are free to use this specific work, to share and distribute it and to adapt it for your own purposes. However, you must attribute this work as mine and you must share all of your alterations. Click on the logo, or follow this link for full details.
All content, with exception of "borrowed" blogpost images, or unless otherwise indicated, is copyright of Tess Sluijter. The character Kilala the cat-demon is copyright of Rumiko Takahashi and used here without permission.