

2008-01-01 00:00:00
EDIT: 23/11/2004
DO NOT USE THE FOLLOWING PROCEDURE! IT HAS PROVEN TO BE FAULTY AND SHOULD ONLY BE USED AS A GUIDELINE FOR MAKING YOUR OWN PROCEDURE!
I will try and correct all of the mistakes as soon as possible.. Please be patient...
At some point in time it may happen that your NIS+ master server has become too old or overloaded to function properly. Maybe you used old decrepid hardware to begin with, or maybe you have been using NIS+ in your organisation for ages :) Anywho, you've now reached the point where the new hardware has received its proper build and that the server is ready to assume its role as NIS+.
Of course you want things to go smoothly and with as little downtime as possible. Of course one of the methods to go about this is about to use the other procedure in this menu: "Rebuild your master". That way you'll literally build a new master server after which you reload all of the database contents from raw ASCII dumps.
The other method would be by using the procedure below :) This way you'll transfer mastership of all your NIS+ database from the current master to the new one. I must admit that I haven't used this procedure in our production environment as of yet (15/11/04), but I will in about a week! But even after that time, after I've added alterations and after I've fixed any errors, don't come sueing me because the procedure didn't work for you. NIS+ can be a fickle little bitch if she really wants to...
This procedure requires that your new NIS+ master server is already a replica server. There are numerous books and procedures on the web which describe how to promote a NIS+ client into a replica, but I'll include that procedure in the menu sometime soon.
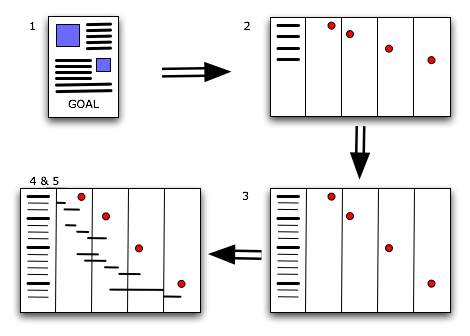
Before you begin, disable replication of NIS+ on any other replica servers you may have running. This is easily done by killing the rpc.nisd process on each of these systems. Beware though that all of the replicas do need to remain functioning NIS+ clients! This ensures that their NIS_COLD_START gets updated.
Log in to both the current master and the replica server you wish to upgrade. Become root on both systems.
On the master server:
# for table in `nisls`
>do
>nismkdir -m $replica $table
>done
# cd /var/nis/data
# scp root.object $user@$replica:/tmp
On the replica server:
# cd /var/nis/data
# mv /tmp/root.object .
# chown root:root root.object
# chmod 644 root.object
Kill all NIS processes on both the master and the replica in question. Then restart on the replica using:
# /usr/sbin/rpc.nisd -S 0
# /usr/sbin/nis_cachemgr -i
Verify that the replica server is now recognised as the current master server by using the following commands.
# nisshowcache -v
# niscat -o groups_dir.`domainname`.
# niscat -o org_dir.`domainname`.
# niscat -o `domainname`.
If the replica system is not recognised as the master, re-run the for-loop which was described above. This will re-run the nismkdir command for each table that isn't configured properly.
# for table in `nisls`
>do
> nischown `hostname` $table.`domainname`.
> for subtable in `nisls $table | grep -v $table`
> do
> nischown `hostname` $subtable.$table
> done
>done
Once again verify the ownership of the tables which you just modified.
# niscat -o `domainname`.
# niscat -o passwd.org_dir
Checkpoint the whole NIS+ domain.
# for table in `nisls`
>do
>nisping -C $table
>done
Kill all NIS+ daemons on the new master. Then restart using:
# /usr/sbin/rpc.nisd
# /usr/sbin/nis_cachemgr -i
Currently the old master has reverted to replica status. If you want to remove the old master from the infrastructure as a server, proceed with the next section.
Login to both the new master and the old master. Become root on both.
On the new master:
# for table in `nisls`
>do
>nisrmdir -s $oldmaster $table
>done
Checkpoint the whole NIS+ domain.
# for table in `nisls`
>do
>nisping -C $table
>done
Now make the old NIS+ master a client system.
# rm -rf /var/nis
# /usr/sbin/rpc.nisd
# nisinit -c -H $newmaster
# nisclient -i -d `domainname` -h $newmaster
kilala.nl tags: tutorial, sysadmin, unix,
View or add comments (curr. 0)
2007-01-26 13:08:00
A PDF version of this document is available. Get it over here.
When I returned to the consulting business back in 2005 I found that a change to my modus operandi would have favorable results to the perceived quality of my work.
Up to that point I had never made a big point of reporting my activities to management, trusting that I'd get the job done and that doing so would make everyone happy. And sure enough, things kept rolling and I indeed got things done. But I won't claim that anyone really knew what I was up to or that they had more than a passing notion of my progress.
2005 provided me with a fresh start and I decided that I'd do things differently this time around. And indeed, as my reports started coming in, my client's response to both my employer and myself seemed to improve.
"So, Peter, what's happening? Aahh, now, are you going to go ahead and have those TPS reports for us this afternoon?"
From the movie 'Office Space'
Reporting. Reports. Status updates. Words that most people in IT dread and that instill nightmare images of piles of paperwork and endless drudgery with managers. Words that make you shudder at the thought of bosses nagging you about layout, instead of content. Of hours of lost time that could have been better spent doing real work.
But seriously, spreading the word about your work and your projects doesn't have to be a huge undertaking and it will probably even help you in getting things done. By spending just a few hours every month you could save yourself a lot of trouble in the long run.
Benefits for the customer:
Benefits for your employer and yourself:
"A lean agreement is better than a fat lawsuit"
German proverb
It may seem slightly odd, but your first report will be made before you've even done any real work. When you start a new project everyone will have a general idea of what you will be doing, but usually no-one has all the details. In order to prevent delays in the future, you will need to make very specific agreements early on.
To get things started you will need to have a little eye-to-eye with your client to draft your assignment. You will be hashing out every significant detail of what the client expects from you.
The good news is that such a meeting usually doesn't take up more than an hour, maybe two. After that you'll need another hour or so to put it all to paper, provided that you have already created a template of sorts.
By putting as much detail as possible into all of these criteria you are creating many opportunities for yourself. From now on everyone agrees on what you will be doing and outsiders can be quickly brought up to speed on your project. At later points in time you can always go back to your document to check whether you're still on the right track. And at the end of everything you can use your original agreement to grade how successful you were in achieving your goals.
So, what if you will be doing "normal" daily management of the customer's servers and IT infrastructure? Doesn't seem like there's a lot to describe, is there? Well, that's when you put extra focus on how things are done. Mind you, even normal daily management includes some projects that you can work on.
Either way, make sure that all demands have been made "SMART": specific, measurable, ambitious, realistic and time-bound. This means that everything should:
When your document is complete, go over it with your client once more to make sure he agrees on everything you put to paper. Then, get his approval in writing.
Here are two examples from my recent assignments. The first example was part of a real project with specific deliverables, while the second example covers normal systems management.
Requirement 1: improving on the old
Our current Nagios monitoring environment is severely lacking in multiple aspects. These include, but are not limited to:
* Sub-optimal design of the infrastructure involved.
* Many services, components and metrics are effectively not monitored.
* Sub-optimal configuration when it comes to alarming.
* Current configuration is a dirty conglomerate of files and objects.
* There is no proper separation between users. People can see monitors to which they really should have no access.
All of these issues should be fixed in the newly designed Nagios environment.
Thomas will take part in the department's normal schedule. This includes the following duties:
* Stand-by duty (being on call), once every five to six weeks.
* The daily shifts, meaning that he either starts his day at 08:00, OR doesn't leave the office before 18:00.
* The expanded schedule with regards to P1 priority incidents and changes. Thomas is expected to put in overtime in these cases.
* The department's change calendar. This involves regular night shifts to implement changes inside specific service windows.
You have done your utmost best to make your project description as comprehensive as possible. You've covered every detail that you could think of and even the customer was completely happy at the time.
Unfortunately happiness never lasts long and your client's bound to think of some other things they want you to do. Maybe there's a hike in your deadline, or maybe they want you to install a hundred servers instead of the original fifty. Who knows? Anything can happen! The only thing that's for certain is that it will happen.
When it does, be sure to document all the changes that are being made to your project. Remember, if your original project description is all you have to show at the end, then you'll be measured by the wrong standards! So be sure to go into all the specifics of the modifications and include them in an updated project description.
And of course, again make sure to get written approval from the client.
Most people I've worked for were delighted to get detailed status updates in writing. Naturally your client will pick up bits and pieces through the grapevine, but he won't know anything for sure until you provide him with all the details. I've found that it is best to deliver a comprehensive document every six to eight weeks, depending on the duration of your undertaking.
Each report should include the following topics. Examples follow after the list.
A short description of your project
The goal of this project is to improve the monitoring capabilities at $CLIENT by completely redesigning the infrastructure, the software and the configuration of the Nagios environment.
Original tasks and their status
Automated installation of UNIX servers
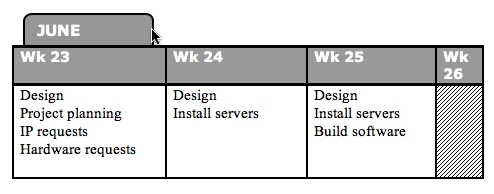
Weeks 26 and 27 (28th of June through the 8th of July) were spent full-time on the implementation of the Jumpstart server. $CLIENT had requested I give this part of the project the highest priority, due to recent discoveries regarding the recoverability of certain servers.
At this point in time the so-called Jumpstart server has the following functionality in place:
[...]
Therefore we can conclude that the Jumpstart server has reached full functionality.
Changes to your project
One of the changes made to the project, based on the new technical requirements, is the switch from NRPE to SNMP as a communications protocol. This choice will allow us greater flexibility in the future and will most likely also save us some effort in managing the Nagios clients.
The downside of this choice is my lack of experience in SNMP. This means that I will need to learn everything about SNMP, before I can start designing and building a project that's based upon it.
A simplified timesheet
Problems and challenges
On the 17th of July I issued a warning to local management that the project would we delayed due to two factors:
* My unfamiliarity with the SNMP protocol and software.
* The lack of a centralized software (and configuration) distribution tool. This lack means that we shall need to install each client manually.
Suggestions and recommendations
$CLIENT is quite lucky to have a CMDB (Configuration Management Database) that is rather up to date. This database contains detailed information on all of their systems and has proved to be very useful in daily life. However, what is lacking is a bird's eye view of the environment. Meaning: maps and lists and such which describe the environment in less detail, but which show a form of method to the madness.
Predictions regarding the outcome of your project
However, as can be seen from the included project planning, I will most probably not be finished with the project before the contract between Snow and $CLIENT runs out.
The contract's end date is set to the 16th of September, while my current estimates point to a project conclusion around the 1st of October. And that's assuming that there will be no delays in acquiring the backup and monitoring software.
One of the biggest mistakes I've made in my recent past was to assume that my customer was reading every document I'd been giving them. I'd been sending them e-mails about show stoppers and I'd been providing them with those beautiful reports I've been telling you about. But still something went horribly wrong. You see, some managers really don't care about technical background and thus they'll ignore certain parts of your reports. They figure that, since you're not coming to talk to them, everything's hunky-dory.
This is exactly why e-mail and big documents are no substitute for good, old face to face contact.
Make sure that you have regular conversations with your client about your progress and any problems that you've run into. You could even go the extra mile and request a regular, bi-weekly meeting! Talking to the customer in person will give you the change to make sure they know exactly what's going on and that they fully understand everything you've written in your interim report.
"You can spend the rest of your life with me...but I can't spend the rest of mine with you. I have to live on. Alone. That's the curse of the Time Lords."
From 2005's season of 'Doctor Who'
Like all masterpieces your enterprise needs a grand finale!
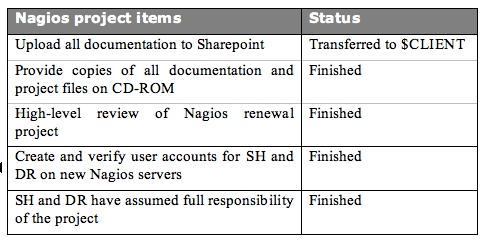
Now that all the work has been done and your goals have been reached you will need to transfer responsibility for everything that you've made. Cross the Ts and dot the Is and all that. In short, you'll be writing an expanded version of the interim report.
The composition of your document should include the following topics:
On the last page of your document, leave room for notes and signatures from your client and their lead technicians. Go over the document with everyone that'll need to take responsibility for your project. When they agree with everything you've written, have them sign that page. You will end up with a page that contains all the autographs that you'll need.
Task review
Solaris automated installation server
[...]
Current status:
Finished per December of 2005. Unfortunately there are a few small flaws still left in the standard build. These have been documented and will be fixed by $CLIENT.
Project recommendations
A basic list of applications to be entered into phase 2 was delivered a few weeks ago. Now we will need to ascertain all the items that should be monitored on a per-application basis.
Once those requirements have been decided on we can continue with the implementation. This includes expanding the existing Nagios configuration, expanding the Nagios client packages and possibly the writing of additional plugins.
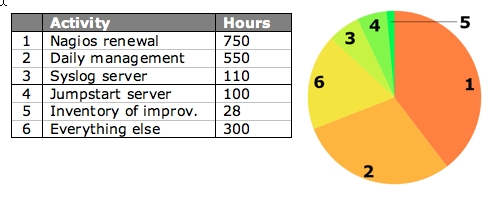
Resource expenditure
Risks and pitfalls
These are areas identified by Thomas as risk areas that need addressing by the $CLIENT team:
1. Limited knowledge of Nagios's implementation of SNMP.
2. Limited knowledge of Perl and Shell scripting in lab team.
3. Limited knowledge of SDS/SVM volume management in lab team.
4. Limited knowledge of Solaris systems management.
5. Only 1 engineer in lab team able to support all aspects of Unix.
Checklists
I've found that many of my customers were pleasantly surprised to receive detailed project reports. It really is something they're not used to from their IT crowd. So go on and surprise your management! Keep them informed, strengthen your bond with them and at the end of the day take in the compliments at a job well done.
kilala.nl tags: writing, tutorial, sysadmin,
View or add comments (curr. 0)
2006-06-01 00:00:00
Working at $CLIENT in 2005 was the first time that I built a complete monitoring infrastructure from the ground on up. In order to keep expenses low we went for a free, yet versatile monitoring tool: Nagios
Nagios, which is available over here, is a free and Open Source monitoring solution based on what was once known as NetSaint.
Nagios allows you to monitor a number of different platforms through the use of plugins which can run on both the server as well as on the monitoring clients. So far I've heard of clients being available for various UNIXen and BSDs (including Mac OS X) and Windows. Windows monitoring requires either the unclear NSClient software, or the NRPE_nt daemon which is basically a port of the UNIX Nagios client.
Setting up the basic server requires some fidgeting with compilers, dependencies and so on. However, a reasonably experienced sysadmin should be able to have the basic software up and running (and configured) in a day. However, adding all the monitors for all the clients is a matter entirely
Although there are a number of GUI's available which should make configuring Nagios a bit easier, I chose to do it all by hand. Just because that's what I'm used to and because I have little faith in GUI-generated config files. You will need to define each monitor separately for each host, so let's take a look at a quick example.
Say that you have twenty servers that need to be monitored by ten monitors each. Each definition in the configuration file takes up approximately sixteen lines, so in the end your config file will be at least 3200 lines long :)
But please don't let that deter you! Nagios is a powerful tool and can help you keep an eye on _a_lot_ of different things in your environment. I for one have become quite smitten with it.
In the menu you will find a configuration manual which I wrote for $CLIENT, as well as a bunch of plugins which were either modified or created for their environment. Quite possible there's one or two in there that will be interesting for you.
kilala.nl tags: tutorial, sysadmin, nagios,
View or add comments (curr. 0)
2006-06-01 00:00:00
I know that, the first time I started using Nagios, I got confused a little when it came to monitoring systems other than the one running Nagios. To shed a little light on the subject for the beginning Nagios user, here's a discussion of the various methods of talking to Nagios clients.
First off, let me make it absolutely clear that, in order to monitor systems other than the one running Nagios, you are indeed going to have to communicate with them in some fashion. Unfortunately very few things in the Sysadmin trade are magical, and Nagios is unfortunately not one of them.
So first off, let's look at the -wrong- way of doing things. When I first started with Nagios (actually I made this mistake on my second day with the software) I wrote something like this:
define service{
host_name remote-host
service_description D_ROOT
check_command check_disk!85!95!/
}
The problem with this setup is that I was using a -local- check and said it belonged to remote-host. Now this may look alright on the status screen ("Hey! It's green!"), but naturally you're not monitoring the right thing ^_^
So how -do- you monitor remote resources? Here's a table comparing various methods. After that I'll give examples on how you can correct the mistake I made above with each method.
PLEASE NOTE: the following discussion will not cover the monitoring of systems other than the various UNIX flavours. Later on I'll write a similar article covering Windows and stuff like Cisco.
|
|
|||||
|
Connection |
Srv -> Clnt |
Srv -> Clnt |
Srv -> Clnt |
Clnt -> Srv |
Clnt -> Srv |
|
Security |
Encryption |
Encryption |
Access List (v2) |
Access List (v2) |
Encryption |
|
Configuration |
On server |
On client |
On client |
On client and On server |
On client |
|
Difficulty |
Easy |
Moderate |
Hard |
Hard |
Moderate |
Just about everyone should already have SSH running on their servers (except for those few who are still running telnet or, horror or horrors!, rsh). So it's safe to assume that you can immediately start using this communications method to check your clients. You will need to:
You can now set up your services.cfg in such a way that each remote service is checked like so:
define service{
host_name remote-host
service_description D_ROOT
check_command check_disk_by_ssh!85!95!/
}
Your check command definition would look something like this:
define command {
command_name check_disk_by_ssh
command_line /usr/local/nagios/libexec/check_by_ssh -H $HOSTADDRESS$ -C "/usr/local/nagios/libexec/check_disk -w $ARG1$ -c $ARG2$ $ARG3$"
}
Working this way will allow you to do most of your configuring centrally (on the Nagios server), thus saving you a lot of work on each client system. All you have to do over there is make sure that there's a working user account and that all the scripts are in place. Quite convenient... The only drawback being that you're making a relatively open account which has full access to the system (sometimes even with sudo access).
As a replacement for the SSH access method, Ethan also wrote the NRPE daemon. Using NRPE requires that you:
You can now set up your services.cfg in such a way that each remote service is checked like so:
define service{
host_name remote-host
service_description D_ROOT
check_command check_nrpe!check_root
}
And in /usr/local/nagios/etc/nrpe.cfg on the client you would need to include:
command[check_root]=/usr/local/nagios/libexec/check_disk 85 95 /
Good thing is that you won't have a semi-open account lying about. Bad things are that, if you want to change the configuration of your client, you're going to have to login. And you're going to have yet another piece of software to keep up to date.
Whoo boy! This is something I'm working on right now at $CLIENT and let me tell you: it's hard! At least much harder than I was expecting.
SNMP is a network management protocol used by the more advanced system administrators. Using SNMP you can access just about -any- piece of equipment in your server room to read statistics, alarms and status messages. SNMP is universal, extensible, but it is also quite complicated. Not for the faint of heart.
To make proper use of monitoring through SNMP you'll need to:
The reason why point C tells you to register a private EID, is because the SNMP tree has a very rigid structure. Technically speaking you -could- just plonk down your results at a random place in the tree, but it's likely that this will screw up something else at a later time. IANA allows each company to have only one private EID, so first check if your company doesn't already have one on the IANA list.
Ufortunately the check_snmp script that comes with Nagios isn't flexible enough to let you monitor custom SNMP objects in a nice way. This is why I wrote the retrieve_custom_nagios script, which is available from the menu. Your service definition would look like this:
define service{
host_name remote-host
service_description D_ROOT
check_command retrieve_custom_snmp!.1.3.6.1.4.1.6886.4.1.4
}
And in this case your snmpd.conf would contain a line like this:
exec .1.3.6.1.4.1.6886.4.1.4 check_d_root /usr/local/nagios/libexec/check_disk -w 85 -c 95 /
Up to now things are actually not that different from using NRPE, are they? Well, that's because we haven't even started using all the -real- features of SNMP. Point is that using SNMP you can dig very deeply into your system to retrieve all kinds of useful information. And -that's- where things get complicated because you're going to have to dig up all the object IDs (OIDs) that you're going to need. And in some cases you're going to have to install vendor specific sub-agents that know how to speak to your specific hardware.
One of the best features of SNMP though are the so-called traps. Using traps the SNMP daemon will actively undertake action when something goes wrong in your system. So if for instance your hard disk starts failing, it is possible to have the daemon send out an alert to your Nagios server! Awesome! But naturally this will require a boatload of additional configuration :(
So... SNMP is an awesomely powerful tool, but you're going to have to pay through the nose (in effort) to get it 100% perfect.
SNMP doesn't involve polling alone. SNMP enabled devices can also be configured to automatically send status updates do a so-call trap host. The downside to receiving SNMP traps with Nagios is that it takes quite a lot of work to get them into Nagios :D
To make proper use of monitoring through SNMP you'll need to:
There are -many- ways to get the SNMP traps translated for Nagios' purposes, 'cause there's many roads that lead to Rome. Unfortunately none of them are very easy to use.
And finally there's NSCA. This daemon is usually used by distributed Nagios servers to send their results to the central Nagios server, which gathers them as so-called "passive checks". It is however entirely possible to install NSCA on each of your Nagios clients, which will then get called to send in the results of local checks. In this case you'll need to:
On your Nagios server things would look like this:
define service{
host_name remote-host
service_description D_ROOT
check_command check_disk!85!95!/
passive_checks_enable 1
active_checks_enable 0
}
For the configuration on the client side I recommend that you read up on NSCA. It's a little bit too much to show over here.
The upside to this is that you won't have to run any daemon on your client to accept incoming connections. This will allow you to lock down your system in a hard way.
Naturally you are absolutely free to combine two or more of the methods described above. You could poll through NRPE and receive SNMP traps in one environment. This will have both ups and downs, but it's up to your own discretion. Use the tools that feel natural to you, or use those that are already standard in your environment.
I realise I've rushed through things a little bit, but I was in a slight hurry :) I will go over this article a second time RSN, to apply some polish.
kilala.nl tags: tutorial, sysadmin, nagios, unix,
View or add comments (curr. 1)
2006-06-01 00:00:00
After reading through my small write-up on Nagios clients on UNIX you may also be interested in the same story for Windows systems.
Since Nagios was originally written with UNIX systems in mind, it'll be a little bit trickier to get the same amount of information from a Windows box. Luckily there are a few tools available that will help you along the way.
For a quick introduction the Nagios clients, read the write-up linked above. Or pick it from the menu on the left.
|
|
||||||
|
Connection |
Srv -> Clnt |
Srv -> Clnt |
Srv -> Clnt |
Srv -> Clnt |
Clnt -> Srv |
Clnt -> Srv |
|
Security |
Password |
Password |
Password |
Access List |
Access List |
Encryption |
|
Configuration |
On client |
On client |
On client |
On client |
On client and |
On client |
|
Difficulty |
Moderate |
Moderate |
Moderate |
Hard |
Hard |
Moderate |
|
Resource |
unknown |
unknown |
9MB RAM |
unknown |
unknown |
30MB RAM |
|
Available |
*: Thanks to Jeronimo Zucco for pointing out that encryption in NSClient++ only works when used with the NRPE DLL.
**: Thanks to Anthony Montibello for pointing out recent changes to NC_Net, which is now at version 3.
***: Thanks to Kyle Hasegawa for providing me with resource usage infor on the various clients.
NSClient was originally written to work with Nagios when it was still called NetSaint: a long, long time ago. NSClient only provides you with access to a very small number of system metrics, including those that are usually available through the Windows Performance Tool.
Personally I have no love for this tool since it is quite fidgetty to use. In order to use NSClient on your systems, you will need to do the following.
You can now set up your services.cfg in such a way that each remote service is checked like so:
define service{
host_name remote-host
service_description D_ROOT
check_command check_nt_disk!C!85!95
}
Your check command definition would look something like this:
define command {
command_name check_nt_disk
command_line /usr/local/nagios/libexec/check_nt -H $HOSTADDRESS$ -p 1248 -v USEDDISKSPACE -l $ARG1$ -w $ARG2$ -c $ARG3
}
NRPEnt is basically a drop-in replacement for NRPE on Windows. It really does work the same way: on the Nagios server you run check_nrpe and on the Windows side you have plugins to run locally. These plugins can be binaries, Perl scripts, VBScript, .BAT files, whatever.
To set things up, you'll need the same things as with the normal NRPE.
You can now set up your services.cfg in such a way that each remote service is checked like so:
define service{
host_name remote-host
service_description D_ROOT
check_command check_nrpe!check_root
}
And in nrpent.cfg on the client you would need to include:
command[check_root]=C:\windows\system32\cscript.exe //NoLogo //T:10 c:\nrpe_nt\check_disk.wsf /drive:"c:/" /w:300 /c:100
Due to the limited use provided by NSClient, someone decided to create NSClient++. This piece of software is a lot more useful because it actually combines the functionality of the original NSClient and that of NRPEnt into one Windows daemon.
NSClient++ includes the same security measures as NRPEnt and NSClient, but adds an ACL functionality on top of that.
On the configuration side things are basically the same as with NSClient and NRPEnt. You can use both methods to talk to a client running NSClient++.
Unfortunately I haven't yet worked with SNMP on Windows systems, so I can't tell you much about this. I'm sure though that things won't be much different from the UNIX side. So please check the Nagios UNIX clients story for the full details.
To make proper use of monitoring through SNMP you'll need to:
Ufortunately the check_snmp script that comes with Nagios isn't flexible enough to let you monitor custom SNMP objects in a nice way. This is why I wrote the retrieve_custom_nagios script, which is available from the menu. Your service definition would look like this:
define service{
host_name remote-host
service_description D_ROOT
check_command retrieve_custom_snmp!.1.3.6.1.4.1.6886.4.1.4
}
As I said, I haven't configured a Windows SNMP daemon before, so I really can't tell you what the config would look like. Just look for options similar to "EXEC", which allows you to run a certain command on demand.
Just as is the case with UNIX systems you will need to dig around the MIB files provided to you by Microsoft and you hardware vendors to find the OIDs for interesting metrics. It's not an easy job, but with some luck you'll find a website where someone's already done the hard work for you :)
SNMP doesn't involve polling alone. SNMP enabled devices can also be configured to automatically send status updates do a so-call trap host. The downside to receiving SNMP traps with Nagios is that it takes quite a lot of work to get them into Nagios :D
To make proper use of monitoring through SNMP traps you'll need to:
There are -many- ways to get the SNMP traps translated for Nagios' purposes, 'cause there's many roads that lead to Rome. Unfortunately none of them are very easy to use.
NC_net is another replacement for the original NSClient daemon. It performs the same basic checks, plus a few additional ones, but it is not exentable with your own scripts (like NRPEnt is).
So why run NC_net instead of NSClient++? Because it is capable of sending passive check results to your Nagios server using a send_nsca-alike method. So if you're going all the way in passifying all your service checks, then NC_net is the way to go.
I haven't worked with NC_net yet, so I can't tell you anything about how it works. Too bad :(
UPDATE 31/10/2006:
I was informed by Marlo Bell of the Nagios mailing list that NC_net version 3.x does indeed allow running your own scripts and calling them through the NRPEnt interface! That's great to know, as it does in fact make NC_net the most versatile solution for running Nagios on your Windows.
Also, Anthony Montibello (lead NC_Net dev) tells me that NC_Net 3 requires dotNET 2.0.
kilala.nl tags: tutorial, sysadmin, nagios, windows,
View or add comments (curr. 7)
2005-11-24 08:30:00
A PDF version of this document is available. Get it over here.
Way back in 1999 when I started my second internship I was told to do something that I had never done before: create and maintain a planning of my activities.
At the time this seemed like a horribly complex thing to do, but my supervisor was adamant. He did not want me to shift one bit of work before I had taken a stab at a rough planning. So I twiddled in Word and I fumbled in Excel and finally, an hour or two later, I had finally finished my first project planning ever. And there was much rejoicing!... Well, not really, but I felt that a Monty Python reference would be welcome right about now...
So now it's six years later and I still benefit from the teachings of my past mentor. However, around me I see people who appear to have trouble keeping track of all of their work. Which is exactly why I was originally asked to write this article.
I have always worked in large corporate environments with several layers of management between the deities and me, which always seems to obfuscate matters to no end. However, the ideas outlined in the next few paragraphs will be applicable to anyone in any situation.
"They [hackers] tend to be careful and orderly in their intellectual lives and chaotic elsewhere. Their code will be beautiful, even if their desks are buried in 3 feet of crap."
From "The new hacker's dictionary"
I realize that keeping a planning is definitely not one of the favorite activities for most people in IT. Most of them seem to abhor the whole task, or fail to see its importance. Also, most are of the opinion that they don't have enough time as it is and that there is absolutely no way that they can fit in the upkeep of a personal planning.
Now here's a little secret: the one thing that can help you keep your workload in check IS a planning! By keeping record of all of your projects and other activities you can show management how heavily you're loaded and at which points in time you will be available for additional duties. By providing management with these details they will be able to make decisions like lowering your workload, or adding more people to the workforce.
In this article I will discuss the aspects of making and maintaining a proper personal planning. I will touch on the following subjects:
A personal planning is what dictates your day-to-day activities. You use it to keep track of meetings, miscellaneous smaller tasks and time slots that you have reserved for projects. You could say that it's your daily calendar and most people will actually use one (a calendar that is) for this task. In daily life your colleagues and supervisor can use your personal planning to see when you're available for new tasks.
A project planning on the other hand is an elaborate schedule, which dictates the flow of a large project. Each detail will be described meticulously and will receive its own place in time. Depending on the structure of your organization such a plan will be drafted either by yourself, or by so-called project managers who have been specifically hired for that task.
"Life is what happens to you, when you're making other plans."
John Lennon
Keeping your personal calendar
I think it's safe to assume that everyone has the basic tools that are needed to keep track of your personal planning. Just about every workstation comes with at least some form of calendar software, which will be more or less suitable.
Microsoft Outlook and Exchange come with a pretty elaborate calendar, as well as a To Do list. These can share information transparently, so you can easily assign a task a slot in your personal planning. Each event in your calendar can be opened up to add very detailed information regarding each task. Also, you and your colleagues can give each other access to your calendars if your organization has a central Exchange server at its disposal.
One of the down sides to this Exchange is the fact that it isn't very easy to keep track of your spent hours in a transparent manner. It allows you to create a second calendar in a separate window, but that doesn't make for easy comparison. You could also try to double book your whole calendar for this purpose, but that would get downright messy.
Looking at the other camp, all Apple Macintosh systems come supplied with the iCal application. It is not as comprehensive as the calendar functions of Exchange, but it is definitely workable. iCal comes with most of the features you would expect, like a To Do list and the possibility to share you calendar with your colleagues. However, this requires that you set up either a .Mac account, or a local WEBDAV server.
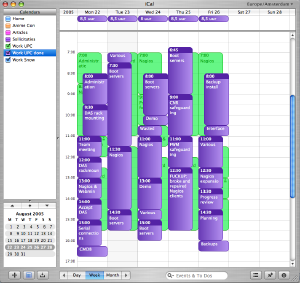
One of the nice things about iCal is the fact that it allows you to keep multiple calendars in one window, thus making it easier to keep track of time spent on projects. In the example shown above the green calendar contains all the events I'd scheduled and the purple calendar shows how my time was really spent.
Finally, I am told that Mozilla's Sunbird software also comes with a satisfactory Calendar. So that could be a nice alternative for those wishing to stick to Linux, or who just have a dislike for the previously mentioned applications.
It's one thing to enter all of your planned activities into your calendar. Another thing entirely is to keep track of the time you spent. Keeping tabs on how you spend your days gives you the following advantages:
1. Reporting progress towards management.
2. A clear view of which activities are slipping in your schedule.
3. A clear view of which work needs to get rescheduled or even reassigned to somebody else.
However, for some reason there aren't any tools available that focus on this task, at least I haven't been able to find them. Of course there are CRM tools that allow a person to keep track of time spent on different customers, but invariably these tools don't combine this functionality with the planning possibilities that I described earlier.
As I said earlier it's perfectly possible to cram the time you spend on tasks into the same calendar which was used to keep your personal planning in, but that usually gets a bit messy (unless you use iCal). Also, I haven't found any way to create reports from these calendar tools that provide you with a nice comparison between times planned and spent. So for now the best way to create a management-friendly report is still to muck about in your favorite spreadsheet program.
Most projects are of a much grander scale than your average workweek. There are multiple people to keep track of and each person gets assigned a number of tasks (which in turn get divided sub-tasks and so on). You can imagine that a simple personal calendar will not do.
That's why there is specialized software like Microsoft Project for Windows or PMX for OS X. Tools like these allow you to divide a project into atomic tasks. You can assign multiple resources to each task and all tasks can be interlinked to form dependencies and such. Most tools provide professional functions like Gantt and PERT charts.

In the next few chapters I will ask you to make estimates regarding the time a certain task will take. Often sysadmins will be much too optimistic in their estimates, figuring that "it will take a few hours of tinkering". And it's just that kind of mindset that is detrimental to a good planning.
When making a guestimate regarding such a time frame, clearly visualize all the steps that come with the task at hand. Imagine how much time you would spend on each step, in real life. So keep in mind that computers may choose not to cooperate, that colleagues may be unavailable at times and that you may actually run into some difficulty while performing each step.
So. Have a good idea of how long the task will take? Good! Now double that amount and put that figure up in your planning. Seriously. One colleague recounts of people who multiply their original estimates by Pi and still find that their guestimates are wrong.
One simple rule applies: it is better to arrange for a lot of additional time, than it is to scramble to make ends meet.
"It must be Thursday... I never could get the hang of Thursdays."
Douglas Adams ~ "The hitchhiker's guide to the galaxy"
Every beginning is a hard one and this one will be no exception. Your first task will be to gather all the little tidbits that make up your day and then to bring order to the chaos. Here are the steps you will be going through.
1. Make a list of everything you have been doing, are doing right now and will need to do sometime soon. Keep things on a general level.
2. Divide your list into two categories: projects and tasks. In most cases the difference will be that projects are things that need to be tackled in a structural manner that will take a few weeks to finish, whereas tasks can be handled quite easily.
3. Take your list of tasks and break them down into "genres". Exemplary genres from my planning are "security", "server improvements" and "monitoring wish list". The categorized list you've made will be your To Do list. Enter it into your calendar software.
4. For each task decide when it needs to be done and make a guestimate regarding the required time. Start assigning time slots in your calendar to the execution of these activities. I usually divide my days into two parts, each of which gets completely dedicated to one activity. Be sure that you leave plenty of room in your calendar for your projects. Also leave some empty spots to allow for unforeseen circumstances.
Now proceed with the next paragraph to sort out your projects.
"Once I broke my problems into small pieces I was able to carry them, just like those acorns: one at a time. ... Be like the squirrel!"
The white stripes ~ "Little acorns"
For each of your projects go through the following loop:
1. Write a short project overview. What is it that needs to be done? When does it need to be done? Who are you doing it for? Who is helping you out?
2. Make a basic time line that tells you which milestones need to be reached in order to attain your goal. For example: if the goal is to have all your servers backed up to tape, exemplary mile stones could be "Select appropriate software/hardware solution", "Acquire software/hardware solution", "Build basic infrastructure" and "Implement backup solution". For each milestone, decide when it needs to be reached.
3. Work out each defined milestone: which granular tasks are parts of the greater whole? For instance, the phase "Select appropriate software/hardware solution" will include tasks such as "Inventory of available software/hardware", "Initial selection of solution", "Testing of initially selected solution" and so on.
4. For each of these atomic tasks, decide how much time will be needed in order to perform it. Use the tips regarding guestimates to decide on the proper figures.
5. Put all the tasks into the time line. Put them in chronological order and include the time you've estimated for each task. Once you're done you've built a basic Gantt chart.
Once you are done, go over the whole project planning and verify that, given the estimated time for each task, you can still make it on time. Discuss your findings with your management so they are know what you are up to and what they can expect from the future.
"Hackers are often monumentally disorganized and sloppy about dealing with the physical world. ... [Thus] minor maintenance tasks get deferred indefinitely."
From "The new hacker's dictionary"
One of the vitally important facts about planning is that it's not a goal, but an on-going process. Now that you have made your initial planning, you're going to have to perform upkeep. Ad infinitum. The point is that things change and there's no changing that!
Projects fall behind because of many different reasons. Vendors may not deliver on time, colleagues may fail to keep their promises and even you yourself may err at times. Maybe your original planning was too tight, or maybe a task is a lot more complicated than it seemed at first. All in all, your planning will need to be shifted. Depending on the project it is wise to revisit your planning at least once a week. Mark any finished tasks as such and add any delays. Not only will this help you in your daily work, but it will also give management a good idea about the overall progress of your projects.
The same goes for your personal time. Projects need rescheduling, you need to take some unexpected sick leave or J. Random Manager decides that doing an inventory of mouse mats really does need priority above your projects. It is best to revisit your calendar on a daily basis, so you can keep an eye on your week. What will you be doing during the next few days? What should you have done during the past few days? Are you on track when it comes to your To Do list?
You may think that all of this planning business seems like an awful lot of work. I would be the first to agree with you, because it is! However, as I mentioned at the start of this article: it will be well worth your time. Not only will you be spending your time in a more ordered fashion, but it will also make you look good in the eyes of management.
Drawing a parallel with the Hitchhiker's Guide to the Galaxy you will be the "really hoopy frood, who really knows where his towel is" because when things get messy you will still be organized.
kilala.nl tags: writing, tutorial, sysadmin,
View or add comments (curr. 1)
2005-05-31 22:15:00
A PDF version of this document is available. Get it over here.
We've all experienced that sinking feeling: blurry-eyed and not halfway through your first cup of coffee you're startled by the phone. Something's gone horribly wrong and your customers demand your immediate attention!
From then on things usually only get worse. Everybody's working on the same problem. Nobody keeps track of who's doing what. The problem has more depth to it than you ever imagined and your customers keep on calling back for updates. It doesn't matter whether the company is small or large: we've all been there at some point in time.
The last time we encountered such an incident at our company wasn't too long ago. It wasn't a pretty sight and actually went pretty much as described above. During the final analysis our manager requested that we produce a small checklist which would prevent us from making the same mistakes again. The small checklist finally grew into this article which we thought might be useful for other system administrators as well.
Before we begin we'd like to mention that this article was written with our current employer in mind: large support departments, multiple tiers of management, a few hundred servers and an organization styled after ITIL. Most of the principles that are described in this document also apply to smaller departments and companies albeit in a more streamlined form. Meetings will not be as formal, troubleshooting will be more supple and communication lines between you and the customer will be shorter.
Now, we have been told that ITIL is a mostly European phenomenon and that it is still relatively unknown in the US and Asia. The web site of the British Office of Government Commerce (http://www.itil.co.uk) describes ITIL as follows:
"ITIL (IT Infrastructure Library) is the most widely accepted approach to IT Service Management in the world. ITIL provides a cohesive set of best practice, drawn from the public and private sectors internationally.
ITIL is ... supported by publications, qualifications and an international user group. ITIL is intended to assist organizations to develop a framework for IT Service Management."
Some readers may find our recommendations to be strict, while other may find them completely over the top. It is of course up to your own discretion how you deal with crises.
Now. Enough with the disclaimers. On with the show!
The following paragraphs outline the phases which one should go through when managing a crisis. The way we see things, phases 1 through 3 and phase 11 are all parts of the normal day to day operations. All steps in between (4 through 10) are steps to be taken by the specially formed crisis team.
1. A fault is detected
2. First analysis
3. First crisis meeting
4. Deciding on a course of action
5. Assigning tasks
6. Troubleshooting
7. Second crisis meeting
8. Fixing the problems
9. Verification of functionality
10. Final analysis
11. Aftercare
"Oh the humanity!..."
Reporter at the crash of the Hindenburg
I really doesn't matter how this happens, but this is naturally the beginning. Either you notice something while V-grepping through a log file, or a customer calls you, or some alarm bell starts going off in your monitoring software. The end result will be the same: something has gone wrong and people complain about it.
In most cases the occurrence will simply continue through the normal incident process since the situation is not of a grand scale. But once every so often something very important breaks and that's when this procedure kicks in.
"Elementary, dear Watson."
The famous (yet imaginary) detective Sherlock Holmes
To be sure of the scale of the situation you'll have to make a quick inventory:
Once you have collected all of this information you will be able to provide your management with a clear picture of the current situation. It will also form the basis for the crisis meeting, which we will discuss next.
This phase underlines the absolute need for detailed and exhaustive documentation of your systems and applications! Things will go so much smoother if you have all of the required details available.1 If you already have things like Disaster Recovery Plans lying around, gather them now.
If you don't have any centralized documentation yet we'd recommend that you start right now. Start building a CMDB, lists of contacts and so-called build documents describing each server.
"Emergency family meeting!"
From "Cheaper by the dozen"
Now the time has come to determine how to tackle the problem at hand. In order to do this in an orderly fashion you will need to have a small crisis meeting.
Make sure that you have a whiteboard handy, so you can make a list of all of the detected defects. Later on this will make it easier to keep track of progress with the added benefit that the rest of your department won't have to disturb you for updates.
Gather the following people:
During this meeting the on-call team member brings everybody up to speed. The supervisor is present so that he/she may be prepared for any escalation from above, while the problem manager needs to be able to inform the rest of your company through the ITIL problem process. Of course it is clear why all of the other people are invited.
One of the goals of the first crisis meeting is to determine a course of action. You will need to set out a clear list of things that will be checked and of actions that need to be taken, to prevent confusion along the way.
It is possible that your department already has documents like a Disaster Recovery Plan or notes from a previous comparable crisis that describe how to treat your current situation. If you do, follow them to the letter. If you do not have documents such as these you will need to continue with the rest of our procedure.
Once a clear list of actions and checks has been created you will have to assign tasks to a number of people. We have determined a number of standard roles:
It is imperative that the spokesperson is not involved with any troubleshooting whatsoever. Should the need arise for the spokesperson to get involved, then somebody else should assume the role of spokesperson in his place. This will ensure that lines of communication don't get muddled and that the real work can go on like it should.
In this phase the designated troubleshooters go over the list of possible checks that was determined in the first crisis meeting. The results for each check need to be recorded of course.
It might be that they find some obvious mistakes that may have led to the situation at hand. We suggest that you refrain from fixing any of these, unless they are really minor. The point is that it would be wiser to save these errors for the meeting that is discussed next.
This might seem counterintuitive, but it could be that these errors aren't related to the fault or that fixing them might lead to other problems. This is why it's wiser to discuss these findings first.
Once the troubleshooters have gathered all of their data the crisis team can enter a second meeting.
At this point in time it is not necessary to have either the supervisor or the problem manager present. The spokesperson and the troubleshooters (perhaps assisted by a specialist who's not on the crisis team) will decide on the new course of action.
Hopefully you have found a number of bugs that are related to the fault. If you haven't, loop back to step 4 to decide on new things to check. If you did, now is the time to decide how to go about fixing things and in which order to tackle them.
Make a list of fixable errors and glance over possible corrections. Don't go into too much detail, since that will take up too much time. Leave the details to the person who's going to fix that particular item. Assign each item on the list to one of the troubleshooters, and decide in which order they should be fixed.
When you're done with that, start thinking about plan B. Yes, it's true that you have already invested a lot of time into troubleshooting your problems, but it might be that you will not be able to fix the problems in time. So decide on a time limit if it hasn't been determined for you and start thinking worst case scenario: "What if we don't make it? How are we going to make sure people can do their work anyway?O.
Obviously you'll now tackle each error, one by one. Make sure that you take notes of all of the changes that are made. Once more though (I'm starting to feel like the school teacher from The Wall): don't be tempted to do anything you shouldn't be doing.
Don't go fixing other faults you've detected. And absolutely do not use the downtime as a convenient time window to perform an upgrade you'd been planning of doing for a while.
Once you've gone over the list errors and have fixed everything verify that peace has been brought to the land, so to speak. Also verify that your customers can work again and that they experience no more inconvenience. Strike every fixed item from the whiteboard, so your colleagues are in the know.
If you find that there are still some problems left, or that your fixes broke something else, add them to the board and loop back to phase 3.
"Analysis not possible... We are lost in the universe of Olympus."
Shirka the board computer, from "Ulysses31"
Naturally your customers will want some explanation for all of the problems you caused them (so to speak). So gather all people involved with the crisis team and hold one final meeting. Go over all of the things you've discovered and make a neat list. Cover how each error was created and its repercussions. You may also want to explain how you'll prevent these errors from happening again in the future.
What you do with this list depends entirely on the demands set out by your organization. It could be that all your customers want is a simple e-mail, while ITIL-reliant organizations may require a full blown Post Mortem.
"I don't think any problem is solved unless at the end of the day you've turned it into a non-issue. I would say you're not doing your job properly if it's possible to have the same crisis twice.O
Salvaico, Sysadmintalk.com forum member
Apart from the Post Mortem which was already mentioned you need to take care of some other things.
Maybe you've discovered that the server in question is under powered or that the faults experienced were fixed in a newer version of the software involved. Things like these warrant the start of a new project at the cost of your customers. Or maybe you've found that your monitoring is lacking when it comes to the resource(s) that failed. This of course will lead to an internal project for your department.
All in all, aftercare covers all of the activities required to make sure that such a crisis never occurs again. And if you cannot prevent such a crisis from happening again you should document it painstakingly so that it may be solved quickly in the future.
We sincerely hope that our article has provided you with some valuable tips and ideas. Managing crises is hard and confusing work and it's always a good idea to take a structured approach. Keeping a clear and level head will be the biggest help you can find!
kilala.nl tags: writing, tutorial, sysadmin,
View or add comments (curr. 0)
2004-12-03 18:43:00
A PDF version of this document is available. Get it over here.
Throughout the last two years I have written a number of technical proposals for my employer. These usually concerned either the acquisition of new hardware or modifications to our current infrastructure.
Strangely enough my colleagues didn't always get the same amount of success as I did, which got me to thinking about the question "How does one write a proper proposal anyway?".
In this mini-tutorial I'll provide a rough outline of what a proposal should contain, along with a number of examples. Throughout the document you'll also find a number of Do's and Don'ts to point out common mistakes.
You will also notice that I predominantly focus on the acquisition of hardware in my examples. This is due to the nature of my line of work, but let me say that the stuff I'll be explaining applies to many other topics. You may just as well apply them to desired changes to your network, some software that you would like to use and even to some half-assed move which you want to prevent management from making.
Now I've never been a great fan of war, but Sun Tzu really knew his stuff! Even today his philosophies on war and battle tactics are still valid and are regularly applied. And not just in the military, since these days it's not uncommon to see corporate busy-bodies reading "The art of war" while commuting to work. In between my stuff you'll find quotes from Sun Tzu which I thought were applicable to the subject matter.
"Though we have heard of stupid haste in war, cleverness has never been seen associated with long delays."
Sun Tzu ~ "The art of war"
It happens occasionally that I overhear my colleagues talking about one of their proposals. Sometimes the discussion is about the question of why their idea got shot down and "what the heck was wrong with the proposal?". They had copied a proposal that had worked in the past and replaced some information with their own. When asked to show me said proposal, I'm presented with two sheets of paper, of which one is the quote from our vendor's sales department. The other consists of 30% header/footer, a short blurb on what we want to buy and a big box repeating all of the pricing info.
The problem with such a document of course is the fact that management gets its nose rubbed in the fact that we want to spend their money (and loads of it too). To them such a proposal consists of a lot of indecipherable technical mumbo-jumbo (being the quote and some technical stuff), with the rest of the document taking up dollars-Dollars-DOLLARS. While to you it may seem that the four or five lines of explanation provide enough reason to buy the new hardware, to management this will simply not do.
So? One of the things it takes to write a proper proposal is to write one which keeps your organization's upper echelons in mind. However! Don't forget about your colleagues either. It is more than logical that you run a proposition past your peer to check if they agree with all of the technicalities.
So in order to make sure that both your targets agree on your proposal you will have to:
A) employ tech-speak to reach your peers and
B) explain your reasoning in detail to your management.
In order to craft such a document there are a number of standard pieces to the puzzle which you can put in place. I'll go over them one by one. One thing I want you to realize though, is the fact that this will take time. Expect to spend at least half a day or even more on writing.
My proposals tend to consist of a number of sections, some of which are optional as not every type of proposal requires the information contained therein. For instance, not every project will require resources which can be easily expressed in numbers and hence there is no need for a list of costs.
"The art of war teaches us to rely not on the likelihood of the enemy's not coming, but on our own readiness to receive him."
Sun Tzu ~ "The art of war"
Keep this part as short and simple as possible. Use one, maybe two short paragraphs to describe the current situation or problem and describe how you'll fix it. Use very general terms and make sure that it is clear which of the reader's needs you are addressing.
Be very careful not to put too much stuff in this section. Its main purpose is to provide the reader with a quick overview on what the the problem is that you're trying to solve and what your final goal is. Not only will this allow the reader to quickly grasp the subject of your proposal, but it will also make sure that it will be more easily found on a cluttered desk. A short summary means quick recognition.
For example:
In the past year UNIX Support have put a big effort into improving the stability and performance capacity of their BoKS and NIS+ infrastructural systems. However, the oldest parts of our infrastructure have always fallen outside the scope of these projects and have thus started showing signs of instability. This in turn may lead to bigger problems, ending in the complete inaccessibility of our UNIX environment.
I propose that we upgrade these aging servers, thus preventing any possible stability issues. The current estimated cost of the project is $16,260.
Most managers only have a broad view on things that are going on in the levels beneath them when it comes down to the technical nitty-gritty. That's the main reason why you should include a short introduction on the the scope of your proposal.
Give a summary of the services that the infrastructure delivers to the "business". This helps management to form a sense of importance. If a certain service is crucial to your company's day to day operation, make sure that your reader knows this. If it will help paint a clearer picture you can include a simple graphic on the infrastructure involved.
The whole point of this section is to imprint it on management that you are trying to do something about their needs, not yours. It's one thing to supply you with resources to tickle one of your fancies, but it's a wholly different thing to pour money into something that they themselves need.
For example:
BoKS provides our whole UNIX environment with mechanisms for user authentication and authorization. NIS+ provides all of the Sun Solaris systems from that same environment with directory services, containing information on user accounts, printers, home directories and automated file transfer interfaces.
Without either of these services it will be impossible for us to maintain proper user management. Also, users will be unable to log in to their servers should either of these services fail. This applies to all departments making use of UNIX servers, from Application and Infrastructure Support, all the way through to the Dealing Room floor.
"Whoever is first in the field and awaits the coming of the enemy, will be fresh for the fight; whoever is second in the field and has to hasten to battle will arrive exhausted." Sun Tzu ~ "The art of war"
Meaning: when writing your proposal try to keep every possible angle on your ideas into mind. Try to anticipate any questions your reader might have and bring your ideas in such a way that they will appeal to your audience. If you simply describe your goal, instead of providing proper motivation you'll be the one who "is second in the field".
In the previous section of your document you provided your audience with a quick description of the environment involved. Now you'll have to describe what's wrong with the current situation and what kind of effects it may have in the future. If your proposal covers the acquisition or upgrade of multiple objects, cover them separately. For each object define its purpose in the scope you outlined in the previous section. Describe why you will need to change their current state and provide a lengthy description of what will happen if you do not.
However, don't be tempted to exaggerate or to fudge details so things seem worse. First off a proposal which is overly negative may be received badly by your audience. And secondly, you will have to be able to prove all of the points you make. Not only will you look like an ass if you can't, but you may also be putting your job on the line! So try to find the middle road. Zen is all about balance, and so the 'art of getting what you want' should also be.
For example:
Recently the master server has been under increased load, causing both deterioration of performance and stability. This in turn may lead to problems with BoKS and with NIS+, which most probably will lead to symptoms like:
* Users will need more time to log into their UNIX accounts.
* Users may become unable to log into their UNIX accounts.
* User accounts and passwords may lose synchronocity.
Close off each sub-section (one per object) with a clearly marked recommendation and a small table outlining the differences between the current and the desired situation. Keep your recommendation and the table rather generic. Do not specify any specific models or makes of hardware yet.
Of course the example below is focused on the upgrading of a specific server, but you can use such a table to outline your recommendations regarding just about anything. Versions of software for example, or specifics regarding your network architecture. It will work for all kinds of proposals.
For example:
UNIX Support recommends upgrading the master server's hardware to match or exceed current demands on performance
System type: Sun Netra T1 200 (current), - (recommended)
Processor: Ultrasparc IIe, 500 MHz (current), 2x Ultrasparc IIIi, 1 GHz (recomm.)
Memory: 512 MB (current), 1 or 2 GB (recomm.)
Hard drives: 2x 18 GB + 2x 18 GB ext (current), 2x 36 GB, int. mirror (recomm.)
The whole point of this section of your proposal is to convince your readers that they're the captain of Titanic and that you're the guy who can spot the iceberg in time. All is not lost... Yet...
"The general who wins a battle makes many calculations in his temple ere the battle is fought. The general who loses a battle makes but few calculations beforehand."
Sun Tzu ~ "The art of war"
Now that you have painted your scenario, and you've provided a vision on how to go about solving things you will need to provide an overview of what you will be needing.
Don't just cover the hardware you'll need to acquire, but also take your time to point out which software you'll need and more importantly: which departments will need to provide resources to implement your proposal. Of course, when it comes to guesstimates regarding time frames, you are allowed to add some slack. But try to keep your balance and provide your audience with an honest estimate.
One thing though: don't mention any figures on costs yet. You'll get to those later on in the proposal.
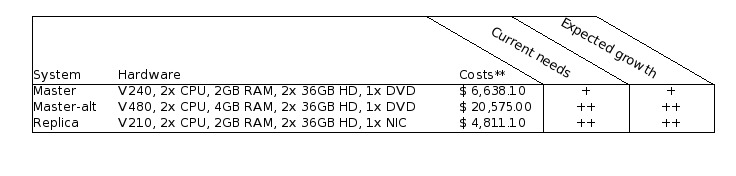
For example:
A suitable solution for both Replica servers would be the Sun Fire V210. These systems will come with two Ultrasparc II processors and 2 GB of RAM installed. This configuration provides more than enough processing power, but is actually cheaper than a lower spec-ed V210.
"Do not interfere with an army that is returning home. When you surround an army, leave an outlet free. Do not press a desperate foe too hard."
Sun Tzu ~ "The art of war"
The above quote seems to be embodied in one of Dilbert's philosophies these days: "Always give management a choice between multiple options, even if there is only one".
Of course, in Dilbert's world management will always choose the least desirable option, for instance choosing to call a new product the 'Chlamydia', because "it sounds Roman". It will be your task to make the option you want to implement to be the most desirable in the eyes of your readers.
In case your proposal involves spending money, this is where you tell management: "Alright, I know times are lean, so here's a number of other options. They're less suitable, but they'll get the job done". Any which way, be sure that even these alternatives will do the job you'd want them to. Never give management the possibility to choose an option that will not be usable in real life.
For example:
Technically speaking it is possible to cut costs back a little by ordering two new servers, instead of four, while re-using two older ones. This alternate scenario would cut the total costs back to about $ 8360,-- (excluding VAT).
If the main subject of your proposal is already the cheapest viable option, say so. Explain at length that you have painstakingly eked out every penny to come up with this proposal. Also mention that there are other options, but that they will cost more money/resources/whatever. Feel free to give some ball park figures.
For example:
Unfortunately there are no cheaper alternatives for the Replica systems. The Sun Fire V120 might have been an option, were it not for the following facts:
It is not in the support matrix as defined by UNIX Support.
It is not natively capable of running IP Multi Pathing.
It will reach its so-called End Of Life state this year.
Basically you need to make management feel good about their decision of giving you what want. You really don't want them to pick any other solution than the one you're proposing, but you are also obliged to tell them about any other viable possibilities.
In the case of some projects you are going to need the help of other people. It doesn't matter if they are colleagues, people from other departments or external parties. In this section you will make a list of how many resources you are going to need from them.
You don't have to go into heavy details, so give a broad description of the tasks laid out for these other parties. Estimate how much time it will take to perform them in man-hours and also how many people you will need from each source. Not only will this give management a clear picture of all of your necessities, a list like this will also give your readers a sense of the scale of the whole project.
For example:
In order to implement the proposed changes to our overall security we will require the cooperation of a number of our peer departments:
Information Risk Management (IRM) will need to provide AS and our customers with clear guidelines, describing the access protocols which will be allowed in the future. It is estimated that one person will require about 36 hours to handle all of the paper work.
Security Operations (GSO) will need to slightly modify their procedures and some of the elements of their administrative tools, to accommodate for the stricter security guidelines. It is estimated that one person will need about 25 hours to make the required alterations.
You'll need to try and keep this section as short as possible, since it covers the costs of all of the viable options that you provided in the past sections. Create a small table, setting off each option against the costs involved. Add a number of columns with simple flags which you can use to steer the reader to the option of your choice.
Reading back I realize that I'll need to clarify that a bit :) Try and recall some of those consumer magazines or sites on the web. Whenever they make a comparison between products they often include a number of columns marked with symbols like + (satisfactory), ++ (exceeds expectations), - (not too good) or -- (horrific). What you'll be doing is thinking of a number of qualities of your options which you can set off against each other.
It goes without saying that you should be honest when assigning these values. If another option starts to look more desirable by now you really have to re-evaluate your proposal.
For example:
"The clever combatant imposes his will on the enemy, but does not allow the enemy's will to be imposed on him."
Sun Tzu ~ "The art of war"
Use two, maybe three, paragraphs to make one final impressing blow on the reader. Shortly summarize the change(s) that you're proposing and repeat your arguments. Be firm, yet understanding in your writing.
For example:
We have provided you with a number of possible scenarios for replacement, some options more desirable than others. In the end however we are adamant that replacement of these systems is necessary and that postponing these actions may lead to serious problems within our UNIX environment, and thus in our line of business.
At all times keep in mind who your target audience is. It is quite easy to fall back into your daily speech patterns when writing an extensive document, while at some point that may actually lead to catastrophe.
Assume that it is alright to use daily speech patterns in a document which will not pass farther than one tier above your level (meaning your supervisor and your colleagues). However, once you start moving beyond that level you will really need to tone down.
Some points of advise:
At my current employer we have made a habit of including a small table at the beginning of each document which outlines all of the versions this document has gone through. It shows when each version was written and by whom. It also gives a one-liner regarding the modifications and finally each version has a separate line showing who reviewed the document.
Of course it may be wise to you use different tables at times. One table for versions that you pass between yourself and your colleagues and one for the copies that you hand out to management. Be sure to include a line for the review performed by your supervisor in both tables. It's an important step in the life cycle of your proposal.
This may be taking things a bit far for you, but it's something we've grown accustomed to.
"Begin by seizing something which your opponent holds dear; then he will be amenable to your will." Sun Tzu ~ "The art of war"
Or in other words: management is almost sure to give in, if you simply make sure they know things will go horribly wrong with their environment if you are not allowed to do what you just proposed.
Of course no method is the be-all-and-end-all way of writing proposals, so naturally neither is mine. Some may simply find it too elaborate, while in other cases management may not be very susceptible to this approach. Try and find your own middle road between effort and yield. Just be sure to take your time and to be prepared for any questions you may get about your proposal.
kilala.nl tags: writing, tutorial, sysadmin,
View or add comments (curr. 1)
2004-04-03 00:00:00
It's only been a couple of months since I switched to Apple OS X, but since then I've learnt many a thing about the OS. It was only recently though that I found the need to configure the built in firewall. This little HOWTO'll explain all of the steps I took.
The built in firewall software is one of the many OS X features that Apple likes to tote around, claiming a higher level of security out of the box when compared to other OSes. And yes indeed the firewall software does appear to do its job properly. With one exception...
Before we begin I would like to point out a couple of conventions I will be using in this document. Whenever you encounter any text written in courier new bold, this means that you're either reading commands which need to be entered into the UNIX command line of OS X or a list of packages or menu names. You will also encounter lines starting with the text "kilala:~ thomas$". This is merely the command prompt as displayed on my system and I include it in these texts to indicate the commands to be entered.
First off I can imagine that some of the people reading this can't even begin to imagine what a firewall is or does. They might've heard the word before on the web or in Apple's (or Microsoft's) PR spiel. I won't go into any technical details, but I'll give a short explanation on the ideas behind a firewall. If you would like more detailed information I recommend a website like http://computer.howstuffworks.com/firewall.htm.
Firewalls are a sort of security measure which work by separating your computer or network from a possibly hostile network, like the Internet. This separation usually takes place by disallowing any and all network traffic to and from your systems, while only allowing a certain number of protocols in and/or out. For instance, a home user may setup his firewall to block everything except outgoing e-mail and browser traffic. On the other hand some companies could be allowing incoming browser requests to their own webserver, next to the already mentioned outgoing e-mail and browser traffic.
One of the most important things to remember though is the fact that a firewall is not the be-all-end-all security measure that fixes all of your problems. It could still be that the software serving the protocols that you do allow through the firewall is buggy with security flaws. Think of Microsoft's ISS webserver software which was famous for security holes in the past.
As I said it was only recently that I found the need to manually configure OS X's built in firewall software. I'd always kind of expected the software to work straight out of the box, which it kind of did.
You see, usually with firewall software you'll say "I want to block any and all traffic to and from my box, except this, this and that protocol". Basically you do the same with OS X's firewall, but with a small snake in the grass: the protocols you allow to go in and out of your systems get permission on all of your network interfaces! So if you're hooked up onto the Internet (which I assume since you found my little article) and if you decide to turn on that Windows file sharing, remember that you're sharing your files with the rest of the Internet! You can imagine I was less than pleased with this and I can't even begin to imagine why it took me two months to start thinking about this. Usually I'm more security minded! Anywho, the damage was done and I decided to quickly learn enough about the OS X firewall, so I could configure it properly.
I quickly found out that OS X uses the BSD UNIX default firewall ipfw, which can be configured in many different ways. There's Apple's custom window in the System Preferences panes. Then there are GUI's like Brickhouse and Firewalker which are available through the Internet. And finally you can take the manual approach and enter ipfw firewall rules one by one, by hand.
I chose to use the manual approach, since that is what I'm most familiar with; I've been entering firewall rules since my internship at Spherion when I was still running a firewall on Suse Linux 6.0. An added bonus to entering the rules by hand is that you know 100% sure what the firewall will do, as opposed to rules created or generated by a GUI.
I wouldn't expect Joe and Little Timmy from across the street to use to approach, so I would recommend people who're less technically involved to give software like Brickhouse a try. I hear it's supposed to be pretty good!
People who don't like typing big files by hand can download the file Firewall-config.tar from my website. This file contains all files which are to be placed in /Library/StartupItems/Firewall.
In a minute we'll start looking at how we create rules for our firewall. But as the title says: "First things first"! Because we want our own set of rules to bypass the OS X default rules we'll need to make sure that our configuration gets loaded right after the systems comes up. This is done by adding a new boot configuration for the firewall. I'll just show you all the steps I took, along with some explanations; that should make things clear enough.
First off, make sure that you're in a user account which is allowed to use the sudo command. This could be the Administrator account, but you could also modify your own account for this purpose. Then open up a Terminal.app window.
Last login: Sun Apr 4 09:46:44 on ttyp1
Welcome to Darwin!
kilala:~ thomas$ cd /Library
kilala:~ thomas$ sudo mkdir -p StartupItems/Firewall
Password:
kilala:~ thomas$ sudo chown -R root:wheel StartupItems
kilala:~ thomas$ sudo chmod -R 755 StartupItems
kilala:~ thomas$ cd StartupItems/Firewall
kilala:~ thomas$ sudo cp -rp /Systems/Library/StartupItems/NFS/* .
The previous commands created a new boot configuration directory for the service we will call Firewall. You setup the directories to have the proper ownerships and access permissions. Finally you copied over the startup configuration for the service called NFS as a basis for our own service.
Now I'm hoping that you are already familiar with the vi text editor, because we are going to make heavy use of it. If you have no clue how to use vi, please look up some tips on the Internet first!
kilala:~ thomas$ sudo vi StartupParameters.list
Modify the file to read as follows:
{
Description = "Firewall";
Provides = ("Firewall");
Requires = ("Resolver", "NetworkExtensions");
OrderPreference = "Late";
Messages =
{
start = "Starting custom firewall";
stop = "Stopping custom firewall";
};
}
kilala:~ thomas$ sudo mv NFS Firewall
kilala:~ thomas$ sudo vi Firewall
Modify the file to read as follows:
#!/bin/sh
##
# Setting up the Firewall rules at boot time
##
# Please note: added "FIREWALL=-YES-" entry to /etc/hostconfig
. /etc/rc.common
StartService ()
{
if [ "${FIREWALL:=-NO-}" = "-YES-" ]; then
ConsoleMessage "Adding Firewall Rules"
ipfw -f flush
exec /Library/StartupItems/Firewall/Ruleset
fi
}
StopService ()
{
ConsoleMessage "Removing all Firewall Rules"
ipfw -f flush
}
RestartService ()
{
ConsoleMessage "Removing all Firewall Rules"
ipfw -f flush
if [ "${FIREWALL:=-NO-}" = "-YES-" ]; then
ConsoleMessage "Adding Firewall Rules"
ipfw -f flush
exec /Library/StartupItems/Firewall/Ruleset
fi
}
RunService "$1"
We're almost there :) Only one more file to edit to set up the automatic booting.
kilala:~ thomas$ sudo vi /etc/hostconfig
Modify the file and add the following line at the bottom of the page:
FIREWALL=-YES-
Now we'll get to the brunt of setting up our firewall. Most of the things discussed in this document are things that I had to learn in the course of a day, so please don't expect me to explain everything in detail ^_^; I was lucky enough to have enough past experience with iptables and ipchains, so that helped me in understanding the rules in the following chapter.
Unfortunately the rules below will only apply to people who have one network card in their system and who use a dial-up connection to the Internet. In my system the primary network card, which is used for my home network, is designated as en0. My Internet connection on the other hand is designated as ppp0. You can check your own settings by running the following command while you're connected to the Internet:
kilala:~ thomas$ ifconfig -a | grep UP
lo0: flags=8049<UP,LOOPBACK,RUNNING,MULTICAST> mtu 16384
en0: flags=8863<UP,BROADCAST,SMART,RUNNING,SIMPLEX,MULTICAST> mtu 1500
ppp0: flags=8051<UP,POINTOPOINT,RUNNING,MULTICAST> mtu 1500
The interface lo0 is your loopback interface, which is a virtual network interface not actively used on the network itself. It is mainly used for communications within your system itself. You can recognise your network card by running the command ifconfig for each of the remaining interfaces (for instance ifconfig en0); your network card will have the IP address which is also set in the System Preferences pane.
My whole point is that, if you do not have the exact same situation as I have, you will have to modify the rules below insofar that you exchange each instance of "en0" with your network card name and each instance of "ppp0" with your Internet connection name. Also, if you have more than one network card, be sure to add additional rules for those interfaces as well.
Anyway. On with the show!
Now you'll have to edit the final file in this whole setup. Make sure that you're still in the /Library/StartupItems/Firewall directory before going on.
kilala:~ thomas$ sudo vi Ruleset
This will also create a new file, which you will have to fill out completely as below. Once you're more familiar with how these rules work you could start adding rules for additional services. You may notice for example that I don't open up ports for IRC or AIM, since those are both services that I make no use of.
#!/bin/sh
# Firewall ruleset for T. Sluyter (Kilala.valhalla.org)
# Ver 1.00 3rd of April 2004
#
# Allows any and all network traffic on the "inside" network.
# Blocks almost all network traffic to and from the internet.
# Allows only a limited amount of network traffic to and from the internet.
#
# Allow a number in default traffic settings
ipfw add allow ip from any to any via lo0
ipfw add allow tcp from any to any established
ipfw add allow ip from any to any frag
ipfw add allow icmp from any to any icmptype 3,4,11,12
ipfw add deny log ip from 127.0.0.0/8 to any in
ipfw add deny log ip from any to 127.0.0.0/8 in
ipfw add deny log ip from 224.0.0.0/3 to any in
ipfw add deny log tcp from any to 224.0.0.0/3 in
# Allow any and all traffic coming through en0, from local network
ipfw add allow ip from 192.168.0.0/24 to any in recv en0
ipfw add allow ip from any to 192.168.0.0/24 out xmit en0
ipfw add allow tcp from 192.168.0.0/24 to any in recv en0
ipfw add allow tcp from any to 192.168.0.0/24 out xmit en0
ipfw add allow udp from 192.168.0.0/24 to any in recv en0
ipfw add allow udp from any to 192.168.0.0/24 out xmit en0
ipfw add allow icmp from any to any in recv en0
ipfw add allow icmp from any to any out xmit en0
# Allow FTP (File transfer) to the outside
ipfw add allow tcp from any 1024-65535 to any 20-21 out xmit ppp0
ipfw add allow tcp from any 20-21 to any 1024-65535 in recv ppp0
# Allow DNS lookups to outside
ipfw add allow udp from any 1024-65535 to any 53 out xmit ppp0
ipfw add allow udp from any 53 to any 1024-65535 in recv ppp0
# Allow SSH (Secure shell) to outside
ipfw add allow tcp from any 1024-65535 to any 22 out xmit ppp0
ipfw add allow tcp from any 22 to any 1024-65535 in recv ppp0
# Allow HTTP (Web browsing) to outside
ipfw add allow tcp from any 1024-65535 to any 80 out xmit ppp0
ipfw add allow tcp from any 80 to any 1024-65535 in recv ppp0
ipfw add allow tcp from any 1024-65535 to any 8080 out xmit ppp0
ipfw add allow tcp from any 8080 to any 1024-65535 in recv ppp0
# Allow HTTPS (Secure web browsing) to outside
ipfw add allow tcp from any to any 443 out xmit ppp0
ipfw add allow tcp from any to any 1024-65535 in recv ppp0
# Allow POP (Retrieving e-mail) to outside
ipfw add allow tcp from any 1024-65535 to any 110 out xmit ppp0
ipfw add allow tcp from any 110 to any 1024-65535 in recv ppp0
# Allow SMTP (Sending e-mail) to outside
ipfw add allow tcp from any 1024-65535 to any 25 out xmit ppp0
ipfw add allow tcp from any 25 to any 1024-65535 in recv ppp0
# Allow ICMP to and from outside
ipfw add allow icmp from any to any in recv ppp0
ipfw add allow icmp from any to any out xmit ppp0
# Block all of the rest, along with logging
ipfw add deny log tcp from any to any in recv ppp0
ipfw add deny log udp from any to any in recv ppp0
ipfw add deny log ip from any to any in recv ppp0
ipfw add deny log tcp from any to any out xmit ppp0
ipfw add deny log udp from any to any out xmit ppp0
ipfw add deny log ip from any to any out xmit ppp0
Before we start rebooting our systems it might be wise to first check if our startup scripts are in full working order. You never know what happens if things aren't written a hundred percent correctly ;)
Luckily Apple has provided us with a command which can be used to run a startup script as if the system was rebooting just now. Running the following command should give you a properly configured firewall.
kilala:~ thomas$ sudo SystemStarter start Firewall
Now don't worry if running this command gives you loads of errors about the ppp0 interface not being unavailable. This is of course normal if you're starting the firewall without being logged into the Internet. Like I said: don't worry! The firewall will work properly. You may check if the firewall rules are properly loaded by running:
kilala:~ thomas$ sudo ipfw list
This command should return a list of 41 rules if you followed my example to the letter. You can count them by running sudo ipfw list | wc -l. If all of this seems to work properly, you should reboot your system. Once it's restarted, run the ipfw list command again to see if the firewall came up properly.
And that's about it! ^_^ Congratulate yourself on a job well done and rest assured that you're surfing the web a little bit safer.
kilala.nl tags: tutorial, writing, apple, security,
View or add comments (curr. 0)
All content, with exception of "borrowed" blogpost images, or unless otherwise indicated, is copyright of Tess Sluijter. The character Kilala the cat-demon is copyright of Rumiko Takahashi and used here without permission.